5 Methods to Screen Record on Mac with Audio Internal & Mic
Screen recording isn’t complete without sound. Imagine you are watching a tutorial or gameplay video without audio. It would feel disconnected and unengaging, right? Audio is vital when capturing a meeting, tutorial, or gaming session. But screen recording with audio on Mac isn’t as simple as hitting the record button. Although built-in tools are available, they are limited and require extra steps. We got you if you’re wondering how to screen record on Mac with audio! This post will show various methods to capture your Mac screen and internal and mic audio. So, without further discussion, let’s explore the best methods to do the job!

Part 1. Can You Screen Record on Mac with Audio
Can you screen record with audio on Mac? The answer is it depends!
If you’re using the Mac’s native tools, the process is not as straightforward as expected. You can only record mic audio, meaning you won’t capture any sound playing internally. That’s because Mac doesn’t allow internal audio recording for some reason. However, there are workarounds. You can install audio-routing software or extensions, which tricks your Mac into recognizing internal sound as a microphone input. But if you’d rather skip the technical setup, third-party screen recording software. These tools offer a more straightforward way to record your screen with internal and mic audio without extra configurations.
Part 2. Screen Record on Mac with Internal and Mic Audio Using Shortcut
The Screenshot toolbar is a built-in tool in every Mac, providing a quick and easy way to record your screen with microphone audio. You can access the screen recorder instantly by pressing a few key combinations. This eliminates the need to download additional tools.
Here’s how to screen record on Mac with audio from the microphone:
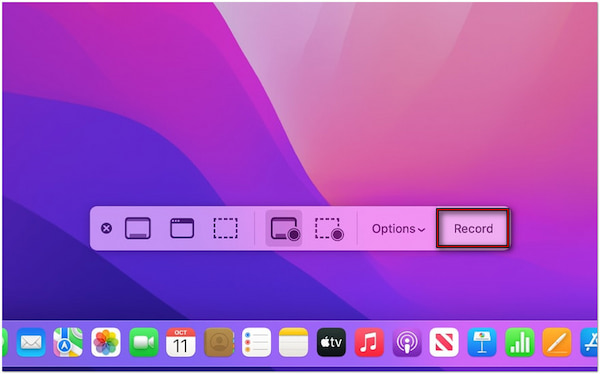
1.Press Shift + Command + 5 keys to bring up the Screenshot Toolbar on your Mac screen. This toolbar is not just for capturing still images but also for recording your screen. Select Record the Entire Screen option to capture everything on your screen. Meanwhile, the Record a Portion of the Screen option lets you select a specific area to record.

2.Next, move to the Options in the screenshot toolbar to enable mic audio. Under the Microphone section, select your built-in microphone or external microphone, if any. You must install an extension to route system sound to the microphone input if you need internal audio.
3.After preparing everything, click the Record button to commence the Mac screen recording. When you’re finished, you can stop the recording in two ways. Press Shift + Command + 5 again and click Stop Recording on the toolbar. Otherwise, press Command + Control + Escape to end the recording instantly.
Although Mac’s Screenshot toolbar is great for quick screen recordings, it has limitations. The built-in tool cannot capture internal audio unless you install an extension. Without a third-party audio-routing tool, you won’t be able to capture the internal audio.
Part 3. Screen Record on Mac with Internal/System Audio with QuickTime Player
QuickTime Player is primarily a media player with screen recording capability. The QuickTime Player provides more control over recording settings than the built-in Screenshot toolbar. Similarly, it doesn’t require installations as it comes pre-installed on Mac systems.
Here’s how to screen record with audio on Mac with QuickTime Player:
1.Download an extension, like Sunflower, that allows applications to send and receive audio. Configure the Mac’s sound settings to send system audio to your speaker and the extension. Open System Preferences, select Volume, click the Gear button, and choose Create a Multi-Output Device. Switch to the Built-in Output option and choose Soundflower (2ch). Right-click the new device and select Use This Device for Sound Output.
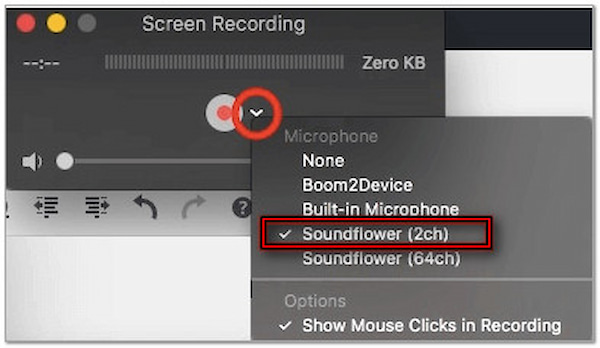
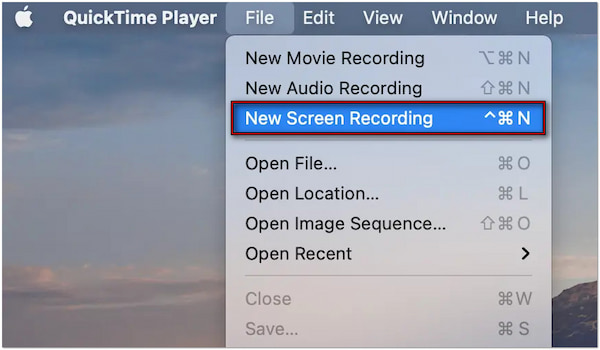
2.Open the QuickTime Player, click File, and select New Screen Recording. Click the arrow next to the Record button to configure the recording settings. Under Microphone, choose Soundflower (2ch) to capture internal audio instead of your microphone. If you’re experiencing audio feedback, lowering the volume would help.
3.Once the recording setup is complete, click Record to record the Mac screen with internal/system audio. Play any audio on iTunes or on any other platforms to test. Once done, click Stop or press the Command + Control + Esc keys to end the recording.
Like the built-in Screenshot toolbar, QuickTime Player doesn’t capture internal audio. You must install a separate app like Sunflower to send and receive audio. Also, completing the setup requires a little workaround.
Part 4. Screen Record on Mac with Internal and Mic Audio with AnyMP4 Screen Recorder
AnyMP4 Screen Recorder is a full-packed screen recording software compatible with macOS X 10.9 and later versions. It can record Mac screens and audio without requiring additional installation to include sounds in the recordings. Not to mention, it allows you to capture multiple inputs simultaneously. This consists of the internal sound, mic audio, webcam feed, and Mac screen. Best of all, recording your Mac screen with AnyMP4 Screen Recorder has no limit. Plus, it comes with drawing, annotation, and video editing tools.
Here’s how to screen record on Mac with audio using AnyMP4 Screen Recorder:
1.Start by downloading the AnyMP4 Screen Recorder for free. Install the screen recording software and allow the installation process to finish. Once the installation is finished, launch AnyMP4 Screen Recorder on your MacBook or iMac immediately.
2.Upon start-up, you will be taken into the Screen Recorder mode by default. This recording mode is optimized for capturing on-screen activities with internal audio and mic audio. Select your preferred recording area in the Display tab to capture your screen. Choose Full to capture the entire screen or Custom for a single window or fixed region.
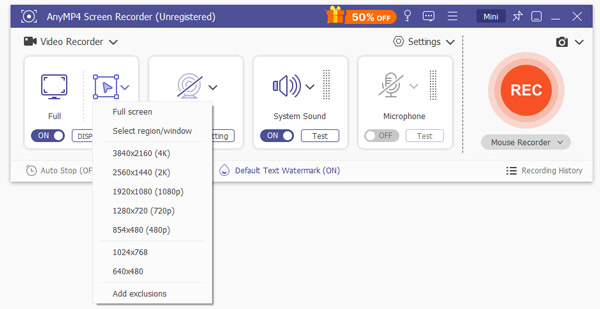
3.After setting up the recording area, proceed to the internal sound and mic recording settings. Toggle on both System Sound and Microphone. Turning these buttons on lets you capture the internal sound and include your voice in the recording.
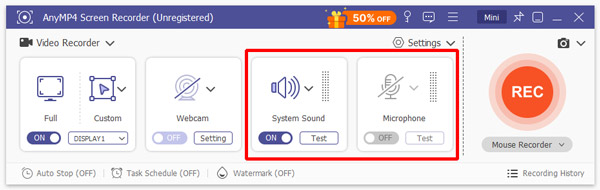
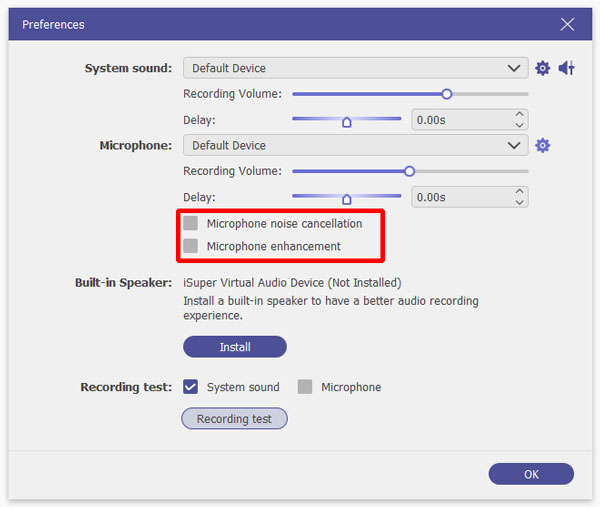
Maximize the recording volume of the system sound and microphone for better audio recording. You can also enable the mic noise cancellation and enhancement feature for clear results. You can also turn on the Webcam to include yourself in the recording if needed.
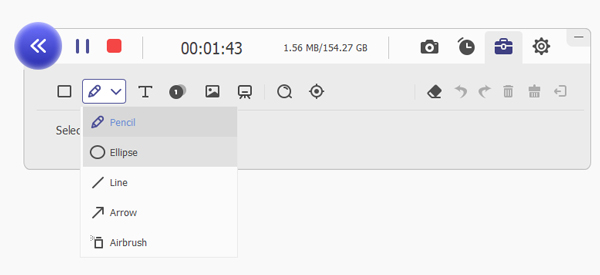
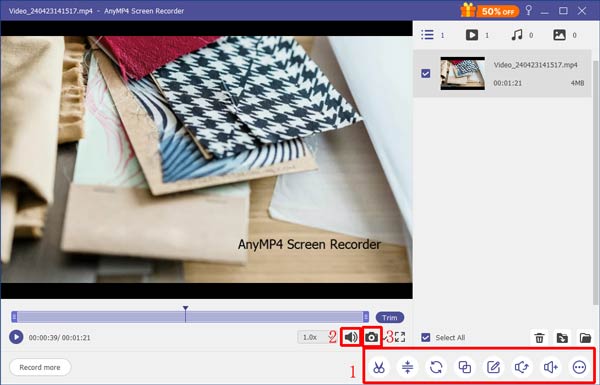
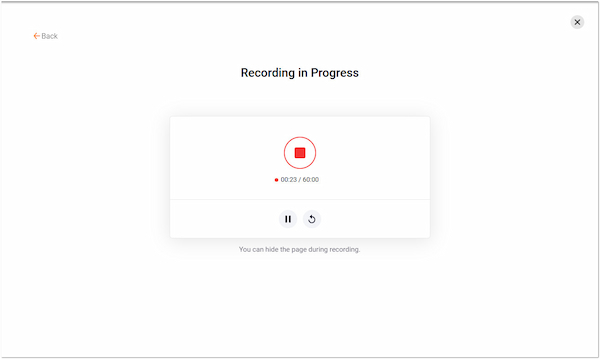
4.Once everything is good, click the big REC button to start recording your Mac screen. A three-second countdown will appear, indicating the screen recording is about to begin. During the recording, a floating bar with useful tools will appear on your screen:
Camera: By clicking the Camera button, you can take a screenshot. It allows you to capture important parts without needing to pause the recording.

Toolbox: You will grant access to the annotation tools by clicking the Toolbox button. You can use these tools to draw lines, add shapes, insert texts, overlay images, and more.
5.Once done with the recording, click the Stop button in the floating bar. You will be headed to the preview window as soon as you end the recording. From there, you can use the additional editing tools to trim clips, merge recordings, boost sound, and more.
AnyMP4 Screen Recorder provides everything you need to record macOS screens with audio. Given its features, we highly recommend AnyMP4 Screen Recorder as the best screen recorder for Mac. If you want to know more about this tool, get a free download now.
Part 5. Screen Record on Mac with Internal and Mic Audio with Snagit
Snagit is a dedicated screen recorder and screenshot software developed by TechSmith. It lets you capture your MacBook screen, webcam, mic, and internal audio. This software can capture a single window, fixed region, or entire screen.
Here’s how to screen record on Mac with sounds:
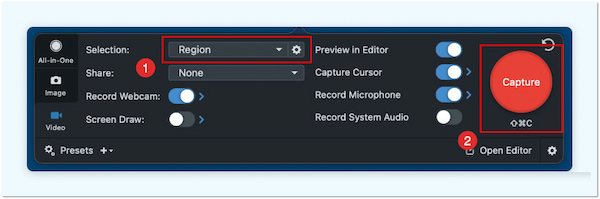
1.Open Snagit and select the Video tab in the Capture Window to enter the recording mode. In the Selection field, choose Region to record your Mac screen in a specific region. Click the Capture button to bring up a crosshair and drag it over the area you want to record.
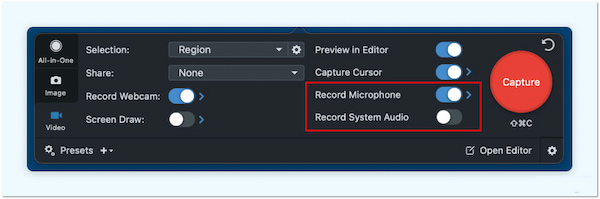
2.Switch the Record Microphone and Record System Audio buttons to enable sound recording. By doing so, you’ll be able to record Mac with audio and mic input. Adjust the microphone input level on Mac’s Sound Preferences if your voice sounds too quiet.
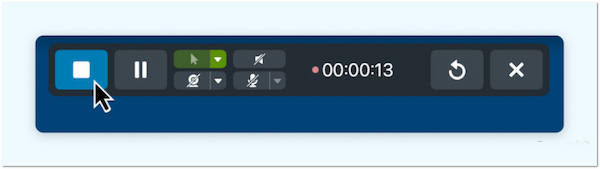
3.Once all the settings are in place, click the Record button to initiate the recording. Before it even starts, a three-second countdown will be displayed. Anything that appears in the specified recording area will be captured afterward. By clicking the Blue Square button, the screen recording will be stopped.
Snagit provides a straightforward solution for screen recording Mac with audio. However, you should be aware that the free version of Snagit has several limitations. Some are limited free trial days, recording length limit, access to recording options, etc.
Part 6. Screen Record on Mac with Internal and Mic Audio Online
FlexClip Free Online Screen Recorder is an internet-based tool that simultaneously records screen, webcam, and audio. It offers multiple recording options, including Screen & Webcam. Screen Only, and Webcam Only. It is ideal if you frequently capture meetings online.
Here’s how to record screen on Mac with audio online:
1.On the FlexClip Free Online Screen Recorder homepage, click Start Recording to proceed. Select the Screen Only option as your recording mode to capture your screen. Opting for this mode will capture the entire screen of your Mac. Click the Next Step button to specify your audio recording option:

• Microphone + System Audio: Capture Mac screen with sound and mic audio.
• Microphone: Only captures mic audio, but no internal sounds.
• System Audio: Only internal sounds will be recorded, but no mic audio will be included.
• No Audio: No internal sound and mic audio will be recorded, focusing on the screen only.
2.Click the Start Recording button and choose the window you want to share. This action ensures it will only record the specified window. Afterward, click the Share button to start sharing and recording the selected window.
3.After you have recorded everything, click the Stop button to process the recording. In the following page, it will give you an option to re-record or download the recordings. If you click the Download and Edit button, your recorded Mac screen will be downloaded and saved locally.
That’s how to record video on Mac using tools like FlexClip Free Screen Recorder Online. Just so you know, it will save the recorded Mac screen in WebM format. Also, you should be aware that the free version has a 60-minute recording limit.
Conclusion
Knowing how to screen record on Mac with audio can enhance your screen recording. Although QuickTime Player and the Screenshot toolbar provide basic recording options, they come with limitations. In particular, these tools cannot capture sounds internally. Fortunately, third-party solutions like AnyMP4 Screen Recorder fill this gap. It simplifies the process by allowing you to record both internal and mic audio effortlessly. In addition, it requires no complicated setups or additional extensions.