Free Download100% Clear & Secure
Free Download100% Clear & Secure
Learning how to change the audio volume in Premiere Pro should be one of the first skills that you learn how to do in the software. Since video editing involves both visual and auditory adjustments, volume control holds so much importance in applying your creative ideas to your video project. In this article, we will provide a detailed guide about three of the best built-in tools in Premiere Pro, as well as an alternative option for all your volume boosting needs.
Before proceeding with our tutorial, let us first discuss what Gain, Decibels, and audio meter panels are, as these features are integral to audio volume control in Adobe Premiere Pro.
First, Gain refers to the input level of the audio in a media file that you will add to Premiere Pro. This setting determines the amount of volume that your file can send to the editing tool. On the other hand, Decibels are the measurement of the loudness of an audio. It is the most constant volume indicator among media players. Finally, the Audio Meter panel serves as a visual guide to help you determine the loudness of your audio.
With the concept of these technical terms now discussed, let us proceed to the proper guide on how to increase and decrease audio volume in Premiere Pro.
When learning how to increase or decrease the audio volume in Adobe Premiere Pro, you have three options available. These options are available in the Effects controls panel, directly in the timeline, and within the audio mixer.
Learn to use these options using the guide below.
The most consistent method for learning how to reduce and set audio volume in Premiere Pro is through the use of the Effect Controls panel. Fortunately, this is easy to adjust and only requires basic audio editing knowledge.
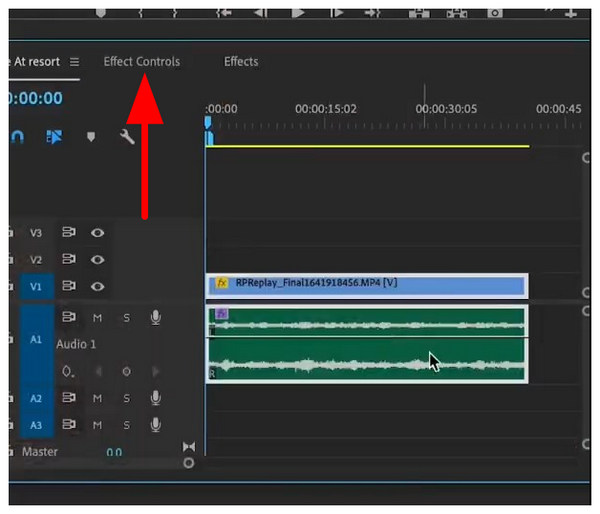
1. Select the media file you are editing in the Premiere Pro timeline. Then, click on the Effect Controls tab.
2. In the Effect Controls menu, adjust the decibel value beside Level. You can do so by typing a set number or by holding Left-Click and sliding the cursor from left to right. This will determine the maximum loudness for your project.
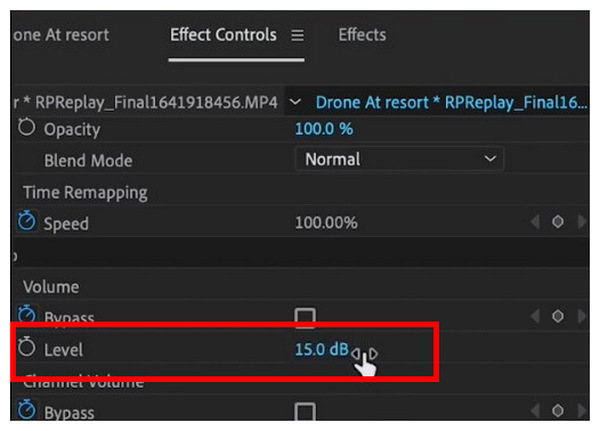
By editing the level option in the Effect Controls menu, the media you are editing will not exceed the decibel value you have set.
When it comes to convenience, editing directly in the timeline is the best option when using the music audio editor. However, keep in mind that faster editing means sacrificing a little accuracy.
1. Click on the media file you are editing in the Premiere Pro timeline. Then, find the line in the middle of the audio track. You can click and hold it to adjust the volume of your media.
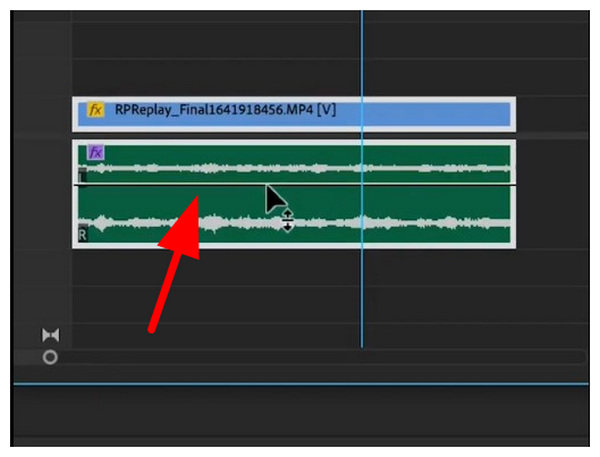
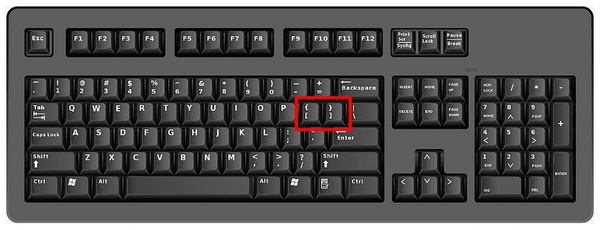
2. For more accurate adjustment, select the media in the timeline, then use your Bracket Keys to adjust the decibel value by one with each press.
Although less accurate than Effect Controls, adjusting the volume of a media file directly in the Timeline is the most convenient option for making quick adjustments.
If you are knowledgeable about advanced audio mixing, you can also utilize the Audio Clip Mixer tool within the program. This option offers both accuracy and clean audio adjustments; however, it is extremely complex to use.
1. Open the media file you want to mix in Adobe Premiere Pro. Then, select the Audio Clip Mixer on the toolbar.

2. In the Audio Clip Mixer tab, you have the option to edit either the Audio Clip Mixer or the Audio Track Mixer. To edit a single file in the timeline, select the former. To adjust the entire track, edit the latter option.
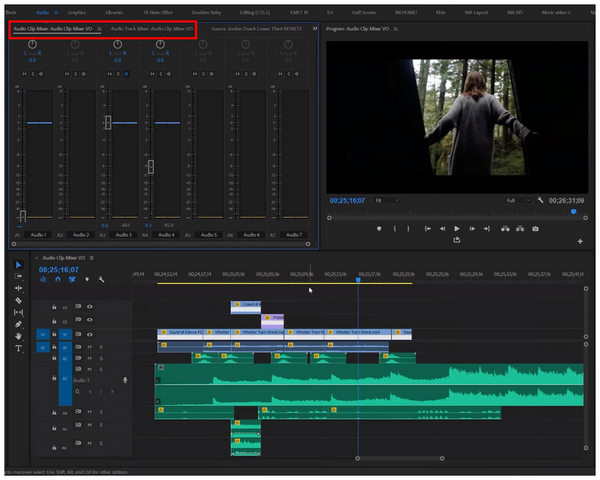
3. Once you have chosen how you want to edit your audio, you may now adjust the Mixer option that you have selected. Unfortunately, access to numerous audio editing tools may become overwhelming if you are not used to these options
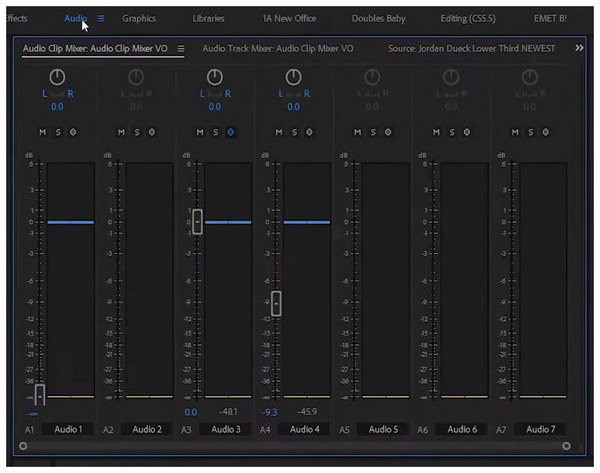
When using either of the mixer options, make sure that you constantly preview the media file you are editing using a high-quality audio peripheral. This is particularly important, as Premiere Pro projects require high audio accuracy.
Although Adobe Premiere Pro offers numerous editing tools for audio adjustments, there are better alternatives that provide a more beginner-friendly option for adjusting audio volume. In the market, AnyMP4 Video Converter Ultimate is the best option.
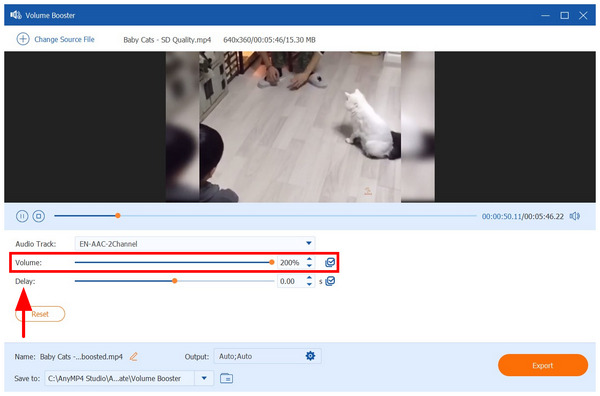
Equipped with an exclusive Volume Booster tool, AnyMP4 Video Converter Ultimate provides the most convenient option for volume adjustments. Unlike Premiere Pro, it features a straightforward slider option that allows you to adjust the volume from 0% to 200%.
It also applies this adjustment directly to the video clip you are editing, making the editing work permanent. To learn how to use the best alternative for adjusting the audio volume in Premiere Pro, read our tutorial below and download the program using the provided link.
Secure Download
Secure Download
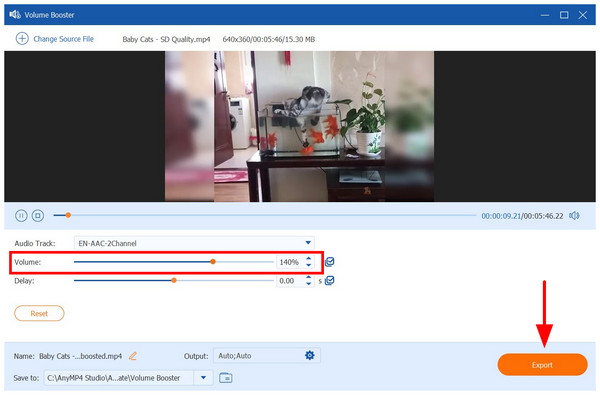
1. Open AnyMP4 Video Converter Ultimate, and proceed to the Toolbox section. Then, find the Volume Booster tool and select it.

2. In the Volume Booster menu, adjust the volume of your file by editing the Volume slider tab. You can boost the audio by up to 200% or set it to mute at 0%. If you stay on 100%, the original volume of the media file will remain. You can also edit the audio Delay if you wish.
3. Once you have edited the volume to meet your needs, simply click Export to begin producing the media file with the audio you have manually adjusted.
Now that you have learned how to lower or edit the audio volume in this Premiere Pro alternative, we hope that AnyMP4 Video Converter Ultimate will provide you with much-needed convenience.
What’s the difference between gain and volume in Premiere Pro?
Gain refers to the level of audio input that a media file can transmit. On the other hand, volume is the adjustable loudness of a media file that is playing. Gain is typically used in editing, while volume is employed for media consumption.
Can I adjust volume over time using keyframes?
Yes, you can. However, it requires technical knowledge, as editing keyframes is a separate skill in itself. This is best used for gradual volume transitions.
Are there keyboard shortcuts for adjusting audio volume?
Yes, there are. You can use the Bracket keys to edit the decibel value directly in the editing timeline. However, this is only present if you edit the media in Premiere Pro’s timeline.
How to turn down the audio volume in Premiere Pro?
You have three options. You can use effect controls, timeline adjustment, or the audio mixers. Fortunately, this article covers all of these three options.
Is it hard to edit the audio volume of videos?
No, it is not. You can use various tools for audio adjustment, depending on your skills. For experienced editors, you can use Premiere Pro. Meanwhile, beginners should use more forgiving tools such as AnyMP4 Video Converter Ultimate.
Now that we have provided detailed guides on learning how to adjust the audio volume in Premiere Pro, we hope this article has given you the best options to edit your project’s audio based on your skills. For complete beginners, downloading and using AnyMP4 Video Converter Ultimate is highly recommended.
Secure Download
Secure Download
 Updated by Mark Cristobal to Edit Audio
More readings
 The Ultimate Guide to Make Split-Screen Effects in Premiere Pro
When you want to make a split-screen effect in Adobe Premiere Pro, this is the ultimate guide to learn more about the detailed process and best tips.
 How to Get Rid of Background Noise Using Premiere (Advance Tips)
This article is all you need to reduce background noise in Premiere Pro. We will guide you on doing the advanced method together with an alternative tool.
 How to Zoom in Premiere Pro With Transform and Magnify Tools
Do you want to learn how to apply zooming effects on video editing in Adobe Premiere Pro? Read this article to learn two zooming tools available in the program.
 How to Reverse a Clip in Premiere | Rewind Clips in 2 Ways
Check this and learn how to reverse a clip in Premiere. This way, you can add a unique touch to your video projects. Plus, explore alternatives for beginners.