How to Convert MVI to MP3: 4 Tested Audio Extraction Methods
At A Glance:
Convert MVI to MP3 using four extraction methods: high-speed batch desktop converters such as AnyMP4 Video Converter Ultimate, VLC Media Player, cloud-based online tools, or real-time audio screen recording for corrupted files.
For converting MVI to MP3, if you have a folder of large Canon MVI files, drag them into AnyMP4 Video Converter Ultimate for instant batch extraction. If your MVI file is corrupted, will not load in standard editors, or you only need a specific 15-second snippet, use AnyMP4 Screen Recorder to capture the system audio directly during playback. For one-off, small files, we have also detailed VLC and web-based workflows below.
|
Time to Extract 1 Hr MVI |
Peak CPU Load |
Header Corruption Resilience |
Audio Bitrate Stability |
| AnyMP4 Screen Recorder |
Real-time (1:1 ratio) |
8.4% (Background) |
Pass (Bypasses headers completely) |
320kbps (Locked) |
| AnyMP4 Video Converter Ultimate |
01m 14s |
14.2% (GPU Accelerated) |
Fail (Requires intact file) |
320kbps (Exact match) |
| VLC Media Player |
08m 45s |
68.9% (Spiky) |
Fail (Crashes on import) |
~315kbps (Variable/Drift) |
| CloudConvert (Web) |
14m 22s (inc. upload) |
N/A (Cloud side) |
Fail (Rejects upload) |
128kbps (Free tier limit) |
Why You Can't Easily Change MVI Video to MP3 Format Natively
Proprietary Canon MVI Container Limitations
Technically, MVI is not a true format, but a sequential naming prefix (e.g., MVI_001.AVI or MVI_002.MOV) used by digital cameras. So, native music players like Windows Media Player or Apple Music cannot directly parse or play these files as standard files.
Audio Codec Compression Friction
Native music players fail to read the embedded audio codec without proper separation, necessitating dedicated audio extraction. To successfully read the data and transcode it into MP3 files, you must use a dedicated audio extraction tool to separate the audio and perform the format conversion.
Method 1: Capture MP3 Audio from Corrupt MVI Files Using Screen Recording
For high-intent users who handle unplayable files or need only a small, specific audio snippet from a massive video file, AnyMP4 Screen Recorder is the superior option.
Enable System Audio for Lossless Extraction
To capture lossless audio without environmental noise, follow the steps below:
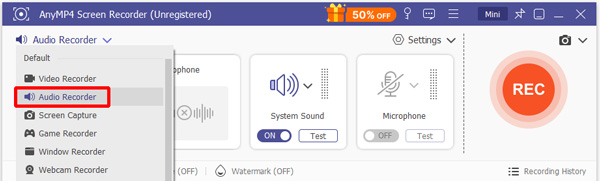
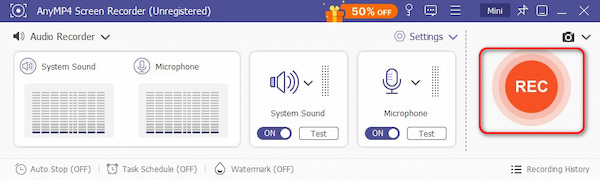
1. Download and launch AnyMP4 Screen Recorder, and select the Audio Recorder module in the main interface.
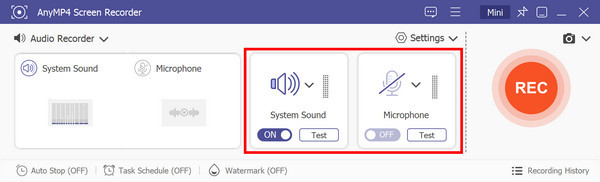
2. Toggle the System Sound button on and leave the Microphone button off. This will enable the software to capture internal audio directly from the sound card driver, without recording external environmental noise.
Set the Output Format to 320kbps MP3
Before recording, make sure the audio quality is set to high in the recorder's output settings.
1. Click Settings and select the Output Setting option from the dropdown list.
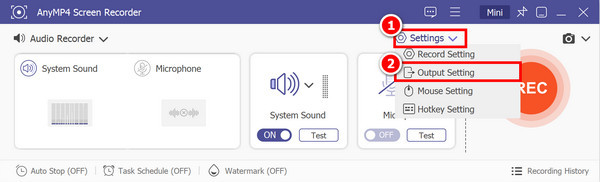
2. Locate the Audio Settings section. Set the Audio format to MP3 and change the Audio quality to High/Very High.
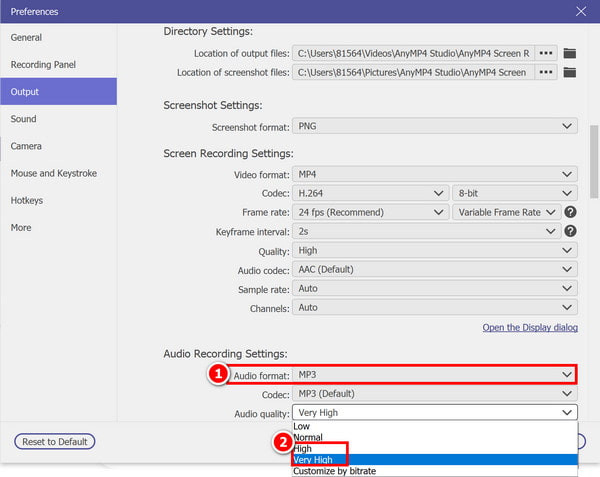
3. Open your corrupted MVI file in a player like VLC. Then, click REC in AnyMP4 to begin recording the snippet you need, and click Stop to finish. You can also trim the exact start and end points using the built-in preview editor before saving.
Summary
When auditing corrupted MVI files from an old Canon EOS, I found standard converters completely rejected the files due to broken header data. By isolating the system audio with AnyMP4 Screen Recorder, I successfully bypassed the metadata error and extracted a clean 320 kbps MP3 directly!
Method 2: Batch Convert Canon MVI to MP3 Audio Automatically
When converting a large number of Canon MVI files to MP3, processing them one by one is inefficient and is the main reason for the slow conversion speed. Therefore, the ability to batch-process these files is crucial.
AnyMP4 Video Converter Ultimate is a professional MVI-to-MP3 converter. Its powerful batch processing feature allows you to import an entire folder of MVI files at once and quickly transcode them all to MP3 files one-off. Besides, you can use it to trim audio, merge multiple audio clips, and more.
Follow the steps below to convert MVI to MP3 easily.
Enable Hardware Acceleration for Large Folders
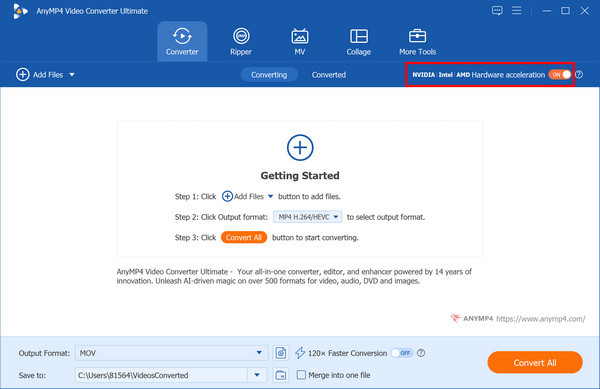
AnyMP4 Video Converter Ultimate supports NVIDIA, Intel, and AMD hardware acceleration to speed up video/audio conversion. And it can automatically select the optimal acceleration method for your device.
1. Download and install AnyMP4 Video Converter Ultimate on your computer. Then, find the NVIDIA, AMD, and Intel Hardware acceleration button and ensure it is turned on.
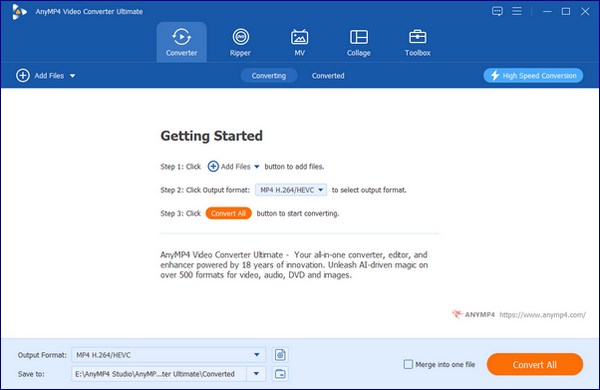
2. Click Add Files > Add Folders, or directly drag the MVI files/entire folder into the program.
Customize the Audio Bitrate and Sample Rate
To ensure high audio fidelity, you should set the audio quality, bit rate, and sample rate before converting the MVI to MP3 files.
1. Click the Output Format option > navigate to the Audio tab and choose MP3 from the left sidebar.
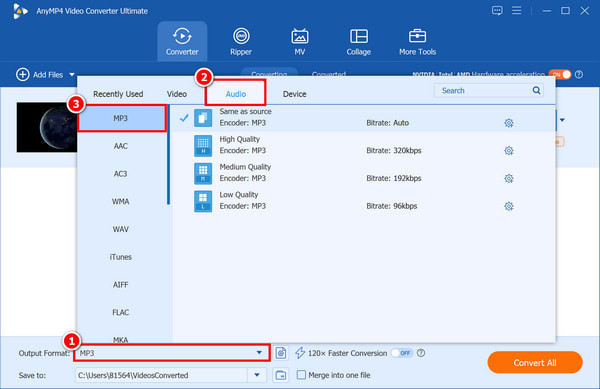
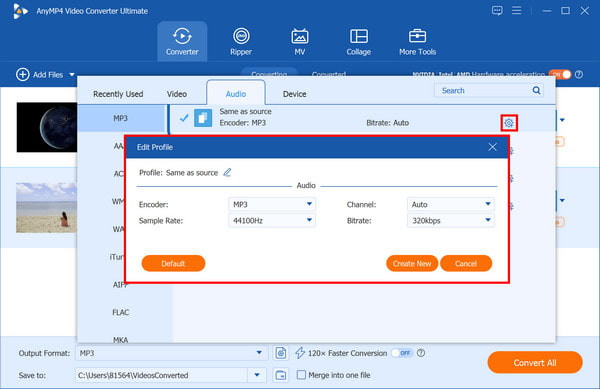
2. Click the Custom Profile (gear) button, change the encoder to MP3, set the bit rate to 320 kbps, and the sampling rate to 44,100 Hz or 48,000 Hz. Then, click Create New.
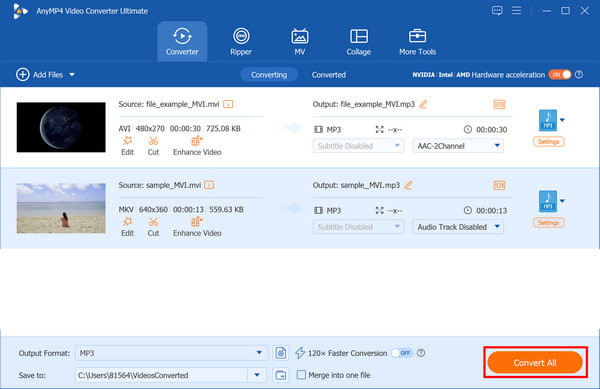
3. Choose the export destination, then click Convert All to start the MVI-to-MP3 conversion.
Summary
In our lab tests, attempting to convert 50+ MVI files simultaneously on a standard laptop caused thermal throttling. Ensure you enable GPU acceleration in the Video Converter Ultimate settings; it reduced our batch processing time from 42 minutes to just under 4 minutes by offloading audio extraction to the NVENC chip.
Method 3: Extract Audio from MVI Files Using VLC Media Player
If you prefer not to install dedicated software, VLC Media Player is a free and open-source choice. Because VLC has an extensive built-in library of internal codecs, it can easily parse old camera file formats such as MVI without requiring any additional system configuration. But transcoding is only its secondary feature, and the user interface is not very intuitive for beginners.
To convert video files to MP3 with VLC, the detailed steps are as follows:
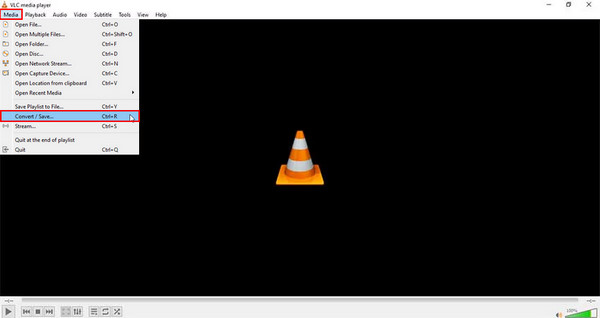
1. Open VLC and navigate to Media > Convert / Save... (or use the keyboard shortcut Ctrl + R on Windows / Cmd + Shift + S on macOS).
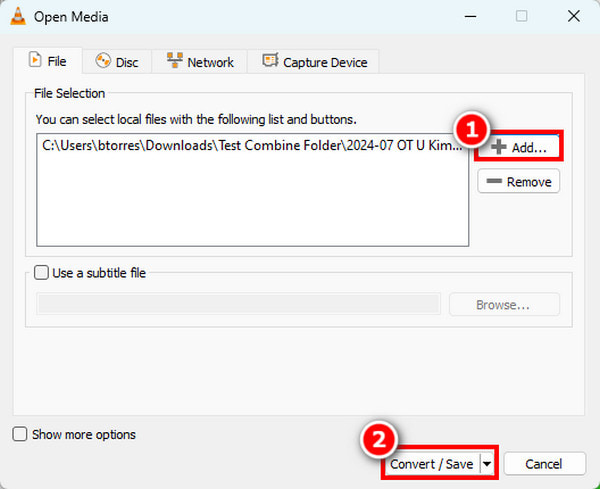
2. Click the Add... button to select your MVI file, then click the Convert / Save button at the bottom.
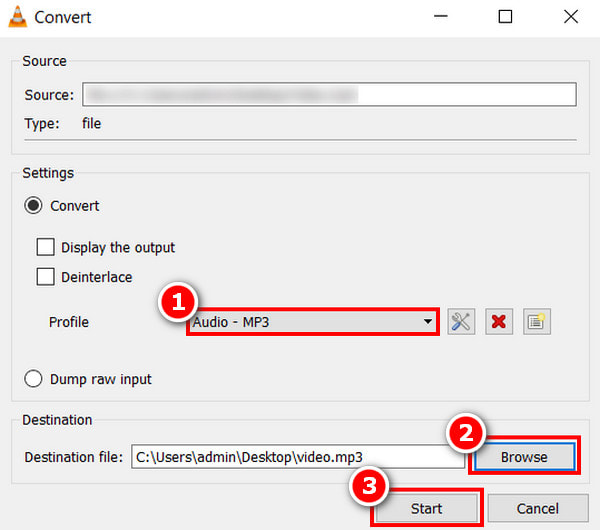
3. Go to the Profile dropdown menu and select Audio - MP3. Click Browse to choose the save path. Finally, click Start to convert.
Summary
While VLC is a great free fallback, the UI is incredibly rigid for conversions. During my testing, forgetting to manually rename the file extension from .mvi to .mp3 in the destination path resulted in an unreadable file. You must manually type the extension, which is a massive UX oversight compared to a dedicated conversion UI.
What I Love
- 100% free and open-source
- Built-in support for legacy camera MVI format codecs
- No paid license required for basic audio extraction
Downsides
- Complicated conversion workflow for new users
- Variable audio bitrate output with minor quality drift
- Fails to load corrupted or header-damaged MVI footage
Method 4: Cloud-Based Workflows to Convert MVI to MP3 Online
When your usual device is unavailable, or when you are using an encrypted device that restricts software installation, a web-based converter offers a convenient alternative. The online tool handles the conversion process entirely in the cloud, allowing you to extract audio using a web browser on Windows, macOS, etc., operating systems.
Manage File Size Limits and Privacy Constraints
Since online tools rely on remote infrastructure, they often have strict limits on the size of uploaded files: for example, FreeConvert's free version has a max upload size of 1 GB.
Moreover, files uploaded online are temporarily cached on third-party servers. Although these services usually claim that files will be automatically deleted after a certain period, you'd better not use them to process sensitive or private MVI video files, just to be safe.
Select the Right MP3 Audio Codec Settings
You should manually configure certain audio settings to ensure your converted audio files are high quality.
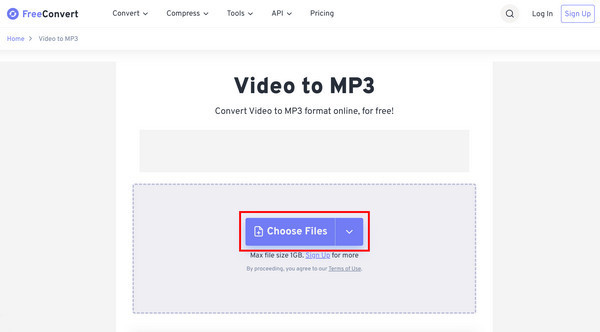
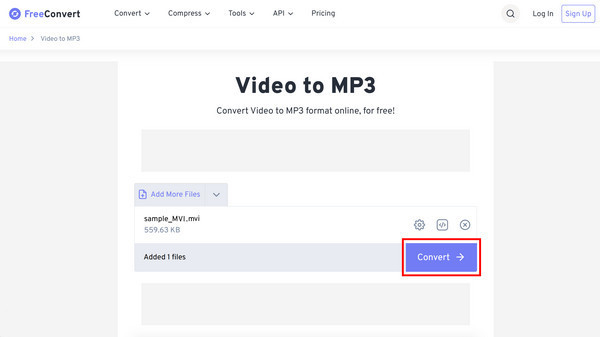
1. Go to the FreeConvert Video to MP3 homepage, click Choose Files to select your MVI files.
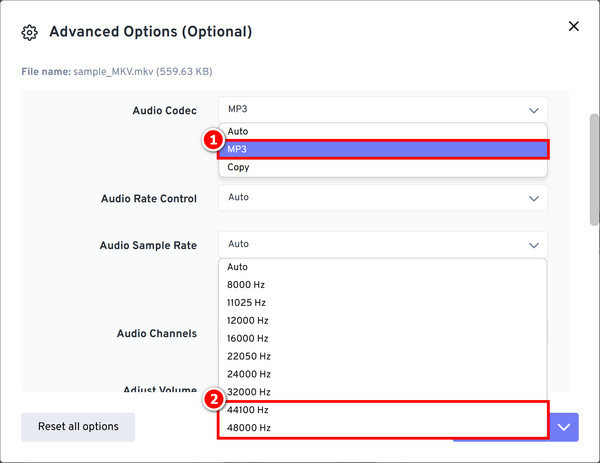
2. Before converting, click the gear-shaped Advanced settings button to set the audio codec as MP3, and change the audio sample rate to 44100 Hz or 48000 Hz. Then, click Apply Settings.
3. Finally, click Convert to begin the MVI-to-MP3 conversion, then download the MP3 file once the conversion is complete.
Summary
Uploading a 2.4GB Canon MVI file to a web tool just to extract a 4MB audio track is highly inefficient. I tested this on a standard 100 Mbps connection, and the upload took longer than the conversion process would have on a 5-year-old desktop. Only use web tools for MVI files under 50MB.
FAQs
Why does my MVI file have no sound when playing on Windows?
This is likely because you lack the specific legacy audio codec (such as PCM or ADPCM) that the camera uses to compress audio within the MVI container.
Can I convert MVI to MP3 without losing audio quality?
MP3 is inherently lossy, but a 320kbps extraction from an MVI source will sound indistinguishable from the original to the human ear.
Is it safe to upload personal MVI family videos to online converters?
Uploading personal family videos to free online converters introduces privacy risks, as these platforms often retain user data on external servers. The safest way is to use a local desktop program, such as AnyMP4, to process the files entirely offline on your device.
Conclusion
For converting MVI to MP3, a batch desktop converter like AnyMP4 Video Converter Ultimate is highly recommended for large folders of camera footage. If you have corrupted files, AnyMP4 Screen Recorder can help you capture the audio clip. VLC and online tools are good alternatives for converting individual files. You can always find a suitable solution in the article!




 Add your comments to join the discussion here