Long Zoom recordings make it difficult to capture important information and waste a lot of time dragging the progress bar back and forth. If you want to share it with your colleagues, you will find that its file size will greatly reduce the efficiency of sharing. At this point, we need to make proper use of tools to remove the long and unnecessary sections in Zoom recordings so as to summarize the best parts of the meeting together. This will make it easier for everyone to focus on key information quickly, and there will be a significant increase in productivity. In this article, we will show you how to trim Zoom recordings and recommend one of the best video editing software to use.
Compatibility: Windows, Mac
Once you've recorded your meeting, you can trim its playback range directly in Zoom Cloud. All you need to do is log in to your Zoom account and find the file you recorded and you're ready to go, no need to use any third-party tools. It is important to note that you must ensure that you are the host of the meeting. Only the host has the right to trim Zoom recordings.
Next, we will provide you with detailed steps, please follow our guide to trim Zoom recordings.
1. Log in with your Zoom account.
2. After signing in, click My Account > Personal.
3. To find your target file, click Recordings and choose Cloud Recordings.
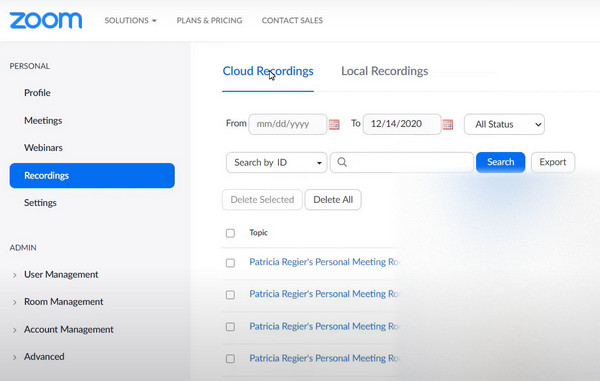
4. Now, you will see all the recordings you have saved in your cloud. Generally though, they can only be saved for 150 days. Select the one you want to trim.
5. Click the play option to enter the video playback window.
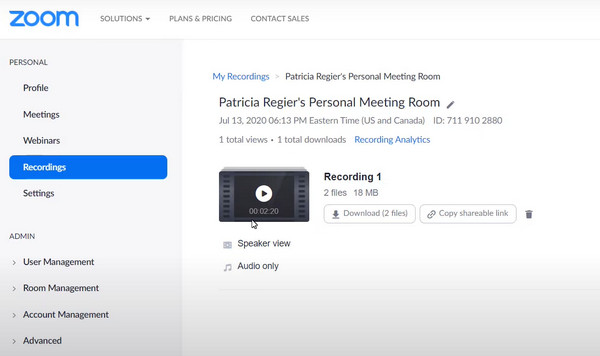
6. In the new interface, you'll see a scissors icon in the lower right corner. Press on it.

7. Now you can drag the sliders to adjust the nodes where the video starts and ends.
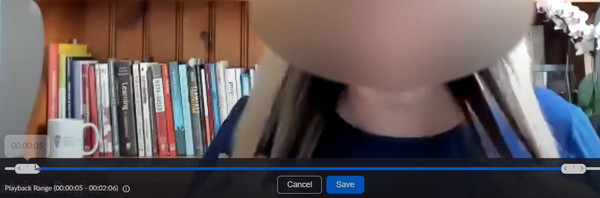
8. When you finish the edition, click Save. Your work will be kept automatically in Cloud Recordings.
This method is very simple to operate, but the operations it enables are relatively basic. If you want to have finer control over the length of the recording, you can use some professional video editing software to help you.
If you want to trim your Zoom recordings more precisely, it is better to download the file to your computer and use a professional video editor. In this case, AnyMP4 Video Converter Ultimate is undoubtedly the best choice. As a professional audio and video processing tool, it allows you to split a long video into several clips of the same length and then make precise editing for each of them. This way, you won't have to drag the progress bar back and forth to find the part you need. It supports almost all popular video formats and converts them with great efficiency. You can use it to convert your trimmed meeting recordings into a format more suitable for distribution or to compress the size of your video files.
Secure Download
Secure Download
Here is what you need to do to cut a Zoom recording.
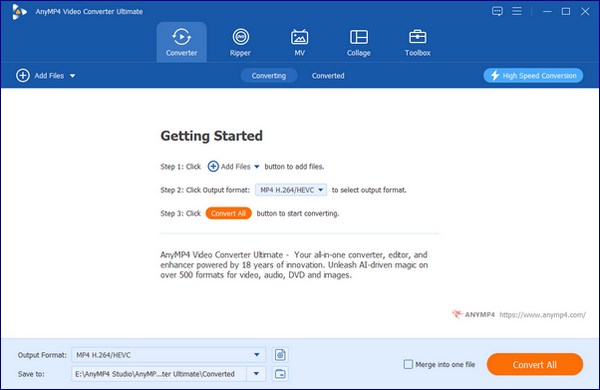
1. Download and install AnyMP4 Video Converter Ultimate on your computer.
2. Click Add Files to upload your Zoom recordings that need to be trimmed.
If your recordings are saved locally, then you can just upload your file and start editing. They are generally stored in a folder named Zoom. If your files are saved in the cloud, then you need to download them locally before you can start video editing.
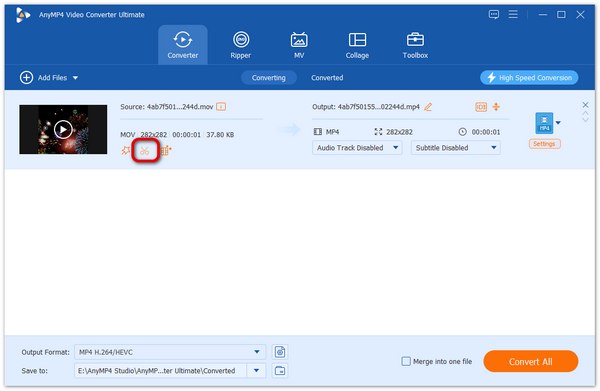
3. After uploading your recordings, you need to click Cut to launch the edition window.
4. To set the start and end point of your video, you can drag the clipper or just enter the time directly.
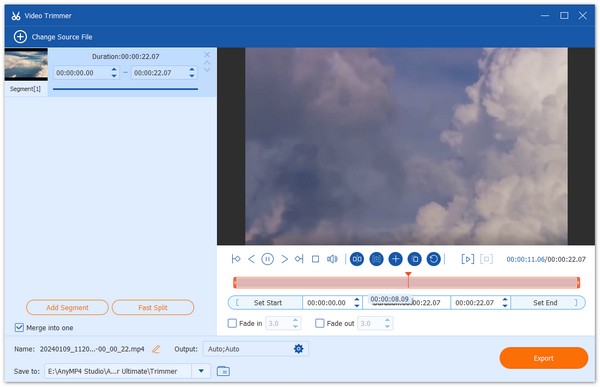
5. If you want to divide the long recording into several parts, you can click Add Segment after you have boxed the content. The clip will be added in the list, and you can set another clip.
6. Once you finish the trimming, click Save.
Can the Zoom recording be edited?
Sure. After getting the Zoom recording, users can trim, cut, or edit it according to their needs to remove unwanted sections or make any necessary adjustments to the content. There are a number of tools that can help you do this. You can either use the editing tools provided by the Zoom platform directly or choose professional video editing software.
Can you trim a local Zoom recording?
Sure. You can choose to use Zoom for editing or try our recommended video trimmer, AnyMP4 Video Converter Ultimate. To make changes directly on Zoom, all you need to do is log in to your account and click Personal > Local Recordings. Find the file you want to trim, and play it. Click the scissor icon, and set the start and end points for your recording.
How can I edit Zoom video for free?
Nowadays, there are quite a few tools that support you to do free video editing. You can pick some online free editors like Kapwing and Clipchamp. These platforms allow you to trim, crop, and add text and effects to your Zoom recordings without any cost.
In this article, we provide you with two methods of trimming Zoom recordings, each accompanied by detailed step-by-step instructions. Regardless of where you choose to save your recordings, you'll be able to complete your editing with our guidance. If you run into any problems or have a good trimmer you'd like to share, please leave us a comment. We look forward to interacting with you.
Secure Download
Secure Download
 Posted by Angelica Liwanag to Edit Video, Record Video
 Related Articles
 How to Trim/Cut Video in VLC Media Player Quickly and in a Better Way
How to cut video in VLC? Can VLC clip video? How to cut a clip from a video in VLC? Learn a detailed guide to trim video in VLC media player from this post.
 How to Trim Videos in iMovie on Computer and Mobile
What is the Cut command in iMovie? How do you select and cut on iMovie? Can I cut in iMovie on a Windows PC? Learn how to trim video in iMovie from this page.
 3 Easy Ways to Trim a Video on MacBook Quickly
Looking for the best method to trim a video clip on Mac? You are lucky since this article shows the easiest methods and the concrete guide.
 Trim Clips on TikTok - How to Trim a Video on TikTok
Why won't TikTok app let me trim my video? How can I trim a video on TikTok? This post tells 3 easy ways to trim videos on TikTok and cut saved TikTok videos.