Capturing video using any video camera can be essential in different aspects of our life. Some users are making vlogs out of these videos to profit using social media accounts. On the other hand, video clips are also applicable for presentations, academic purposes, business, and advertisements. Therefore, whatever reasons you have for having a video, there is only one thing that we all need– presentable videography. We need to ensure that our video possesses the correct elements, like quality, frame, and clarity. However, we cannot prevent Grain and Noise with our clips for different reasons. These grains can be a nuisance for us. In this article, we will alleviate this problem by learning the best tools and best ways to remove Grain from video. We will see the ability of AnyMP4 Video Converter Ultimate, Adobe Premiere, and an online tool regarding the situation.

Let us start with these guidelines in introducing you to the best tool to solve your problem. There are many editing software that we can get from the digital market, but AnyMP4 Video Converter Ultimate is the software that can give us simple yet powerful features that will enable us to experience a high-quality process of editing. This tool is a prominent feature for converting media files but equips excellent tools for enhancing our video files with ease by adopting the AI technology. Let us see its outstanding performance as an enhancing tool in line with that.
Secure Download
Secure Download
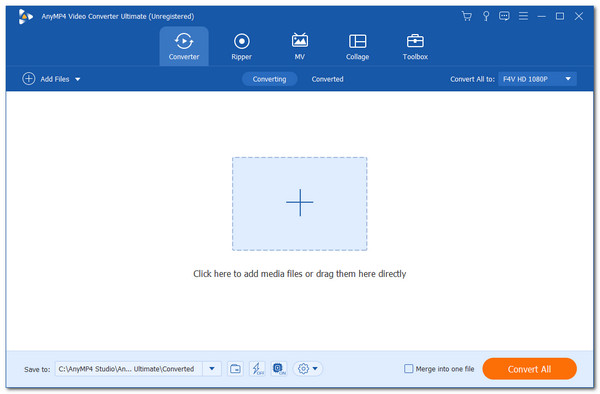
Step 1. Download AnyMP4 Video Converter Ultimate from their official website and install it with your computer. After having it on your device, launch it to see its interface.
Step 2. From the main interface, please direct to the Toolbox of the software. This feature will give you many options for enhancing your video clips. Then, click the Video Enhancer among the options for removing the noise of your film.
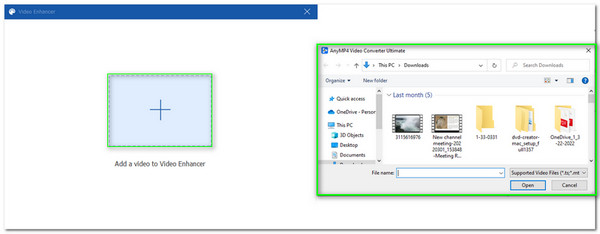
Step 3. On the new tab, you will see an Add icon that will allow you to insert the video file you need to enhance. Then, a new account will appear, showing your files folder. Click the files and press the Open button at the right bottom part of the tab.
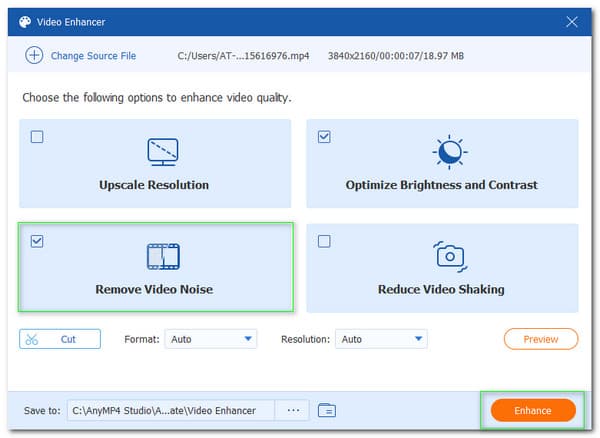
Step 4. A new tab will exist where it shows four significant features to enhance your video. Among these features, kindly select the Remove Video Noise as we alleviate the grain of our video for much better quality.
Step 5. If you are now good to go after adjusting the settings of your video, it is now the time to click the Enhance button, which we can see in the lower right portion of the minimize interface. Please wait for the process until your video is automatically saved.
That process is one of the most simple and effective methods we can use in removing the grains with our videos. We can see how the tool is effective in enhancing our video grains. That is also one of the reasons why many users are using AnyMP4 Video Converter Ultimate for many aspects of media processes. Besides, you can use its enhancer feature to upscale video resolution, reduce video shaking, and more.
We shall now see the effectiveness of removing Grain from video in Adobe Premiere in the following method. We are in the same phase when we say that Adobe Premiere is one of the leading editing software we can use. In connection with that, we shall now see its performance in cleaning the grains with our video clips. However, in this scenario, we need the help of Adobe After Effects to make the process possible. We all know that being flexible with the tool links it with other Adobe tools. We shall now remove Noise and Grain from the video using Adobe Premiere and After Effects without further dialogue.
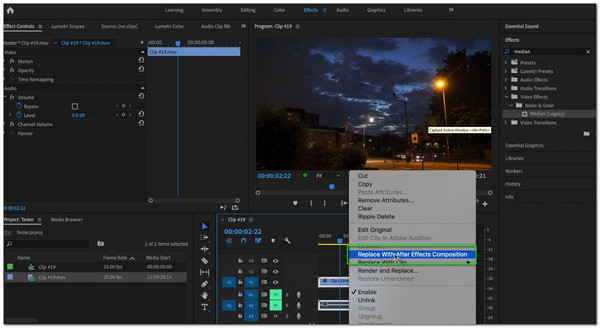
Step 1: Go with the Adobe Premiere timeline and choose the clip you need to move to Adobe After Effects. Please right-click on the video and choose to Replace With After Effects Composition. Please wait until the After Effects open as a New Project to your files.
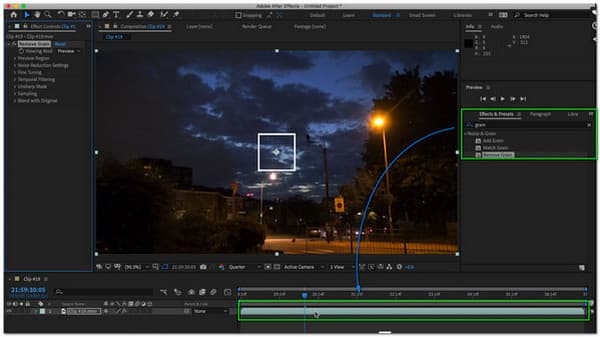
Step 2: The next step will remove the grain on your video. We only need to go with the Effects Panel under the option for Windows Menu. Kindly check the Effects and Presets icon under it. Then, please use the Remove Grain and grad and drop it to your video under the Effects Control Panel.
Step 3: After doing the steps above, we shall now move to the rendering process. Going back to your Adobe Premiere, you must right-click the Dynamic Linked Composition, which we can locate on the Timeline. Then click the Render and Replace to finish the process.
Those steps are the instructions we need to follow to make the process possible. We can see that the process is complicated, but we guarantee that the output comes with a high-quality resolution. However, Adobe Premiere and After Effects can be very expensive for many users because it is not a free editing tool.
Moreover, Adobe Premiere can stabilize videos, rotate videos, and more like AnyMP4 Video Converter Ultimate. But you have to admit that the latter is easier to control.
We shall know how to remove Grain from video through an online tool as an additional method. In this portion, let us see the effectiveness of VEED.IO in helping us remove grains in the video.
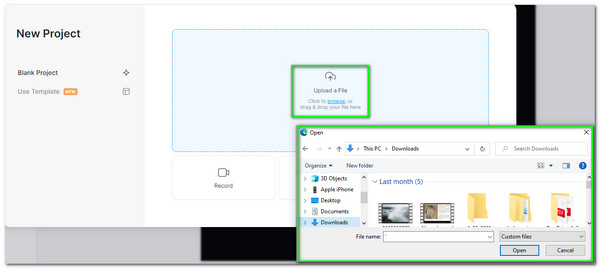
Step 1: Access the main web page of VEED.IO and see its main interface. Please click the Choose Video as we add the video that we need to enhance.

Step 2: Please wait for a moment, and the online tool will load, leading you to a new tab where you can upload your video. Select the video you need to enhance.
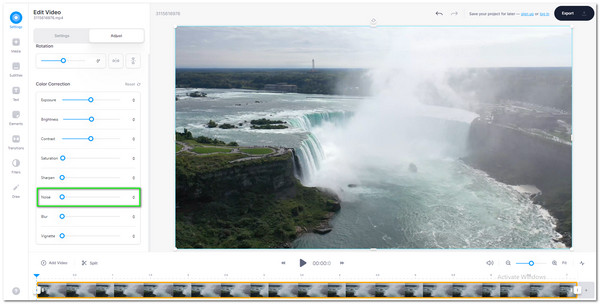
Step 3: You will now see your video on the preview feature of the tool. Please click the video to see the settings for editing it. Locate the Noise under the editing features and drop it into Zero using the slider.
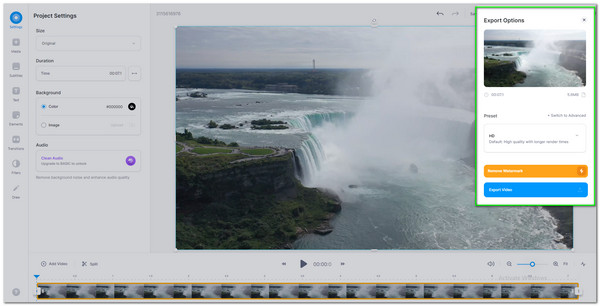
Step 4: After the adjustment process, please click the Export button and tap the Export Video to finish your process.
There you go, the simple to remove grain from video for free. An online tool is also effective in eliminating the grains in our video.
What is grain in a video?
A grain in our video clips is commonly the Noise we can see on our cLips. These are the tiny dots with the visuals that do not make sense with the purposes of the video. Most commonly, we can see these grains in the dark scenes, affecting our video quality.
What is the connection of ISO with the grains in our video?
Adjusting our will's ISO depends on whether your video will become bright or dark. However, this ISO is most likely associated with grain, especially if we set our ISO higher, the higher the chance of noticing the grain within our video. It is better to capture with lower ISO to alleviate this grainy feature, whether on image or video clips.
When is the time that grain in the film becomes effective?
As we all know, Grain also belongs to the visual effect that we can add to our movie. A grain is evolving beneficial when we want to give a nostalgic atmosphere within our films. In line with that, media editors commonly add grains for the flashbacks clips.
We can see grains in film can affect the quality of our video. That is why we need to fix it immediately. In addition, we can also see above the valuable and proper tools to use in making the process of removing possible and practical. We are hoping that this guide helps you eliminate grain hassle-free. Please share this post so that we can help other editors enhance their projects.
 Posted by Angelica Liwanag to Edit Video
Related Articles
 3 Best Ways on How to Fix a Video with Bad Quality
Are you struggling with poor-quality videos on your device? Do not worry; in this article. We will teach you how to fix a bad-quality video on a mobile phone and computer quickly.
 How to Improve Zoom Video Quality in 2 Ways
Do you want to upscale the quality of your video on Zoom? Find out and learn the best ways to increase Zoom video quality with AI-powered software.
 5 Best Performing AI Video Upscaling App
AI video upscale procedure is not commonly known to most people out there. This article will introduce to you the five best AI-powered apps and software that can create a stunning masterpiece.
 3 Easy Ways on How to Remove a Blur from a Video by AI
Nobody wants a blurry video, and that is undeniably true. In this article, we will clearly instruct you on how to remove blur from video using some of the best apps and software.