Apple released iCloud, a cloud service, for iPhone users to expand the internal storage. However, a recent survey found that many users did not use iCloud at all partly because they do not understand how to transfer photos to iCloud. It makes sense that Apple introduced several options related to photos into iCloud, such as optimize iPhone storage and keep the originals. That is why we share this guide to tell you everything you need to know about moving photos to iCloud on iPhone.
Firstly, you can move photos, GIFs, screenshots and more to iCloud Photo Library from iPhone. Apple gives each user 5GB free storage in iCloud. If it is not enough for you, there are several plans to pay for. To transfer photos to iCloud from iPhone, follow the steps below.
Step 1. Open the Settings app from your Home screen, and tap on your name.
Step 2. Head to iCloud -> Photos, and toggle on iCloud Photo Library or iCloud Photos.
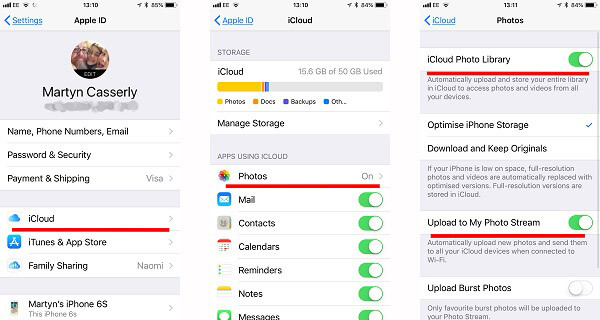
Step 3. There are two options, Optimize iPhone Storage and Download and Keep Originals once you enable iCloud Photo Library. If you want to free up space, choose the first one; otherwise, select the second one.
Step 4. Once your iPhone is connecting to a network, your photos will send to iCloud automatically.
Note: My Photo Stream is another way to save your photos in cloud server. It can store no more than 1000 photos taken in recent 30 days. More importantly, it does not take up your iCloud storage.
For more questions about downloading iCloud photos, you can check this FAQ.
iCloud works well most time; however, some users also reported that they cannot upload photos to iCloud. If you encounter the same problem, try the solutions below.
iCloud relies on internet connection to back up your photos. So, the first thing you need to check is your network settings on iPhone.
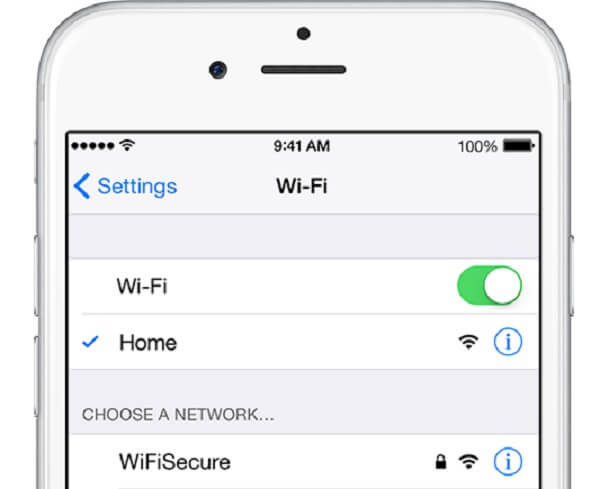
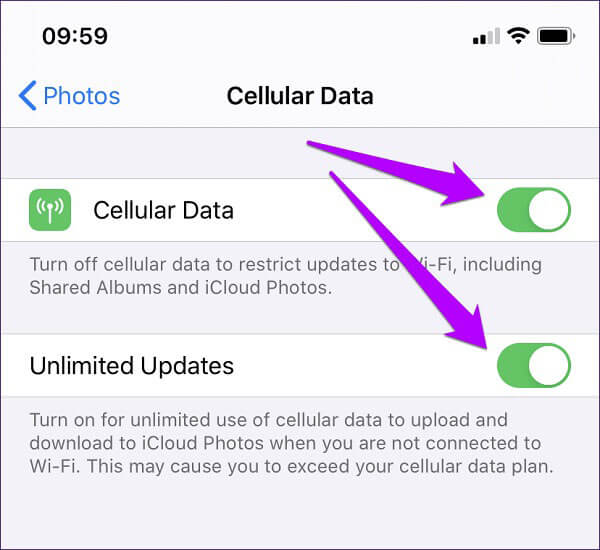
Go to Settings -> [your name] -> Wi-Fi and connect to a good network. Open Photos in Settings screen and toggle off Cellular Data.
If you use the cellular data on iPhone, turn on Cellular Data and Unlimited Updates.
iCloud Photo Library takes up your iCloud storage. If there is no space available in iCloud, pictures will not save to iCloud.
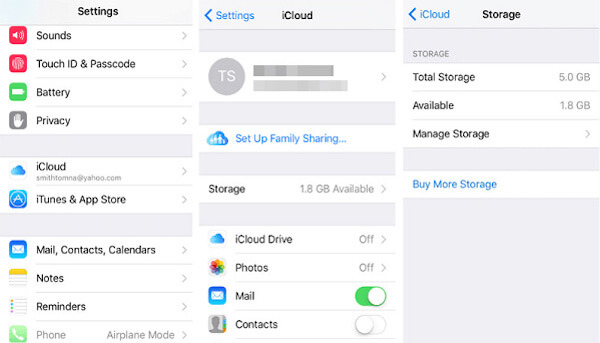
Head to Settings -> [your name] -> iCloud -> Storage and check the Available storage. If it is insufficient, delete the old files and backup in iCloud.
Sometimes, the improper settings are responsible to iCloud does not upload photos on iPhone.
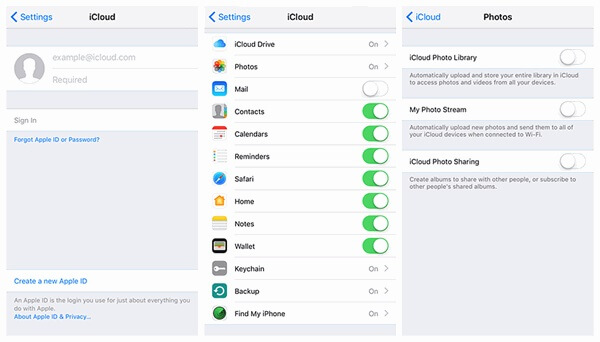
Go to Settings -> [your name] -> iCloud -> Photos. Make sure to enable iCloud Photo Library or iCloud Photos. If the problem persists, turn on Upload to My Photo Stream along with iCloud Photo Library.
If you have changed your Apple ID or password, photos cannot send to iCloud on iPhone. In such case, you need to re-sign in your account.
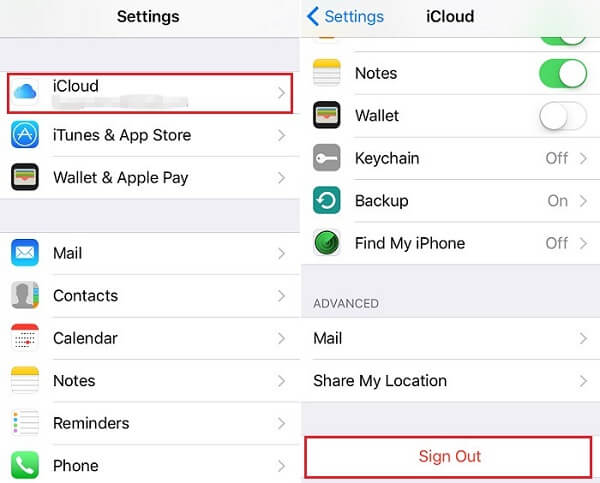
Step 1. Go to iCloud Settings screen in Settings app, scroll down and tap Sign Out button.
Step 2. When prompted, tap Sign Out, and choose Delete from My iPhone.
Step 3. Next, tap Sign In in iCloud Settings screen, and enter your Apple ID and password. Now, photos should transfer between iCloud and iPhone normally.
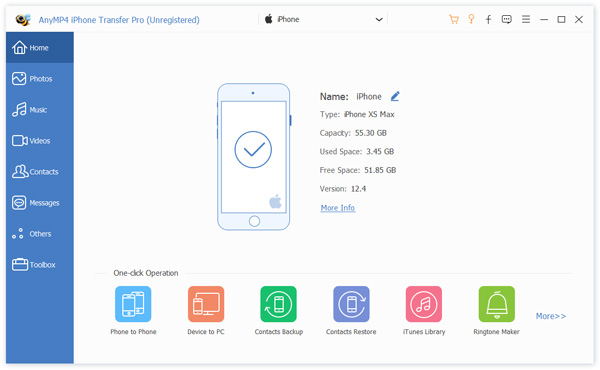
Of course, iCloud is not a perfect tool. The free storage, for example, is pretty limited. Once Apple servers are down, you cannot access photos in iCloud. Therefore, you may need an alternative of iCloud to back up your photos, AnyMP4 iPhone Transfer Pro.
In short, it is the best alternative to iCloud for backup your photos on iPhone.
Secure Download
Secure Download
Step 1. Install the best alternative to iCloud
If you do not like iCloud, download and install the best alternative software to your PC. There is another version for Mac machines. Then hook up your iPhone to the computer with the Lightning cable. Once launch the software, your iOS device will be detected immediately.
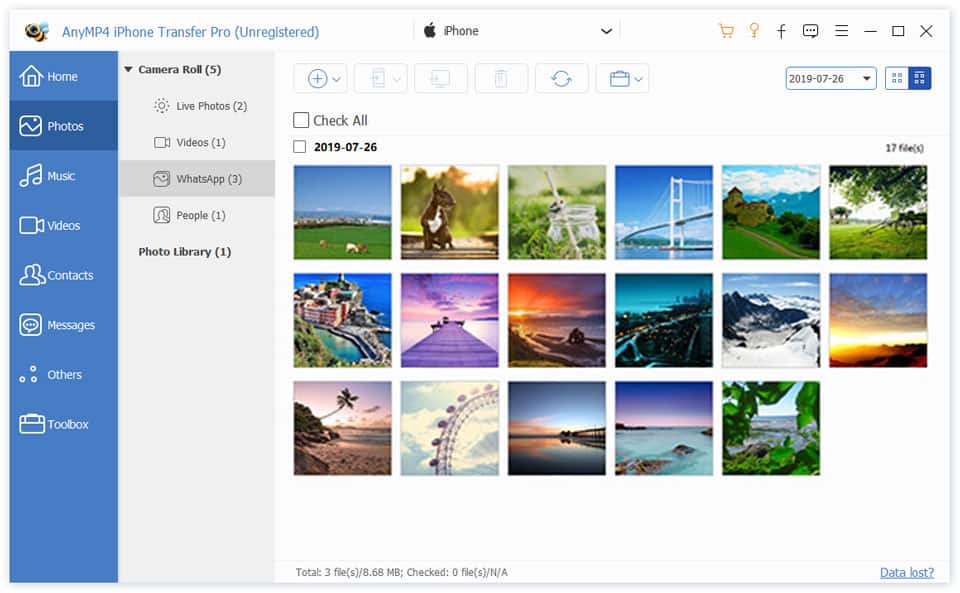
Step 2. Preview photos on iPhone
After data scanning, you will be presented the main interface. Go to the Photos tab from the left-hand column to display all photos on your iPhone. You can see the thumbnails and find the photos you want to download to computer without iCloud. Moreover, you can quickly locate your photos by albums or date.
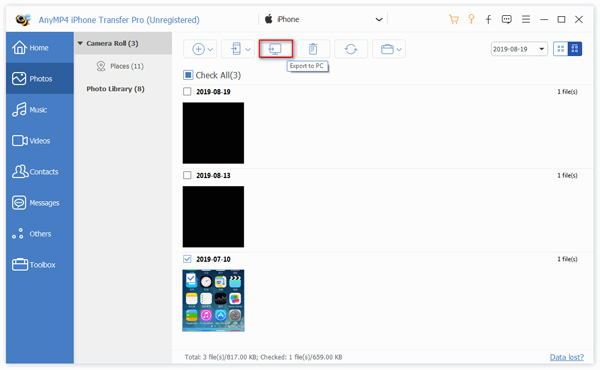
Step 3. Back up iPhone photos to computer
Check the box next to each photo you want to backup. To download all iPhone photos, tick the box of Check All under the menu bar. Next, click the Computer icon on the top of the window and choose your machine. On the pop-up, find a specific directory to save the photos and start the process.
Note: It may take a few minutes to download your photos to computer from iPhone if you have a lot of HD pictures to backup. However, it is still much faster than iCloud.
Conclusion
Based our sharing above, you might understand how to download photos from iCloud to PC, Mac or iPhone. Apparently, iCloud is a convenient way to back up your pictures or transfer them between computer and iPhone. When iCloud does not work, you can follow the troubleshooting to fix it. Sometimes, iPhone users may need an alternative way to back up iPhone photos. Then AnyMP4 iPhone Transfer Pro is the best options. If you have other questions related to iCloud, please tell use below this post.
 Posted by Ted Klarso to Mobile Transfer
Related Articles
 How to Transfer Data Between Android and iPhone with Top 5 Software
How to transfer data from iPhone to Android or from Android to iPhone? Here are 5 ways of moving files between iPhone and Android with top 5 applications to make it with/without computer.
 3 Ways to Transfer Contacts from iPhone to Android
After buying a new Android phone, you need switch files from your old iPhone. This post will tell easy solutions to transfer contacts from iPhone to Android.
 6 Quick Ways to Transfer Contacts from Android to iPhone 17/16/15/14/13/12/11/XS/XR
Do not know how to move contacts from Android to iPhone? This post gathers the top 6 methods of syncing Android contacts to iPhone 14/14 Plus, 14 Pro, 14 Pro Max, 13, 13 Pro, 13 Pro Max, 13 mini, 12 Pro Max, 12 Pro, 12 mini, 12, 11 Pro Max, 11 Pro, 11, XS, XR, X, 8 (Plus), 7 (Plus), 6/6s (Plus), etc.
 8 Proven Ways to Transfer Music from iPhone to iPhone 17/16/15/14/13/12/11/XS/XR/X/8/7/6
How can you sync music from one iPhone to another one? This article gathers the easy 8 ways to make it via iTunes, Wi-Fi, Bluetooth, Finder, Apple Music, AirDrop, Home Sharing, and other apps.