With the development of the camera system of iPhone, it’s much easier to take photos and shot videos in higher quality for Apple users. And it’s normal that we have more and more videos stored in our iPhone which have eaten up much of the storage space. In this case, many people will choose to transfer videos from iPhone to computer in order to free up the iPhone storage, and for the backup purpose also. Or when you need to edit the videos saved in your iPhone or iPad, exporting the videos from iOS device and edit them in computer will be much easier and more convenient. No matter what your reasons are, if you need to transfer videos from iPhone or iPad to PC or Mac, please keep reading to get the most complete guide.
The easiest way to get videos from iPhone to PC and Mac is using Apple’s iCloud Photos feature, which enables you to sync videos wirelessly without the need to connect your iPhone to computer with a USB cable. Please check the step-by-step guide below.
Step 1. Set up iCloud on both your iOS device and computer and sign in with the same iCloud account.
Step 2. Connect your iPhone to a stable Wi-Fi network.
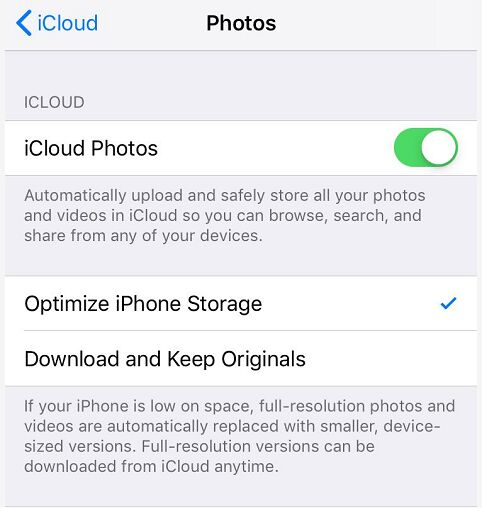
Step 3. Turn on iCloud Photos on your devices.
On your iOS device, go to Settings > [Your name] > iCloud > Photos, then turn on iCloud Photos.
On your PC, download iCloud for Windows and follow the steps to set up iCloud Photos on your PC, after that you can go to This PC > iCloud Photos > Downloads to access all the videos from your iPhone in PC.
On your Mac, go to System Preferences > iCloud, click the Options button next to Photos, then select iCloud Photos.
Now all the videos and photos in your iPhone or iPad will be synced to your PC or Mac computer. If you have synced photos to your iOS device from iTunes before you turn on iCloud Photos, you’ll receive a message “Photos and Videos Synced from iTunes will be Removed.” In this case, the photos and videos that you synced from your computer will be deleted from your device.
Note: Please note that if you transfer videos from iPhone to PC or Mac with iCloud Photos feature, you cannot selectively choose the specific videos you want to transfer from iPhone. Instead, all the videos and photos will be synced to your computer at once.
If you want more initiative when transferring videos from iPhone to computer, it’d be better to use a professional iOS data transfer tool that allows you to transfer videos and other data from iPhone/iPad/iPod to PC and Mac selectively. According to my user experience, AnyMP4 iPhone Transfer Pro can be a nice choice. It helps iOS users easily transfer photos, videos, music, contacts, text messages, voicemails and more from iPhone to computer, and it supports the latest iPhone 14. There is also a corresponding Mac version available, which is AnyMP4 iPhone Transfer Pro for Mac, so if you have a Mac computer, you can also use this software.
Secure Download
Secure Download
Check the easy steps below to export the specific videos from iPhone to PC and Mac. Here we take the Windows version for example.
Step 1. After you download and install this iOS data transfer tool on your computer, launch it and connect your iPhone to computer with USB cable. This software will detect your iOS device automatically.
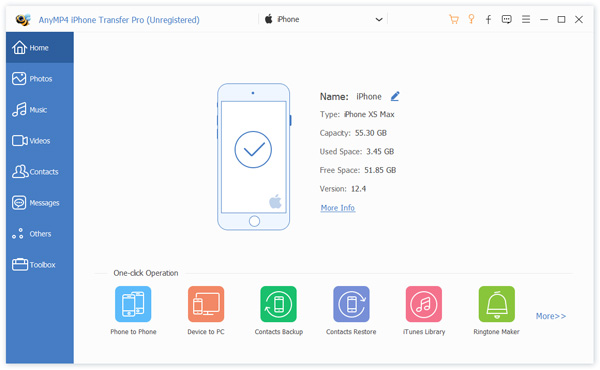
Step 2. Wait for seconds to let the software scan the data in your iPhone. If there are a large amount of videos and photos in your device, it will take a while to finish scanning. When all the data in your iPhone has been scanned out, you will see all the files are divided in to categories like below.
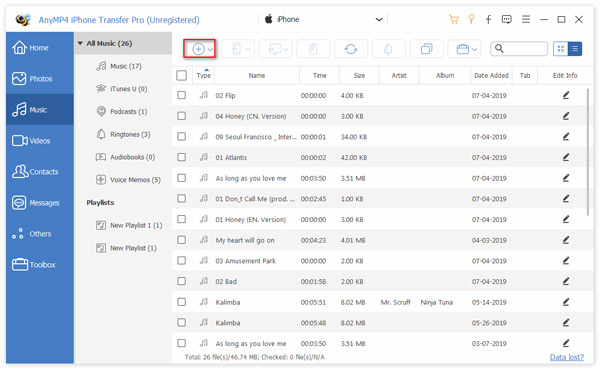
Step 3. To transfer videos from iPhone to PC or Mac, select the Videos type on the left side to check all the videos found by iPhone Tranfer Pro. You can preview the video by double-clicking it. Then you can check the videos you want to transfer and click the Export to PC button to export videos from iPhone to computer. Or you can choose to export iPhone videos to iTunes too.
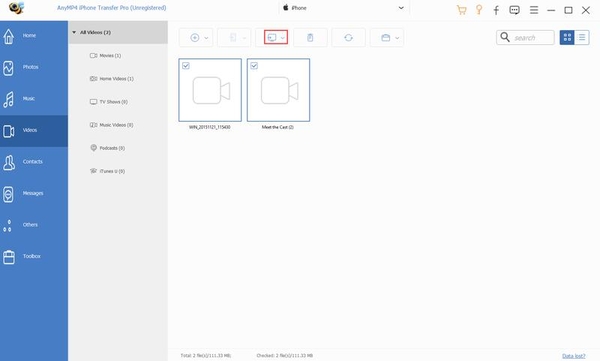
Step 4. This iOS data transfer tool will pop up a window to let you choose the destination where you want to save the exported videos in computer. Select the folder as per your need, then start to transfer videos from iPhone to computer. The transferring process will be finished within seconds.
Note: In the Videos category, the software will find the movies, music videos, TV shows, etc. saved in your iPhone. If you want to transfer videos recorded by iPhone, please go to the Photos category, there will also be a Videos option available that listed all the videos taken by your iPhone camera. You can repeat the steps above to export videos from iPhone to PC and Mac.
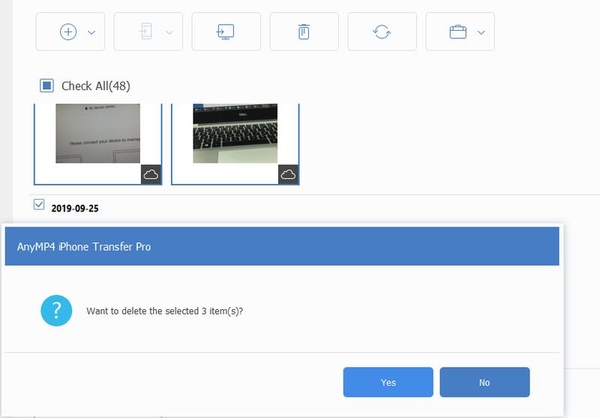
Step 5. If you want to delete the videos in your iPhone after transferring them to your computer, you can select the videos you want to delete and click the delete button directly in the top of the interface to free up the your iPhone storage.
Step 6. You are also allowed to manage your photos and videos with AnyMP4 Transfer Pro. For example, you can add photos to an existing album or create a new album, rename album, delete album and more. Moreover, this program also enables you to transfer videos, photos, music and other files from PC/Mac to iPhone iPad or iPod.
If you transfer videos from iPhone to PC or Mac for editing later, you can check this guide on how to edit videos on Mac or Windows computer.
Except the two methods introduced above that can be used to transfer videos from iPhone to both PC and Mac, there are also some common ways to sync videos from iPhone to PC or Mac individually.
If you are using Windows 10 PC, its default Photos app makes it quite easy to transfer photos and videos from phone to computer. Check the step-by-step guide below.
Step 1. Connect your iPhone iPad or iPod to the Windows PC via a USB cable.
Step 2. Find the Photos app in your computer and launch it.

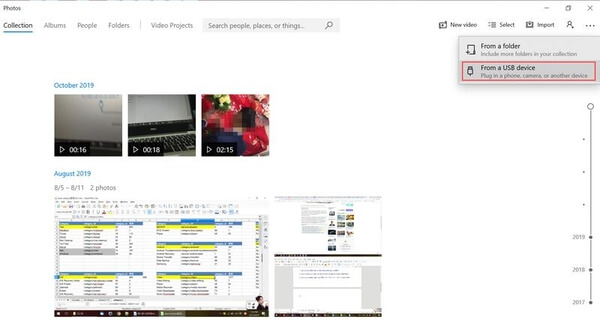
Step 3. On the top right corner of the Photos app interface, click Import > From a USB Device. Then the Photos app will automatically look for new photos and videos on your iOS device.
Step 4. Tap Import Settings to change the import destination, choose to group the items by data/month/year, and decide whether to delete the items from your iPhone after you import them to PC. Then confirm your settings and click Done.
Step 5. Select the videos you’d like to transfer from iPhone iPad to Windows 10 PC and click Import Select to begin.
If you are using a Windows 7 computer, you can get videos from iPhone to PC with the AutoPlay feature.
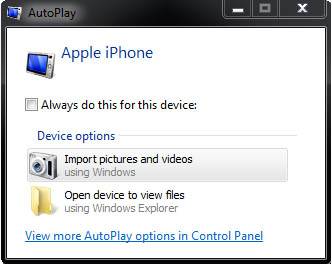
Step 1. Connect your iDevice to PC and AutoPlay will pop up automatically.
Step 2. In the AutoPlay window, choose Import pictures and videos.
Step 3. In the Import Settings, choose or create a folder to save the videos you want to transfer. Then select the videos.
Step 4. Finally click Import to begin transferring videos from iPhone iPad or iPod to PC.
Windows Exploerer in Windows 7 (now called File Explorer in Windows 10) can also help you view and extract photos, videos, music and documents from your iPhone.
Step 1. Connect your iPhone to PC with a USB cable.
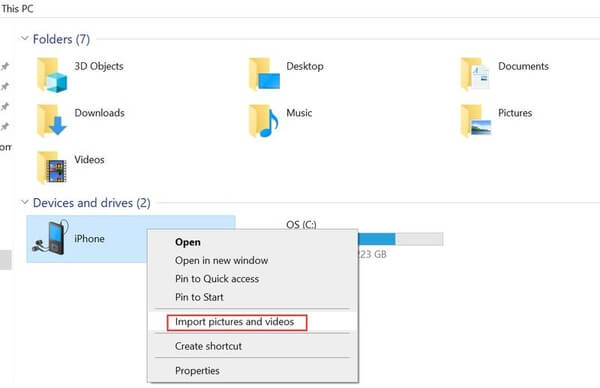
Step 2. Open This PC and find your iPhone. Right-click your device name and select Import pictures and videos.
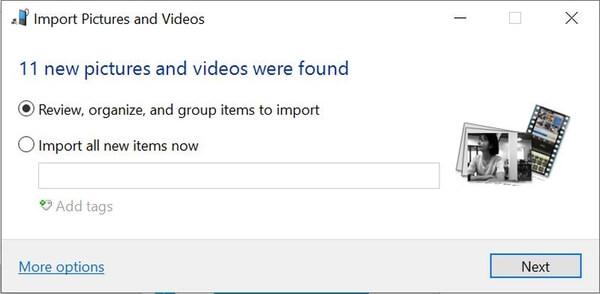
Step 3. Then Windows Explorer will show you how many new pictures and videos have been found. Choose Review, organize, and group items to import option, then click on Next to continue.
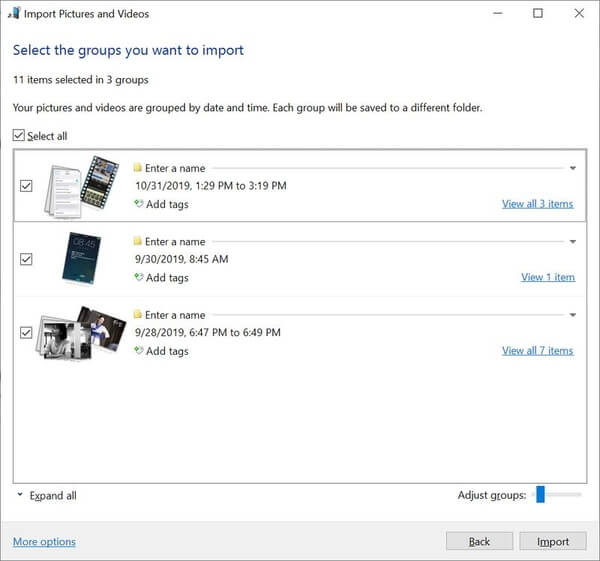
Step 4. Check the videos you want to upload to your PC and click Import to start transferring.
AirDrop is a useful function that Apple designs for its users to share files like videos, photos, documents and more between Apple devices wirelessly. So it’s very convenient and fast to transfer videos from iPhone iPad or iPod to Mac with AirDrop.
Step 1. Turn on AirDrop on your iOS device and Mac. Please note that you need to turn on the Bluetooth and WiFi on both iPhone and Mac.
On iOS device:
Step 1. Swipe up from the bottom of your iOS screen to launch the Control Center.
Step 2. Tap on AirDrop and set your iPhone to be discovered by Everyone.
On Mac:
Step 1. Go to Finder > Go > AirDrop.
Step 2. Set the option Allow to be discovered by as Everyone.
After you set AirDrop on both iPhone and Mac, you can start to share videos between iPhone and Mac.
Step 1. Open the Photos app on iPhone and find the video you want to transfer to Mac, then tap the Share button at the left bottom of the screen.
Step 2. Then many share options will pop up. Tap AirDrop and tap your Mac name.
Step 3. Your Mac will receive a message to remind you that an iOS device wants to send you a video, click Accept on your Mac and choose to open the video in Photos app or save it in Downloads.
Note: You can only transfer one video from iPhone to Mac once a time.
There is also a built-in app in Mac named iPhoto or Photos (Mac OS X 10.10.3 or later) that enables Apple users to import the videos recorded by iPhone camera to Mac computer. You can follow the detailed guide below to transfer videos from iPhone to Mac easily.
Step 1. Open Photos app on your Mac and connect iPhone to Mac via a USB cable.
Step 2. Click your device name, then click Import to find the new videos and photos in your iPhone.
Step 3. Select the videos you want to get from iPhone to Mac and click the Import Selected option to begin the transferring process.

We have introduced totally 7 ways to transfer videos from iPhone to PC or Mac computer in this article. All are common and practical to be tried. What’s more, all the methods recommended above can not only help you transfer videos from iPhone to computer, but also back up iPhone photos in computer to avoid data loss. You can decide which one to choose after reading the details above. Feel free to leave us a comment if you have any new method or any suggestion.
 Posted by Riley Mitchell to Mobile Transfer
 Related Articles
 Top 11 Best Photo Collage Maker & Photo Editor for Mobile and Computer
When you need to edit photos or make collages, you can learn more about the 11 best photo editor and collage makers design some stunning photo collages from the article.
 How Can I Record iPhone iPad iPod Screen via AirPlay on Computer?
Want to mirror and record iPhone/iPad screen to your Windows or Mac computer for a better watching experience? An AirPlay recorder can do you a favor. Keep reading to find the list of top AirPlay recorders.
 How to Save iMovie As MP4
Want to save iMovie as MP4, one of the most widely used video formats? Here we offer 5 solutions for you to export video from iMovie to MP4.
 How to Use VLC or an Effective and Professional Way to Convert Video Files to MP3
How to convert your video to MP3 with VLC? Is there any better or professional choice to convert MP3 from video files? Learn how in this step-by-step guide.