“How do I transfer videos from my PC to my iPhone? My PC is running Windows 10.”
“I have stored some funny videos on my Mac. How do I sync these videos to my iPhone 14 Pro in order to share with my family members?”
“How to transfer videos from PC to iPhone? Do I need iTunes?”
Many people are used to downloading or saving videos on their computers. For those who want to share videos with family or enjoy interesting videos during a long journey via iPhone, we will show you 4 easy ways to transfer videos from PC/Mac to iPhone with/without iTunes.
For most users, iTunes is the first choice when wanting to transfer videos from PC/Mac to iPhone. However, many people find that it really spends long time transferring videos to iPhone via iTunes successfully. Therefore, we highly recommend you to take iPhone Transfer Pro as the first thought. You don’t have to transfer videos from PC/Mac to iPhone with so many annoying steps. It is time-saving. You can choose a lot of videos at a time and transfer them to your iPhone without data loss. Apart from videos, iPhone Transfer Pro can also transfer photos, pictures, music, contacts, text messages and voicemails from PC/Mac to iPhone.
Here's the in-depth tutorial on how to transfer videos from your PC/Mac to your iPhone.
Step 1. To start with, you should prepare the videos you want to transfer and download the time-saving software iPhone Transfer Pro to your computer.
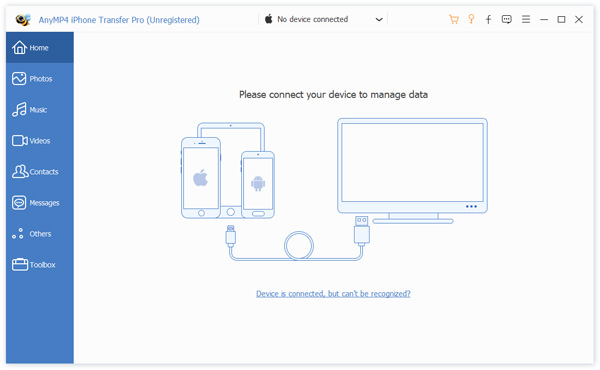
Step 2. Connect your iPhone with a USB cable. Your iPhone will be detected automatically by the software. After connected successfully, you should tab “Trust” on your iPhone. If you connect your iPhone for the first time, you need install the driver first.
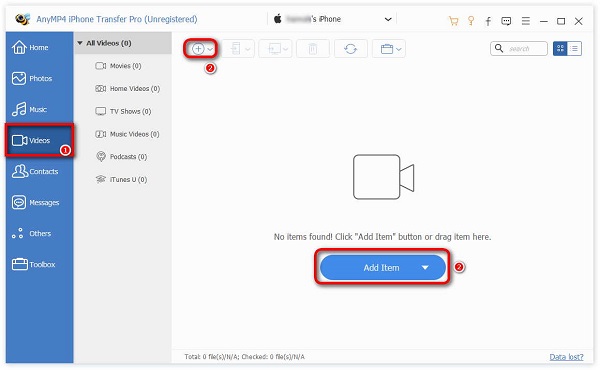
Step 3. Choose the “Videos” on the left interface. Click “Add Files” or “Add Folders”.
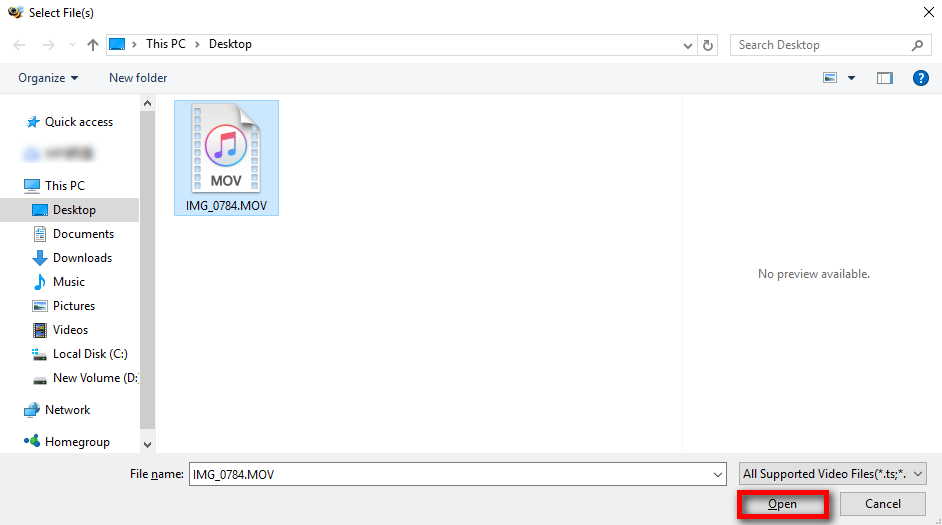
Step 4. A window will pop up. Now, you can click the file path to find your saved videos and tab “Open” button. At last, the window will show you “Add videos to device successfully!”.
If you want to bring all your videos and cloud videos both on computer and iPhone devices, you can use the cloud services, such as Dropbox. At the same time, you can also back up your videos conveniently. No matter for new babies or professional people, this method to import videos from PC to iPhone is very easy to learn.
Step 1. Navigate to official website of Dropbox and sign in your own account. If you don’t have a Dropbox before, you can click “Sign up” to register a new account to continue.

Step 2. After you have logged into your account, you can tab “Upload files” button. Or you can drag all the videos you want to Dropbox directly.
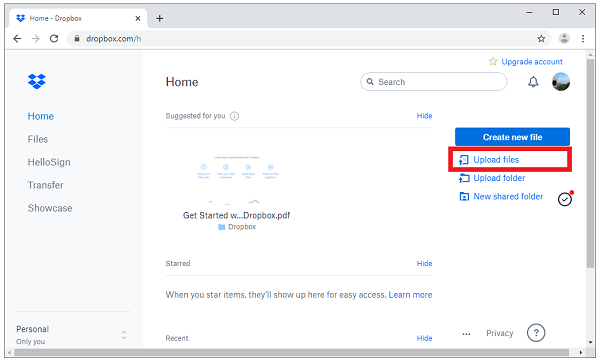
Step 3. Launch the Dropbox application on your iPhone. If you haven’t installed this application, please get it form App Store for free. Select and download the videos in your Dropbox account to your iPhone.
Note:
Make sure the network of your iPhone and PC. Because the transfer process and time depend on network connections of both devices.
If you want to transfer a few videos from Mac to iPhone over the air more quickly, AirDrop can do you a great favor. In fact, Apple company has really done a great job among different Apple products. That’ s because people can work seamlessly and sync data under the same Apple ID with the help of Internet connection. Let’s see how it works.
Step 1. Turn on both “AirDrop” button of your iPhone and Mac.
For Mac:
Click “Finder”> “AirDrop”> “Allow me to discovered by: Everyone”
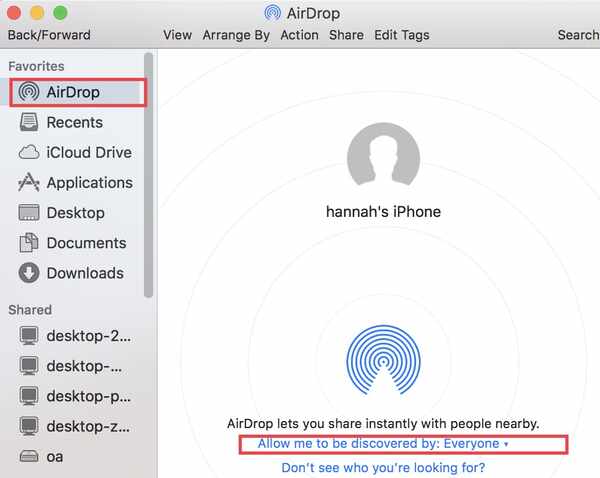
For iPhone:
iPhone X or later: Swipe down from the upper-right corner of the screen to open Control Center.
iPhone 8 or earlier: Swipe down from the bottom of the screen to open Control Center.
Press firmly the network settings region in the upper-left corner, long hold the “Airdrop” button and choose “Everyone”, which means all nearby Apple devices can see your iPhone.
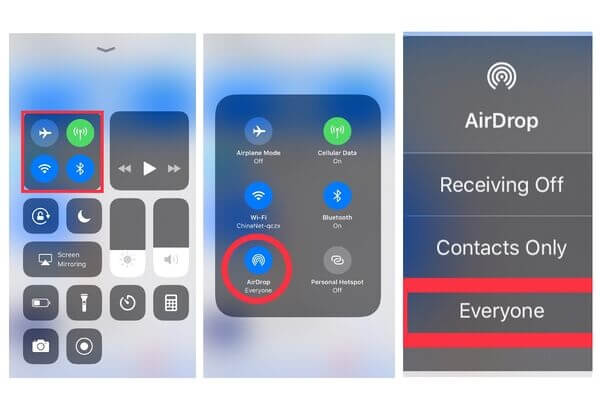
Step 2. Open native “Photos” application.
Find the videos that you want to transfer to your iPhone. Then, right-click videos and choose the “Share” button to send videos. Click the device name of the iPhone to transfer.

Step 3. Accept the videos.
After you have done the operations above on your Mac, you will see an alert preview on your iPhone. Then, tap “Accept” button, the videos will come to your iPhone’s Photo application successfully.

Note:
1. If your iPhone and Mac are signed in with the same Apple ID, an option to “Accept” or “Decline” won’t be shown. Videos will get sent to your iPhone automatically.
2. When you want to transfer multiple or large videos, this method isn’t suitable for you. As it may fail or spend long time completing the transfer process.
iPhone users must be familiar with iTunes. It is an official media player and file management tool developed by Apple Company. People can use this software to transfer music, photos from iPhone to computer, play iOS videos, back up iPhone photos and so on. The following steps will show you how to transfer videos from PC/Mac to iPhone with iTunes in details.
Step 1. Connect your iPhone to PC/Mac with a USB cable. iTunes will launch automatically. If not, you can run iTunes manually.
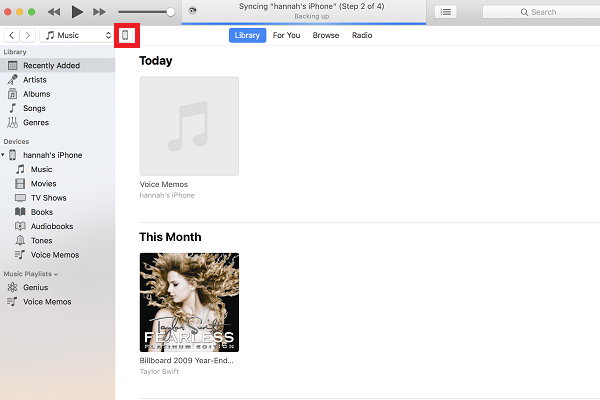
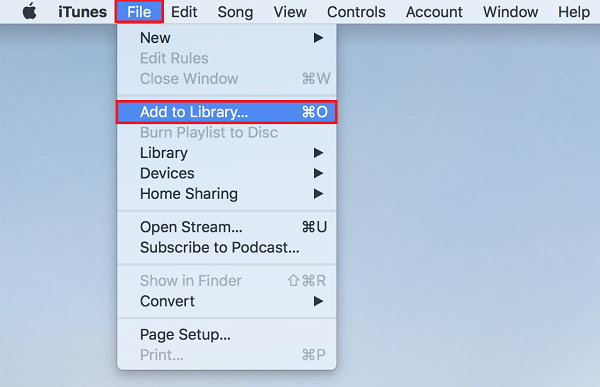
Step 2. Go “File” > “Add File to Library” button. Then, a new widower will pop up, you can add the videos according to your demand.
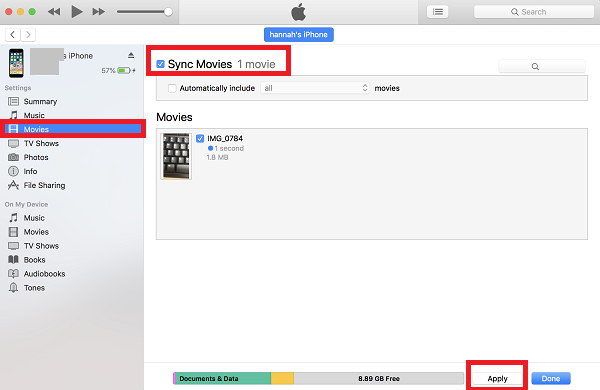
Step 3. On the upper-left interface of iTunes, you can click the iPhone device button. Afterwards, choose the “Movies” library and check the videos you wish to transfer. Finally, click “Apply” button.
Note:
1. You can manually add music, movies, TV shows, and podcasts to your device. You can’t manually add photos, contacts, text messages or other info.
2. Non-apple format of videos won’t be accepted, like “M4V”, “MTS” and so on. If iTunes tells you that a video can’t be transferred, that’s the case. You can firstly convert such video format like M4V to MP4 in order to play on your iPhone. Or please do as follows: Choose File in the library> Convert > Create iPhone Version.
3. In the Step 3, if you haven’t chosen all the videos in the library, then, the unselected videos will be erased by iTunes. Please make sure that all the videos in iTunes library are saved or purchased. If not, you will lose all your videos permanently when you don’t choose them before syncing.
Followed by 4 ways listed, you must have got how to transfer videos from PC/Mac to iPhone easily. If you are looking for a one-stop solution, please try iPhone Transfer Pro. Besides transfer videos, it can easily transfer iPhone photos, pictures, contacts, text messages and voicemails from iPhone to computer or reversely. It can also make ringtones and convert HEIC pictures. And it’s not limited by network or Apple account. If you wish to transfer videos from PC to iPhone over the air, go with Dropbox. If you want to transfer between Mac and iPhone, AirDrop is a good choice for you. A free solution, iTunes is also accepted. Any other easy ways to transfer videos from PC/Mac to iPhone, you can share with us in the comments.