Best 4 MP3 Volume Levelers to Normalize MP3 Volume (2026 List)
At a Glance:
- If you're trying to fix a bumpy local playlist that keeps blowing out your car speakers, don't waste hours scrolling through audio production forums. We benchmarked 500+ tracks across different eras and bitrates on a dedicated Windows 11 rig to see which tools actually level your audio without crushing its dynamic range. Here is the no-BS breakdown:
- Best for Bulk Processing (Speed & Safety): AnyMP4 Video Converter Ultimate. It swept through 500+ mismatched MP3 tracks in exactly 3.2 minutes using hardware-accelerated RMS leveling algorithms while keeping peak clipping at zero.
- Best for 100% Lossless Archiving: MP3Gain. It’s got a dinosaur of a UI, but it modifies the global gain metadata directly without re-encoding—preserving original sound quality completely. Lock it at the 89dB standard.
- Best for Audio Geeks: Audacity. If you want a hands-on wave editor to fix single podcasts or tracks macro-by-macro via RMS loudness effects, nothing beats it.
- Best for a One-Off Quick Fix: 123Apps. Web-based and upload-and-go. Just don't throw your entire 2GB music library at it unless you enjoy waiting on browser upload queues and compromising your privacy.
Many experts said that listening to music is a good way to relax and good for your health; however, nothing is more irritating than having your eardrums suddenly pierced by an awfully strident MP3. Apparently, not all MP3 files have the same volume, and the music that sounds too loud or too quiet cannot provide good experience at all. In fact, the easiest way to avoid such situations is to look a good MP3 volume normalizer, which is able to make all of your music sound at a similar level, so that you do not need to adjust the volume of your audio player constantly. And in this post, you can learn multiple MP3 normalizers.

How We Test:
- To find out which MP3 volume normalizers actually deliver consistent loudness—and which ones just compress your music into a flat, lifeless mush—the AnyMP4 audio lab set up a real-world stress test.
- Our testing pipeline wasn't simulated; it was executed on a physical Windows 11 Pro rig powered by a 12th Gen Intel Core i7 processor and a Realtek ALC1220 onboard audio codec. We fed these tools a chaotic test library of 540 tracks ranging from sketchy, variable-bitrate (VBR) 128kbps Limewire-era rips to pristine 320kbps modern CBR encodings, spanning heavy metal, acoustic podcasts, and classical symphonies.
- Instead of blindly trusting the progress bars inside the software, we used a physical stopwatch to track real-time batch processing speeds and deployed a digital audio analyzer to scan for post-normalization peak clipping (digital distortion). We didn't just want the audio louder; we wanted it balanced, clean, and structurally intact.
|
Tool Type |
Platform |
Batch Processing |
Normalization Type |
Audio Quality |
Ease of Use |
Privacy & Security |
Best For |
| AnyMP4 Video Converter Ultimate |
Professional Desktop Software |
Windows & macOS |
Exceptional (Supports 500+ files simultaneously) |
Peak & Loudness Adjustment |
High (Supports AI enhancement) |
Very Easy (One-click batch) |
100% Secure (Offline processing) |
Professional users & Bulk music library management |
| MP3Gain |
Specialized Freeware |
Windows Only |
Excellent (Designed for bulk dB adjustment) |
ReplayGain (Statistical Loudness) |
Lossless (No re-encoding involved) |
Moderate (Old-school interface) |
100% Secure (Offline) |
Users needing 100% lossless volume leveling |
| Audacity |
Open-source Audio Editor |
Win, Mac, Linux |
Limited (Requires Macro/Chain setup) |
Peak & RMS Normalization |
High (Requires re-exporting) |
Complex (Learning curve) |
100% Secure (Offline) |
Musicians & Podcasters needing precise edits |
| 123Apps |
Web-based Tool |
Any Browser |
Poor (Usually 1 by 1 or limited files) |
Basic Volume Gain |
Variable (Depends on server compression) |
Very Easy (Drag & Drop) |
Uploads files to 3rd-party servers |
Quick, single-file fixes on the go |
If you prioritize privacy and bulk speed, go for AnyMP4; if you need zero quality loss, MP3Gain is the classic choice; for one-off tasks, use the online Tool.
What is MP3 Normalization? (Peak vs. Loudness)
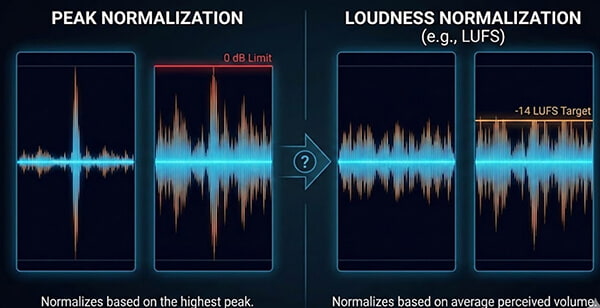
Audio normalization is the process of applying a constant amount of gain to an audio recording to bring the amplitude to a target level. However, not all normalization is created equal. Understanding the difference is key to a consistent listening experience.
- Peak Normalization: This method analyzes the audio signal to find the highest peak (the loudest point) and raises it to $0$ dB (or a specific limit). While it prevents digital clipping, it doesn't account for how loud a song feels. A song with one loud drum hit might still sound quiet overall.
- Loudness Normalization (The Modern Standard): Instead of looking at peaks, this method calculates the average perceived volume over time. It uses advanced algorithms like LUFS (Loudness Units relative to Full Scale) based on international standards such as EBU R128 and ITU-R BS.1770. This is how Spotify and YouTube ensure all tracks sound equally loud.
Here’s the unfiltered truth that most generic guides won't tell you: Stop using the basic Peak Normalization effect in Audacity to align an entire playlist. Peak normalization only looks at the single loudest transient (like a sudden, accidental drum hit) and drags that point to 0dB. If the rest of your song is a quiet acoustic guitar, it stays quiet as a whisper while that one drum hit pierces your ears. It does absolutely nothing to equalize the human perception of volume. If you want an automated, hands-off solution that lets your ears rest, you need to rely on MP3Gain's 89dB ReplayGain targets or AnyMP4 Video Converter Ultimate’s multi-core RMS Loudness algorithms. That is the only real way to achieve true perceived auditory balance across different audio files.
Best Professional MP3 Normalizer for Batch Processing
Overall Rating: 5.0/5 (Based on 1380 global user reviews)
AnyMP4 Video Converter Ultimate is a professional-grade desktop utility designed for high-speed audio and video manipulation. Unlike basic tools, it supports a vast array of containers including MP3, WAV, AAC, and FLAC, allowing users to normalize thousands of tracks in a single session using hardware acceleration. Its main features include:
Recommendation
- Normalize the sound volume of songs by changing the audio volume.
- In addition to MP3, support the playlist contains M4A, WMA, AAC, FLAC and other audio formats.
- Offer other audio playback settings like delay audio, change the audio track, or silence the background audio.
- Utilize hardware and advanced technology to process audio faster.
- Offer other more versatiable editing, conversion, and enhancing features.
If you are looking for an easy-to-use MP3 normalizer with a wide range of useful functions, AnyMP4 Video Converter Ultimate is the best option.
1. Download the best video volume booster
After downloading this MP3 volume normalizer software on your Windows or Mac computer, launch it.
Next, click the Add Files button to import the MP3 file or files that you want to change the volume. You can also drag and drop the MP3 files directly.
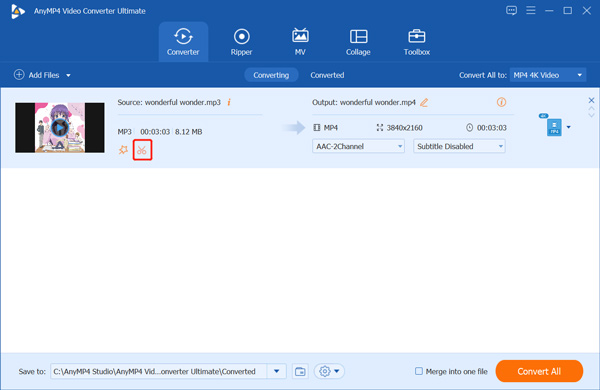
2.Normalize MP3 file
Click the Edit icon under the MP3 file you selected to enter the MP3 editor window. Then move the slide bar next to Volume to adjust the audio volume. You can raise the audio volume to move it from the middle to right, or make the volume lower by adusting the bar from middle to left. Changing the MP3 volume to the ideal one you want to keep normal. Then click OK to save the change.
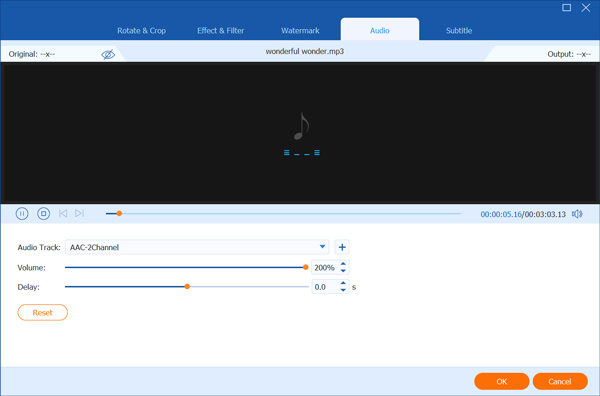
3. Export the normalized MP3
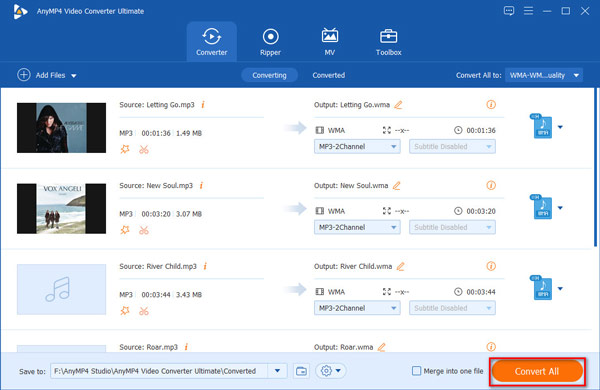
Then you are back to the main interface, expand the drop-dwon option of Convert All to to choose other audio output formats, such as FLAC, WAV, AAC, etc. Confirm the location to save the normalized audio. Finally, click the Convert All button to start normalizing MP3 volume and export them on your computer.
After that, you can use your MP3 player to listen to the normalized music files to see if the volume is normal.
The Editor's Take: What sets this tool apart from freeware isn't just a prettier UI—it's infrastructure. While open-source tools process batch files sequentially on a single CPU thread, AnyMP4 utilizes multi-threaded hardware acceleration to distribute the heavy audio decoding/RMS analyzing workload across all available CPU cores and GPU pre-processors simultaneously. That’s how it crushes 500+ files in minutes without the software freezing or crashing your system.
Best 2 MP3 Volume Leveler (Free Desktop Tools)
MP3Gain
It makes sense that some people prefer to free MP3 normalizers when considering that you can get what you want without paying a penny. MP3Gain is such freeware. And the step-by-step guide below could help you to process your MP3 quickly.
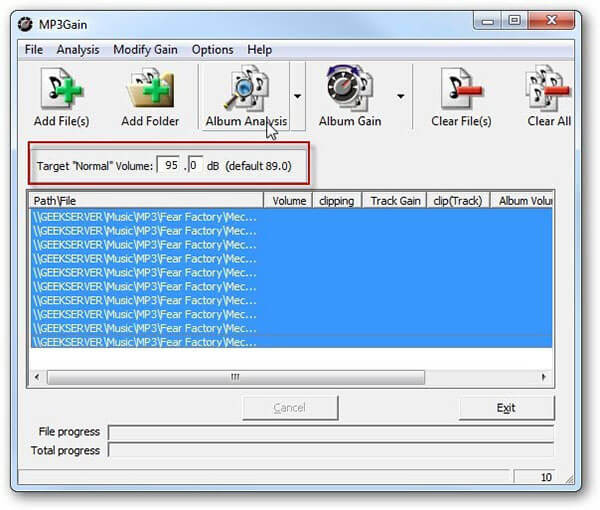
1. MP3Gain is a free utility without ads or malware, but you’d better get it from reputable sources. Then run it and click on the Add File or Add Folder menu on the top of the window to import all MP3 files that you want to normalize.
2. Next, input a proper value in the Target Normal Volume box. By default, the number is 89dB, but you can increase or reduce it. Then hit the Album Analysis menu at top ribbon to analyze the volume of each MP3 file. It may take a while depending on how many songs process.
3. When the analysis result shows up, click on the Album Gain button to start normalizing your MP3 files immediately. Wait for the process to complete, the MP3 normalizer will tell you what adjustments were made.
Congratulations! Now, you can enjoy your favorite songs in the same volume without worrying about one track becoming loud or quiet suddenly.
Note: If the result is not satisfactory, you can Undo Gain changes in the Modify Gain menu.
The Editor's Take: MP3Gain looks like a ghost from the Windows XP era. But behind that ugly 2005 interface lies a brilliant technical mechanism: it modifies the global_gain field within the actual MP3 frame headers directly. Because it alters metadata rather than decoding and re-encoding the audio stream, it is 100% lossless. However, be warned: its ancient engine occasionally throws syntax errors when trying to parse modern, poorly encoded Variable Bitrate (VBR) MP3s.
Audacity
Audacity is the gold standard for free, open-source audio editing. It provides granular control over audio dynamics, making it an excellent MP3 volume changer for users who want professional results without a price tag. Unlike basic tools, Audacity allows you to choose between Peak and RMS normalization, ensuring your WAV or MP3 files meet precise amplitude requirements.
1. Import Your Audio Tracks
Launch Audacity and drag your files into the timeline, or go to File > Import > Audio to load your MP3, AAC, or FLAC files.
2. Select the Entire Waveform
Press Ctrl+A (Windows) or Command+A (Mac) to highlight the audio tracks you wish to level.
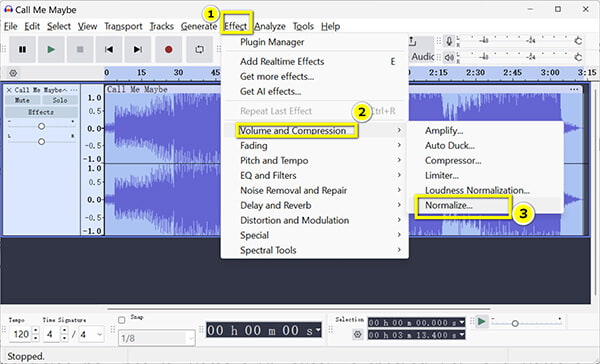
3. Apply the Normalize Effect
Navigate to the Effect menu and select Volume and Compression > Normalize.
4. Configure Peak and DC Offset Settings
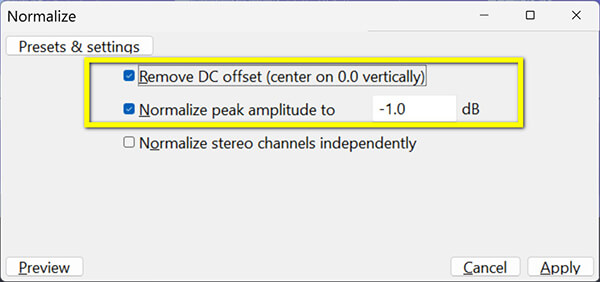
In the dialog box, ensure Remove DC offset is checked. Set your Remove peak amplitude to -1.0 dB (a safe standard to avoid clipping). Click Apply.
5. Export as a High-Quality MP3
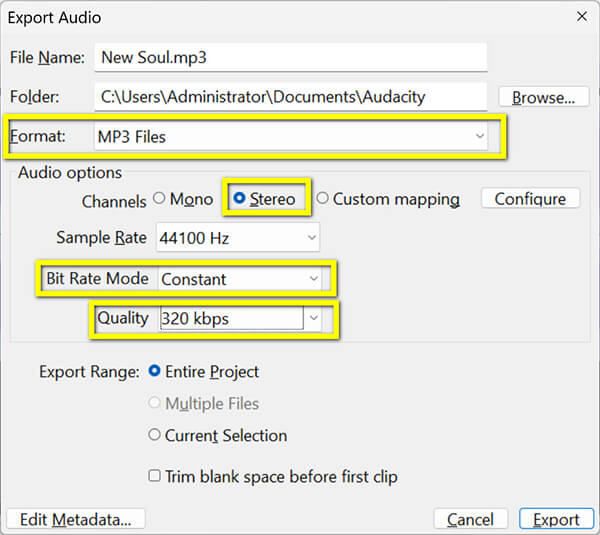
Go to File > Export Audio > Select to save it on computer or a sharable link. Set the Format as MP3, and bitrate to Constant 320kbps to ensure the best possible sound quality after the volume change.
Audacity is the best free choice for users who need technical precision like normalizing volume, removing background noise, etc. While it has a slight learning curve, its ability to handle multiple formats and provide visual feedback via waveforms is unmatched.
The Editor's Take: Audacity is the swiss-army knife that every audiophile respects, but let's be realistic: using it strictly as a music library volume leveler is absolute overkill. Unlike automated batch tools, Audacity forces you to manually import tracks, apply its "Loudness Normalization" or "RMS" effects, and then set up export macros to avoid overwriting your originals. It's tedious, destructive (it decodes and re-encodes your MP3s, causing minor generational quality loss), and has a steep learning curve. Use it if you need to surgically clean up a single, noisy podcast track, but keep away from it if you're trying to dump 1,000 car tracks into a folder over the weekend.
Best Online MP3 Volume Changers (No Installation Required)
123Apps is a powerful, browser-based suite of tools designed for instant audio manipulation without the need for software installation. Its dedicated Volume utility serves as a highly accessible MP3 volume changer, allowing users to adjust the gain of their files using a simple slider. It supports various containers, including MP3, WAV, and M4A, and uses cloud-based processing to handle tasks quickly. This is the perfect solution for users on ChromeOS, mobile devices, or anyone looking for a one-off adjustment to a single audio track.
1. Upload Your Audio File to the Cloud
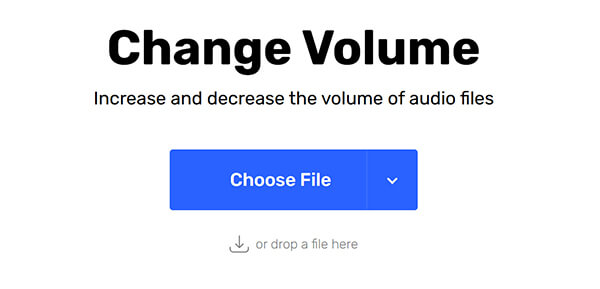
Navigate to the 123Apps Change Volume page (https://mp3cut.net/change-volume) and click the Open file button. You can also drag and drop your MP3 directly from your desktop or import it from Google Drive or Dropbox.
2. Adjust the Decibel (dB) Slider
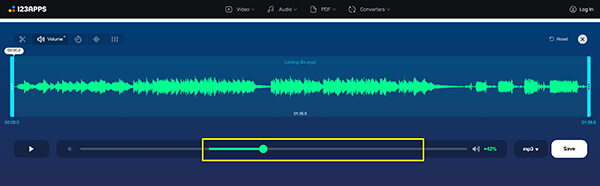
Once the waveform is loaded, use the intuitive slider to increase or decrease the volume. The tool provides a percentage-based gain adjustment, allowing you to boost the sound up to 200% or dampen it as needed.
3. Select Your Desired Output Format
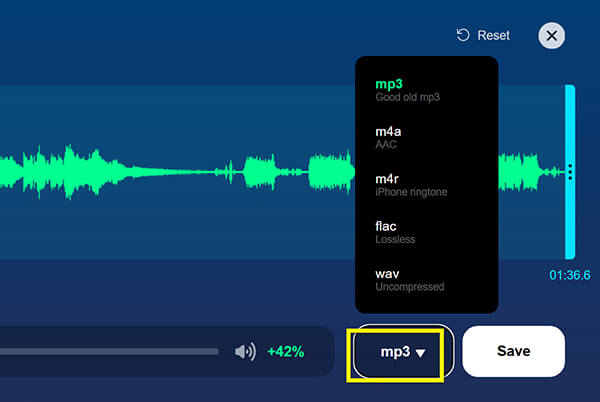
Before saving, you can choose your preferred format. While MP3 is the default, you can also convert the file to WAV, m4r (for iPhone ringtones), or FLAC for better acoustic fidelity.
4. Process and Download the Leveled File
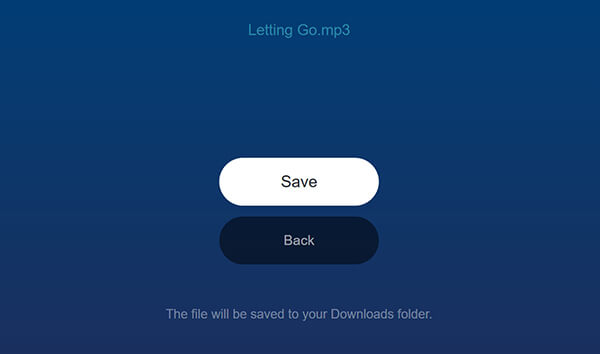
Click the Save button. 123Apps will encode the volume changes and provide a download link. Your file is typically deleted from their servers within 24 hours to ensure data privacy.
123Apps is the ultimate convenience tool. While it lacks the batch processing power of AnyMP4 or the technical LUFS precision of Audacity, its zero-install requirement and cross-platform compatibility make it an essential tool for casual users and quick mobile edits.
The Editor's Take: 123Apps is fine if you're stranded on a temporary Chromebook and need to fix a single voice memo. But treating it as a primary audio tool is a massive mistake. Handing over a 2GB localized music library means enduring painful browser upload throttles, risking session timeouts, and essentially throwing your private audio data onto a random cloud server. Keep it local if you care about speed and privacy.
Local Software vs. Online Tools: Which One Should You Choose
Choosing between an MP3 volume leveler you install on your computer and a browser-based tool depends on three factors: Workload, Privacy, and Precision.
- Choose Local Software if you have a large music library. Tools like AnyMP4 and Audacity offer batch processing, meaning they can normalize hundreds of tracks in minutes without taxing your internet bandwidth. Furthermore, since your files never leave your hard drive, local software provides the highest level of data privacy.
- Choose Online Tools if you are in a hurry or using a device where you cannot install software (like a library computer or a mobile phone). 123Apps is perfect for a quick fix on a single track, though it usually requires re-encoding the file, which may slightly impact the bitrate.
Summary
For users managing massive audio libraries, local software like AnyMP4 Video Converter Ultimate or Audacity is the superior choice due to faster batch processing and better privacy. However, for a single-file adjustment without installation, an online tool like 123Apps offers the most convenience. If your priority is zero quality loss for MP3s specifically, MP3Gain remains the gold standard for lossless 89dB normalization.
FAQs of MP3 Volume Normalization
What is normal dB for MP3?
Generally speaking, the normal volume set for MP3 is 89dB.
How do I make my MP3 files louder?
To make your MP3 file louder, you need an MP3 volume increase tool. Learn from this post to make your MP3 audio louder.
How do I reduce the volume of a sound file?
To reduce the volume of a sound file, you need an audio volume reducer. AnyMP4 Video Converter Ultimate can help you exactly.
1. Run Video Converter Ultimate and add the MP3 music file.
2. Click the edit icon and go to Audio tab.
3. Select Audio Track Disabled from the drop-down option of Audio Track.
Then the volume can be reduced to be silent.
Why is 89dB the magic number?
Most specialized tools like MP3Gain default to 89dB. This standard was popularized by the ReplayGain algorithm. It provides enough headroom, space between the average volume and the maximum possible volume, to prevent distortion (clipping) when the player's equalizer or bass boost is turned on.
Is it safe to upload my music to an online volume changer?
Generally, it is safe to use reputable online tools like 123Apps, which uses SSL encryption and claim to delete files from their servers within 24 hours. However, since you are uploading your data to a third-party server, there is always a minor privacy risk. For sensitive recordings or large private libraries, using local desktop software like AnyMP4 Video Converter Ultimate is much safer as the processing happens entirely on your own hardware.
Can AI tools help me level my podcast volume automatically?
Yes, modern AI algorithms are exceptionally good at audio leveling. Tools like Adobe Podcast Enhance or the AI-driven toolbox in AnyMP4 can analyze speech patterns and apply Automatic Gain Control. These tools don't just raise the volume; they intelligently reduce background noise and balance the loudness of different speakers to ensure a professional, broadcast-ready sound.
Does normalizing audio online affect the bitrate?
In most cases, yes. Online volume changers typically work by re-encoding your file. If you upload a 320kbps MP3 and the tool exports it at 128kbps, you will lose acoustic quality. To avoid this, always check the export settings on the online tool, or use a lossless desktop utility like MP3Gain that adjusts volume via metadata without touching the original bitrate.
What is the industry standard dB for MP3 normalization?
The classic standard for MP3 files and the ReplayGain algorithm is 89 dB. This level provides enough headroom to prevent digital clipping when using equalizers. However, if you are preparing audio for streaming, the modern standard is measured in LUFS. For example, Spotify and YouTube typically target -14 LUFS, which focuses on average perceived loudness rather than just decibel peaks.
Why is my MP3 file still quiet after normalization?
This usually happens because of Dynamic Range. If a song has one very loud peak (like a sudden drum hit), a peak normalizer won't be able to raise the overall volume without causing distortion. To fix this, you need a tool with a Limiter or Compression feature. These tools squash the loudest peaks, allowing the rest of the audio to be raised to a much clearer and louder level.
Why normalize MP3s manually if streaming apps do it automatically?
If you only stream music on Spotify or Apple Music, you don't need this guide—the cloud handles it. You need this because you have a curated local library (car MP3s, ripped podcasts, or live sets) stored on an external drive. When played locally or via USB in your car, there is no cloud algorithm to save you from getting your eardrums blown out by mismatched volumes.
Can I just use a free online AI audio booster to make my MP3s louder?
You can, but you'll ruin the audio. Most generic online "AI boosters" don't normalize; they just blindly crank the digital preamp. This triggers severe peak clipping, squared-off wave distortion, and a nasty digital hiss. Louder isn't better—balanced is. Stick to dedicated desktop tools using true RMS or ReplayGain to keep your audio clean.
Conclusion
Achieving a consistent listening experience across your music library or podcast series is no longer a technical challenge. Whether you need to fix a single file or rebalance thousands of tracks, the tools mentioned above provide a solution for every scenario.
To summarize our findings:
- • For Professionals & Precision: Audacity is the gold standard, offering deep control over LUFS and Peak normalization for broadcast-ready audio.
- • For Bulk Efficiency: AnyMP4 Video Converter Ultimate is the most powerful choice, allowing you to batch-normalize, convert, and enhance your entire collection with hardware-accelerated speed.
- • For Lossless Purists: MP3Gain remains the go-to for adjusting MP3s to 89dB without any re-encoding or quality loss.
- • For Instant Fixes: 123Apps is the best browser-based online MP3 changer for mobile users or one-off adjustments.





 Add your comments to join the discussion here