
Key Takeaways:
MP4 files require video content. To make the conversion work, we must link your WAV audio track with a visual element, like a basic background photo. Here are 3 ways:
Whether you want to put sound to a picture and make a video, or as a podcast host, want to upload a show to YouTube, as a musician, want to post a new track on Instagram or TikTok. Even as a language teacher, need to share an audio lesson on WeChat, all these tasks need the exact same thing: converting WAV to MP4 with an image to meet platform rules.
To change WAV to MP4 is not just a basic format swap. It is the active process of putting an audio track and a picture together to create a video file. Let us look at how to make it quickly using 3 desktop and web methods.
| Price | Difficulty Level | The Best Part | The Drawback | |
|---|---|---|---|---|
| AnyMP4 Video Converter Ultimate | Free Trial / Paid | Easy (Drag & Drop) | The built-in MV Maker does all the heavy lifting in one click. | The free trial version puts a strict time limit on your final export length. |
| Shutter Encoder | 100% Free | Medium (Clunky) | Completely free with incredible advanced format support. | The workflow for attaching an audio track to a picture is surprisingly backward. |
| FFmpeg | 100% Free | Hard (Command Line) | Perfect for running automated bulk scripts for dozens of files. | A single typo or space in your text command crashes the entire process. |
Best For: Users who want to quickly combine audio and pictures into a stylish video.
As a reliable WAV to MP4 converter, we used AnyMP4 Video Converter Ultimate because it has a built-in MV Maker. You just drop your picture and your MP3 audio file into the window. It handles the H.264 encoding in the background. You do not need to know any video editing skills to turn WAV into MP4 video with cover art here. It takes less than one minute to set up because it highly supports the GPU acceleration.
Secure Download
Secure Download
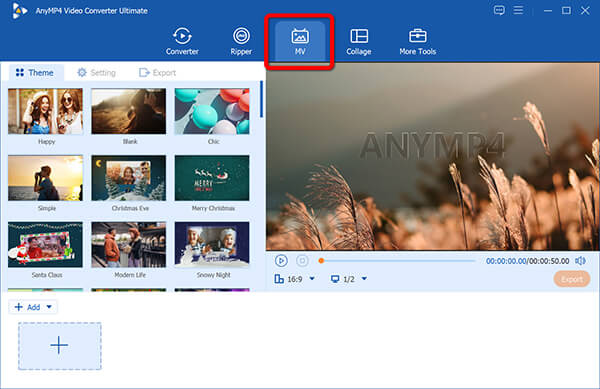
1. Open the MV Maker
Open the software on your computer. Look at the top menu bar. Click the tab that says MV to open the video maker tool.
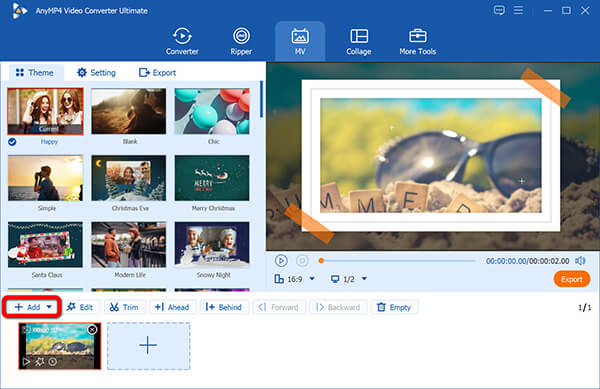
2. Add your cover image
Look at the bottom left of the screen. Click the Add button. Pick the JPG or PNG image from your folder. This is the picture people will see while the audio plays.
Use a 1920x1080 resolution image for YouTube. If you use a small square picture, you will get ugly black bars on the sides of your final video. I made this mistake on my first try.
3. Add your WAV audio
Go to the Setting tab on the left side menu. Uncheck the box that says Keep original audio track. Then, check the box that says Background Music. Click the small plus icon next to it and load your WAV file.
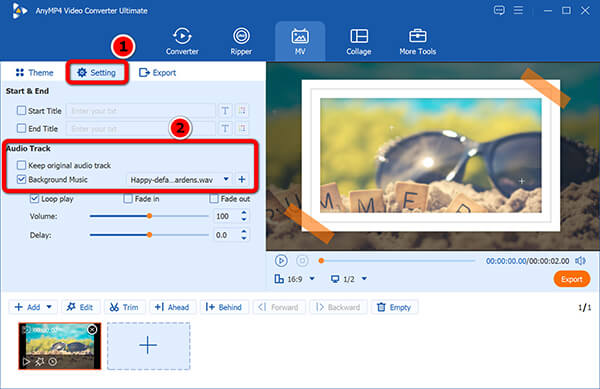
Double-check the volume slider in this menu. Sometimes it defaults to 50%, and I have ruined a few video exports by forgetting to push the volume back up to 100%.
4. Export the MP4 video
Click the Export tab on the right. Pick MP4 as your output format. Click the Start Export button. The tool will save the new video to your computer.
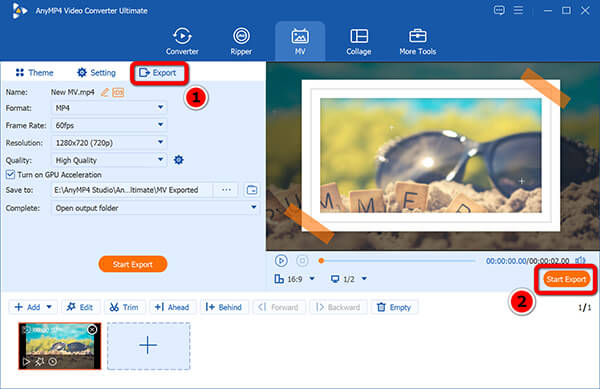
This software has a converter and metadata editor features. You can use its Converter feature to convert WAV files to MP4 in bulk, then use its metadata editor to add the album cover to the converted MP4 files.
Summary:
We loved the drag-and-drop speed and the clean visual interface that did not require any skilled editing knowledge. However, the strict time limit on the free trial version is a major drawback if you need to process a full one-hour podcast episode right away.
Best For: Users who want a powerful, free desktop audio-to-video converter.
Shutter Encoder is a free audio to video converter built by video editors. It runs on a powerful engine but gives you buttons to click instead of code to type. It does a great job helping you convert WAV to MP4 without paying anything. However, merging a static image with audio is a bit of a hidden workaround in this software. You cannot do it in one single click. You have to build a silent video first, then add the audio. Here is the exact way to do it.
1. Make a silent base video
Drag your cover image (JPG or PNG) into the main file list.
Under the Choose function dropdown, select H.264. Click the gear icon (Settings) in the top left corner, find Set still image duration, and type in the exact length of your audio track in seconds.
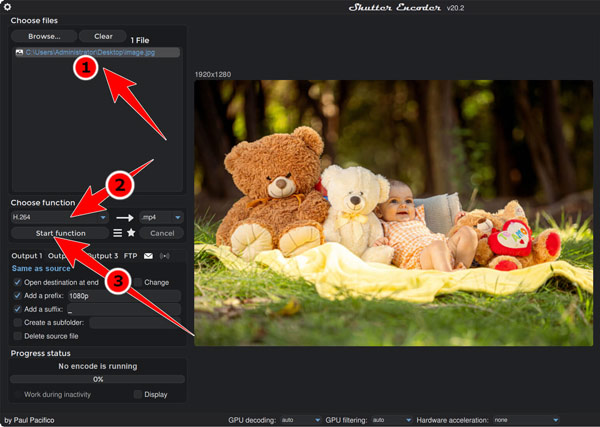
If you click start and get a red error box saying The following file(s) were not able to be processed, your image size is the problem. H.264 requires image dimensions to be even numbers. If your picture is 1921x1080, it will crash. Fix this by going to the right panel, checking the Scale box, and forcing the size to exactly 1920x1080.
2. Reload WAV and MP4
Once your silent MP4 is ready, clear the main file list. Now, drag that newly created silent MP4 video AND your WAV audio file into the Shutter Encoder window together.
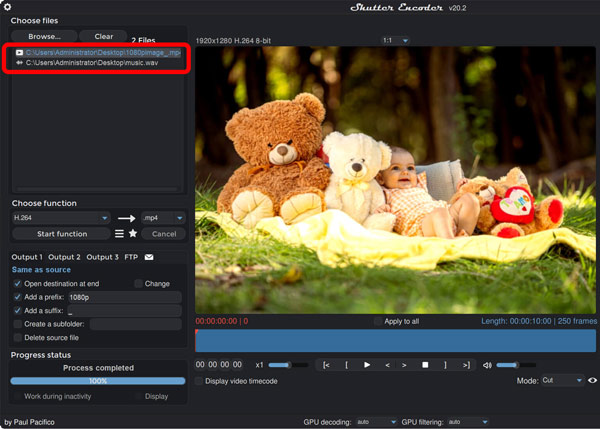
Do not skip setting the duration in step one! If you don't type in the seconds, the software will just create a useless 1-second video. I wasted 15 minutes figuring this out the first time.
3. Replace MP4 Audio with WAV
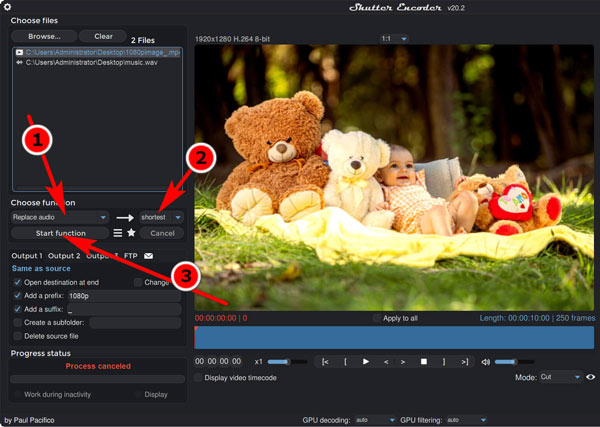
Go back to the main Choose function drop-down menu. Scroll down to the Without conversion section and select Replace audio.
Look at the panel on the right. Select shortest. This ensures the final video stops exactly when your audio stops, cutting off any extra dead space from the silent video. Click the Start function button to get your final file.
Summary:
We like that it is completely free and leaves no watermarks. We can change any setting we need. But the actual process is annoying. Doing a simple WAV to video swap takes too many steps. We hate that we have to build a silent video first just to add the audio later. It is simply too much work for a basic task.
Best For: Tech-savvy users who want to automate bulk conversions.
FFmpeg is the engine that powers most video apps. It is a command-line tool, meaning you have to type text commands to make it work. It is an amazing WAV to MP4 converter if you need to automate things. If you regularly convert podcast WAV to YouTube video files in large batches, using a text script is the fastest way.
1. Install FFmpeg
Download FFmpeg from its official site. Add it to your system path. Open your command prompt or terminal window.
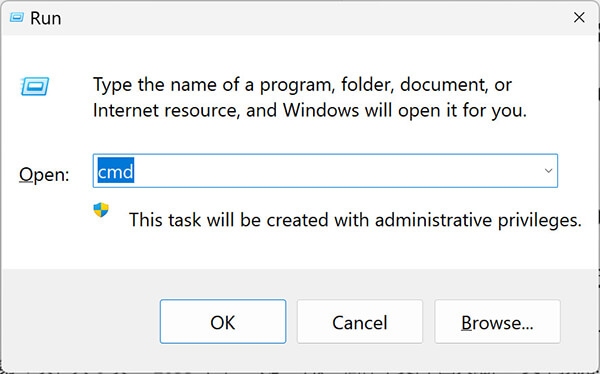
On Windows, press the Windows key, type cmd, and press Enter.
On a Mac, press Command + Space, type Terminal, and press Enter. A plain text box will open.
2. Put files in one folder
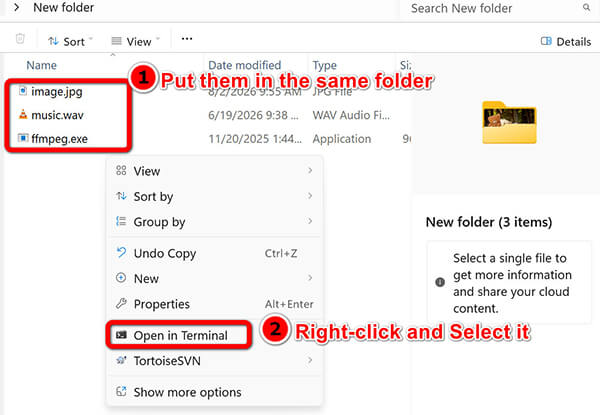
Put your WAV file (name it audio.wav) and your image (name it cover.jpg) in the exact same folder. Use the cd+space+folder path command in your terminal to open that specific folder.

3. Convert WAV to MP4 with cover
Type this exact command line:
ffmpeg -loop 1 -i cover.jpg -i audio.wav -c:v libx264 -c:a aac -b:a 192k -pix_fmt yuv420p -shortest output.mp4
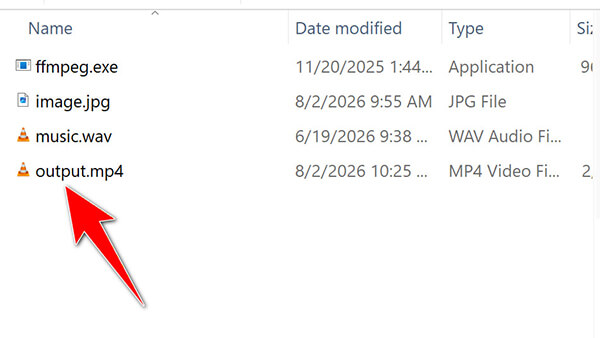
Press the Enter key. FFmpeg will run the process and save a file named output.mp4.
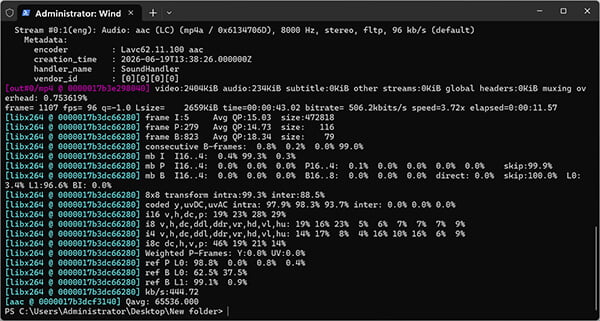
Before you run the command, you need to change a few small things in the text so the code can find your actual files:
Real example:
When I tested this on my Windows laptop with my own files, my final command looked exactly like this: .\ffmpeg -loop 1 -i image.jpg -i music.wav -c:v libx264 -c:a aac -b:a 192k -pix_fmt yuv420p -shortest output.mp4
Summary: We save hours of time because one script can convert fifty files at once. But the tool is unforgiving. If we miss a single space or letter in the text, the process breaks instantly and gives us a confusing error message.
Let's step back and look at the actual files we are dealing with.
WAV is an uncompressed audio format. It holds pure sound. It is large and sounds perfect. However, it cannot hold moving pictures. If you want to know more about its technical roots, you can read what is WAV here.
MP4 is different. It is an MP4 container format. Think of it like a digital box. Inside this box, you can put an audio track and a video track at the same time. When you convert WAV to MP4 with an image, you just put the audio and a still picture into this box. It is the exact same concept used when you fix a broken web video and convert WebM to MP4.
We always suggest adding visual elements instead of leaving it blank. Audio visualization matters. People want to look at something nice while they listen on their phones or TVs.
How to convert WAV to MP4 with an image?
You need a tool that handles video rendering. You load your WAV file as the audio track. You load your image as the video track. Then you export them together as an MP4 file.
Can I upload an audio file to YouTube?
No. YouTube only accepts video files. If you try to upload a raw audio file, the site will reject it.
I recorded a podcast in WAV. How do I turn WAV into video with cover art for YouTube?
You need to create a static video file. Take your podcast logo. Use a desktop audio to video converter to merge the logo with your audio. Export it as an MP4, then upload that file. If you want to be extra helpful to your deaf viewers, you can later add subtitles to MP4 files in a separate editor.
Does WAV to MP4 conversion change the audio quality?
Yes. WAV is uncompressed. MP4 usually uses AAC compression for the audio track. You will lose a tiny bit of data, but most people will not hear the difference online.
To convert a WAV audio file into an MP4 video file, you must pair the audio with a visual element because MP4 is a strict video container format. Whether you use a simple WAV to MP4 converter with visual buttons or a text script, you can now convert podcast WAV to YouTube video files easily.
If you want fast results and a simple screen, pick AnyMP4 Video Converter Ultimate.
Secure Download
Secure Download
If you want a free desktop app and do not mind a busy menu, pick Shutter Encoder. If you like typing code and want to process fifty files at once, pick FFmpeg.
 Posted by Alice Thorne to Convert Audio, Convert Video
More readings
 10 Ways to Convert between WAV and MP3 on Computer & Mobile
Looking for the best WAV to MP3 converter? We tested 10 methods on desktop, online, and mobile. From AnyMP4 (top pick) to free tools, find yours here.
 4 Best Ways to Convert WAV to OGG for Game Audio
Stop letting giant WAV files eat your disk space. Here is how to convert WAV to OGG fast, keep a clean 320 kbps stream, and batch-convert without crashes.
 10 Best MOV to MP4 Converters in 2026 (Fast & Lossless)
MOV files are unplayable? Read our honest, hands-on review of the top 10 MOV to MP4 converters, including desktop, online, and mobile tools to get the best one.
 How to Convert WFP to MP4 Without Watermark
This post will outline how to convert WFP to MP4 with ease while removing watermarks. Discover the best tools and techniques for a video conversion experience.
 Add your comments to join the discussion here