The Secret Hack Style to Add Music to CapCut from YouTube
Creator Note on Copyright (2026):
While recording system audio is a reliable technical shortcut, always ensure you have the right to use the music. YouTube's Content ID and CapCut’s built-in copyright checkers are extremely sensitive in 2026. Use this method for personal projects or tracks under Creative Commons to avoid strikes.
If you’ve ever tried to rip music from YouTube only to face endless Download Failed errors on free websites, you know how frustrating it can be. Low-quality converters and broken links can ruin your workflow and compromise original quality. That’s where a screen recorder becomes the Pro Shortcut: if you can hear it, you can record it.
This post shows you how to add music to CapCut from YouTube seamlessly. Using audio capture with internal sound lets you preserve the track’s high-fidelity quality, avoid lag, and maintain perfect sync with your video. By the end, you’ll know how to extract any YouTube track safely, efficiently, and in the original quality your project deserves.
How to Add Music from YouTube to CapCut (2026 Updated Guide)
Quick Answer:
The most reliable way to add YouTube music to CapCut in 2026 is to record the track using AnyMP4 Screen Recorder with System Sound enabled. Save the recording as a high-quality MP3 or WAV, then import it into CapCut via Audio> Sounds> From Device. This bypasses broken URL converters and ensures 100% audio-visual synchronization.
Pro Step:
Before you spend hours syncing your edit, use CapCut Desktop’s built-in Copyright Check. Simply right-click your audio track in the timeline and select Run Copyright Check. In 2026, this tool scans the waveform signature against global databases (including YouTube Content ID) to warn you of potential mutes or strikes before you publish.
The Easiest Way: Using AnyMP4 Screen Recorder for Lossless Audio
AnyMP4 Screen Recorder is a one-stop capturing software that goes beyond screen recording. It comes with an Audio Recorder mode that captures pure system sound. It records the audio signal straight from your sound card with zero room noise, just the crystal-clear YouTube track. It also supports on-the-fly audio trimming, allowing you to stop recording exactly when the song ends. You can also quickly trim silence immediately afterward for precise timing.
Furthermore, it lets you save recordings as MP3, AAC, or WAV. These formats are fully compatible with CapCut and suitable for both lightweight edits and high-quality production. For longer sessions, the Task Schedule feature lets you automatically record live streams or concerts and return later to perfectly captured audio ready for multiple edits and clips.
Why Screen Recording is Safer than Online Converters
- • A dedicated system sound recorder doesn’t force you to download unknown files from ad-heavy websites.
- • Screen recording tools capture internal audio directly from your sound card, with no background noise.
- • With proper settings, you get high-quality MP3 capture or even WAV output at a stable, ample rate.
- • When using YouTube Music desktop or browser playback, the recording system audio keeps everything local.
- • Desktop recorders' hardware acceleration ensures smooth capture without audio glitches, lag, or desync.
Step-by-Step: Capturing YouTube Audio for CapCut
Here’s how to add music to CapCut from YouTube:
1. Get started by securing a free download of AnyMP4 Screen Recorder. Install the audio recorder and complete the setup process. Once the installation is finished, run the software on your system to access its main dashboard.
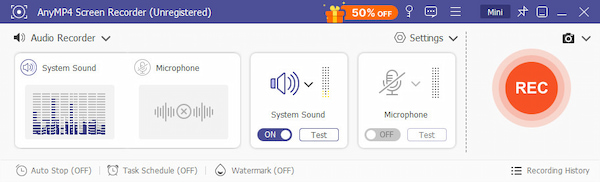
2. Select Audio Recorder as your recording mode and enable System Sound. Ensure a clean recording without background noise, keep the Microphone disabled. Then, open Preferences, select Output, and navigate to Audio Recording Settings to configure parameters.
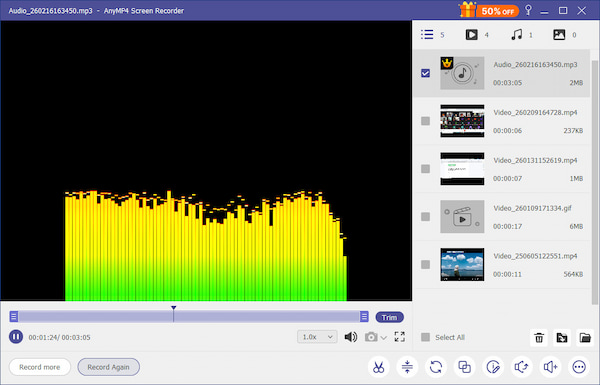
3. Open YouTube Music and set the playback quality to the highest available. Return to the software, click REC to begin the three-second countdown, and start the track. Once the song ends, stop the recording and trim any silence if necessary.
Using this method ensures lossless quality, privacy, and complete control. This makes it the easiest and most dependable workflow for adding YouTube audio to your CapCut projects. In addition to CapCut, you can also use YouTube Create to add royalty-free music from the YouTube audio library.
Alternative: Using Your Phone’s Built-in Screen Recorder
Smartphones’ built-in screen recorder offers a quick way to capture music from YouTube and use it in CapCut. Modern Android devices and iPhones can record internal audio during screen capture. This allows you to save the track and extract it for editing.
Here’s how to add a song from YouTube to CapCut using the phone’s built-in recorder:
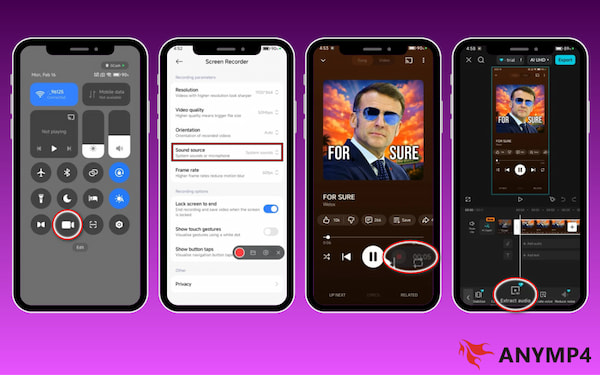
1. GSwipe down to open Quick Settings, then tap Screen Recorder to launch it. In the settings, select System Sounds as your sound source.
2. Open YouTube Music and set the playback quality. Tap the Record button, play the music, and stop it when the track ends.
3. Open the recorded video in CapCut and add it to a new project. Tap the clip, select Extract Audio, and delete the video layer, leaving only the audio track.
Using your phone’s built-in recorder is a convenient backup method. It lets you still capture and use YouTube audio in CapCut wherever you are. To enhance video accessibility, you can also add subtitles to YouTube videos in CapCut.
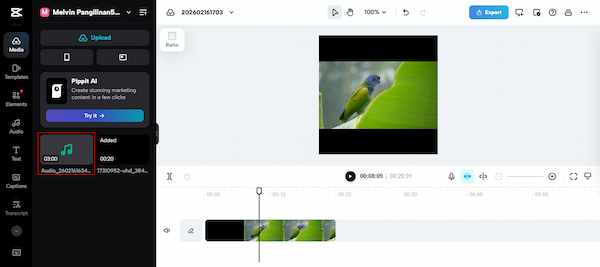
How to Import Your Recorded Audio into the CapCut Timeline
After capturing clean audio from YouTube, the next step is adding it to your CapCut project for precise editing and synchronization. Because the recorder exports in CapCut-friendly formats like MP3, AAC, and WAV, importing is quick and seamless.
Here’s how to add audio from YouTube to CapCut:
1. GOpen CapCut and open your existing project or create a new one. In the Media tab, click Upload to import the recorded YouTube Music.
2. Drag the audio track to align with your footage. If needed, trim the beginning or end to remove silence. Adjust the volume levels and use fade-in/out for smoother transitions.
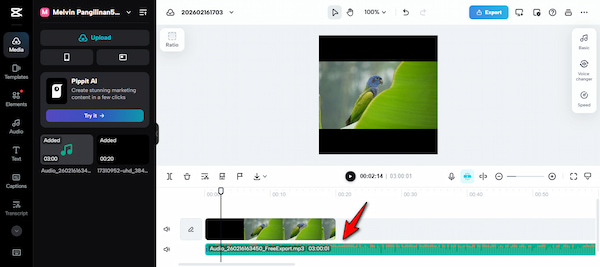
Importing audio recorded with AnyMP4 Screen Recorder ensures a smooth, high-quality editing workflow. It lets you maintain perfect timing and a professional sound in your CapCut projects. To speed up content production, use the AI YouTube Video Maker.
Comparison: AnyMP4 Screen Recorder vs. Built-in Tools
| AnyMP4 Screen Recorder |
VS |
Built-in Tools |
| Captures pure system sound directly from the sound card. |
Audio Source |
Records media audio. |
| Lossless |
Internal Audio Quality |
Compressed |
| Stable recording with hardware acceleration and long-session support. |
Reliability |
Stops unexpectedly due to notifications, calls, or battery limits. |
| No |
Edit Before Import |
Requires extracting audio first |
| MP3, M4A, WMA, AAC, OPUS, FLAC, and WAV |
Format Options |
MP4 video; audio must be extracted |
| Records internal audio only |
Noise Control |
Captures alerts and system sounds |
| Yes |
Task Scheduling |
No |
| Audio-only files save space |
Storage Efficiency |
Video recordings consume more storage |
Tips for Maintaining 320kbps Audio Quality
If you want your music to sound crisp and professional, preserving audio quality during recording and editing is essential. Follow these best practices to maintain true 320kbps clarity from capture to export.
- • Disable notifications, alerts, or other apps that may inject noise during recording.
- • Use a system sound recorder, such as AnyMP4 Screen Recorder, to capture audio directly from your sound card.
- • Always select 320kbps MP3 or WAV output when exporting from your recorder to preserve maximum fidelity.
- • Each format conversion can reduce quality; export once in your desired format rather than converting multiple times.
- • Ensure YouTube Music desktop runs smoothly and uses hardware acceleration to prevent glitches that affect the sound wave integrity.
FAQs about Adding Music to CapCut from YouTube
Q: Will the screen recorder capture my voice, too?
A: Yes, it can, but only if you enable the microphone input. Most screen recorders, including AnyMP4, allow you to toggle System Sound and Microphone independently. By default, capturing System Sound records only the internal audio from your computer.
Q: Is recording YouTube audio better than downloading it?
A: In many cases, yes. Recording audio via a system sound recorder avoids unreliable, ad-heavy, or unsafe converters. It preserves the full quality of the track and prevents broken downloads from corrupted or blocked URLs.
Q: Can I use this for CapCut Desktop?
A: Any audio recorded with a desktop screen recorder, saved in formats like MP3, AAC, or WAV, is fully compatible with CapCut Desktop. You can import the file directly and edit it just like any other audio clip.
Conclusion
That’s how to add music to CapCut from YouTube! With direct capture from a reliable screen recorder, you can achieve flawless, crisp audio that keeps your creative vision intact. This method elevates your creative workflow, giving your videos a professional edge without relying on unstable converters or low-quality downloads.
Stop wasting time with broken links and low-quality converters. By using AnyMP4 Screen Recorder, you take total control over your audio. Whether it's a cinematic score or a trending soundbite, capturing it directly from the source ensures your CapCut projects sound as crisp as they look. Ready to elevate your edits?