Image noise is a type of unwanted detail in an image that causes visual obstruction to the subject through graining, discolored pixels, and digital scratches in the image foreground. Because of these, photos with too much noise can be described as grainy or gritty which can be good effects in some designs. Unfortunately, too much image noise could prevent the main subject of an image from popping, and this effect has the potential to make the photos look digitally dirty. In this article, we will explore three software that can be used to denoise images. These options vary from online tools to traditional editing software. We will also define what are the different types of image noise and how to identify if your image noise is too much.
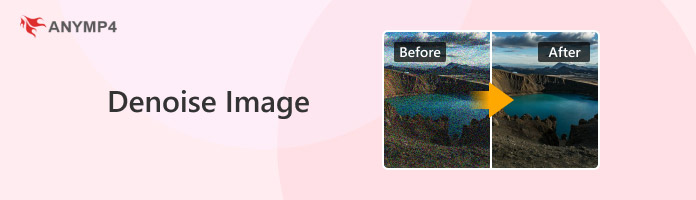

Although image noise is very similar to image graining, their source is entirely different, and this is what differentiates one from the other. Primarily, image noise is caused by digital effects such as problems in the camera lens or any form of file corruption that might produce discolored pixels. On the other hand, image graining is often caused by the environment in which the image has been taken. This effect commonly occurs in dimly lit areas and while using camera flash. Unlike image noise, graining is natural and often fits the aesthetic that the picture was supposed to capture.
Despite their differences, misidentifying image noise and graining is fairly common, and they are usually interchangeable. It also does not help that both effects affect the grittiness of an image and its general visual cleanliness.
When it comes to image noise, three common patterns usually appear on images. These are gaussian, salt and pepper, and speckles. First, gaussian noise is the type of image obstruction that affects the entire photograph. As a visualizer, this is similar to a poor television signal. Next, salt and pepper noise are often large bits of graining in an image that is commonly black and white; thus, the name. This type of image noise is usually the most distracting. Finally, speckle noises are noise patterns that are localized in one part of the image. These are often circular and only occupy a part of an image.
If you are looking for a reliable tool to do image denoising online, look no further than AnyMP4 Image Upscaler Online. This online image enhancer software was designed to enhance the quality of images by improving small details present in an image, such as texture, colors, lines, edges, and image noise. This makes the tool an ideal option to make sure that image quality will be top-notch and that too much noise and graining will be fixed.
On top of being able to enhance images all the way to the smaller details, this online tool is also designed to make image upscaling simple and highly accessible. This is because the software was designed to automatically apply image enhancement to images that are uploaded to it using advanced AI technology.
To learn how to use the software as an AI image denoiser, please follow our provided guide below.
1.Open AnyMP4 Image Upscaler Online and upload the image that you want to enhance using the Upload Photo button. You can also click and drag the photo that you will be enhancing into the upload box. Wait for the image uploading process to finish.
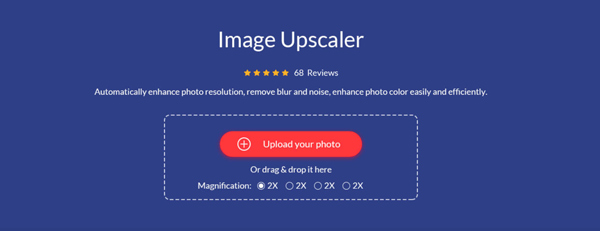
2.Once the image has been added, simply choose the magnification or upscaling option that you want to use. You can choose between 2X (SD), 4X (HD), 6X(SHD), and 8X (UHD).
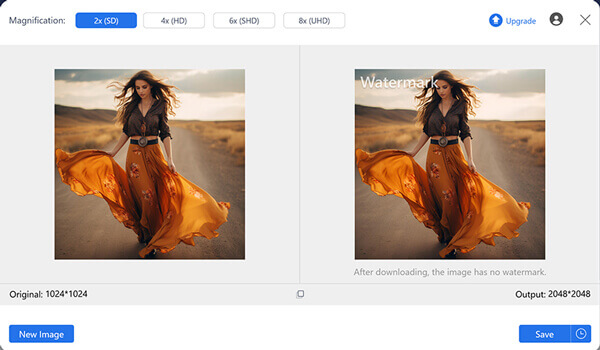
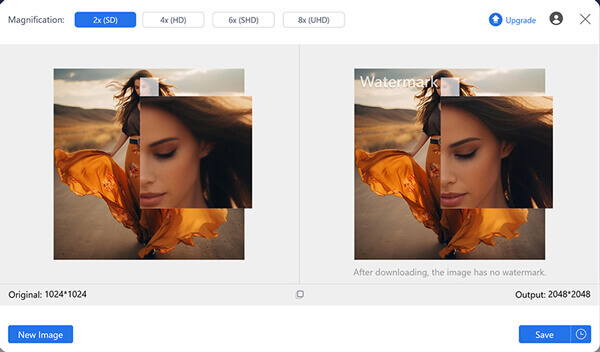
3.When the upscaling option has been applied, you can zoom into the image and preview it using your cursor. Otherwise, directly click on Save to download the image back onto your device.
Among the software present in this article, using an online image upscaling tool such as AnyMP4 Image Upscaler Online is one of the most, if not the easiest, photo denoiser options.
When looking for a reliable image editor software, Adobe Photoshop will always be a good option. This is still true when it comes to applying basic image enhancement, such as reducing photograph noise and increasing image resolution. Fortunately, Adobe has designed a dedicated Filter section in Photoshop which will be the main tool that we will use in the denoiser guide about the software below.
Simply follow this three-step guide to learn how to denoise images in Photoshop.
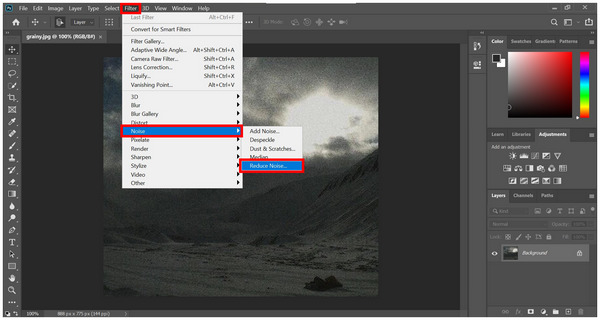
1.Open the image that you want to denoise in Photoshop. Then, click on the Filter tab, hover to Noise, and click on Reduce Noise.
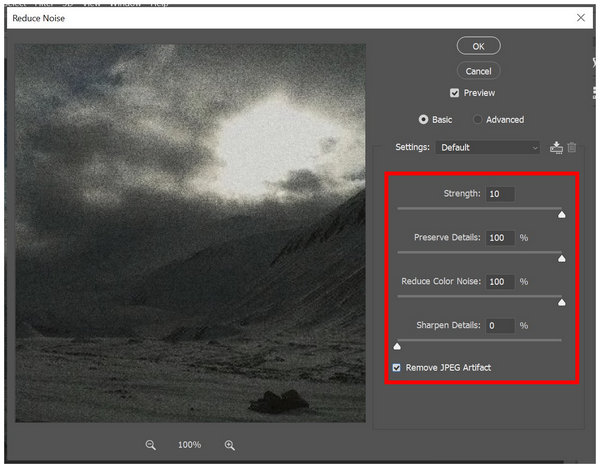
2.In the Reduce Noise menu, adjust the Strength, Preserve Details, Reduce Color Noise, and Sharpen Details according to your liking. You can click on the image to preview its original appearance.
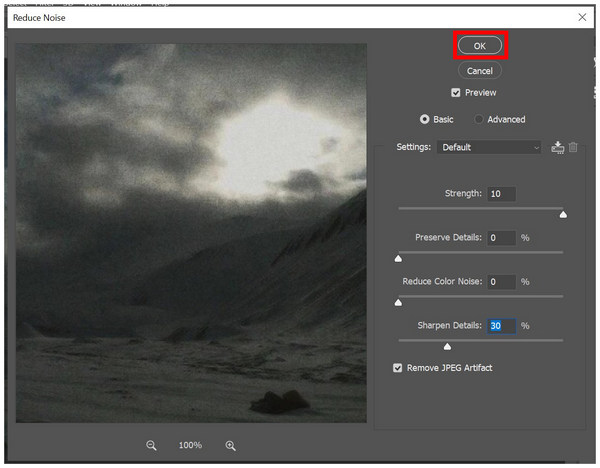
3.Once you are satisfied with the noise reduction that you applied, click on OK to save the settings that you have applied.
Although Photoshop might be hard to learn, adjusting basic elements such as image noise is, fortunately, simple to do in the software. All you need to learn is to find the right balance between the adjustment settings.
Originally developed as an open-source program to compete with the more expensive Adobe Photoshop software, GIMP has improved over time to become a reliable photo editing software. In fact, the tool is significantly better than Photoshop when it comes to improving the details of images that have too much noise since GIMP’s option is way easier to do.
To learn how to use GIMP for image noise reduction, two simple steps will be enough to do the job.
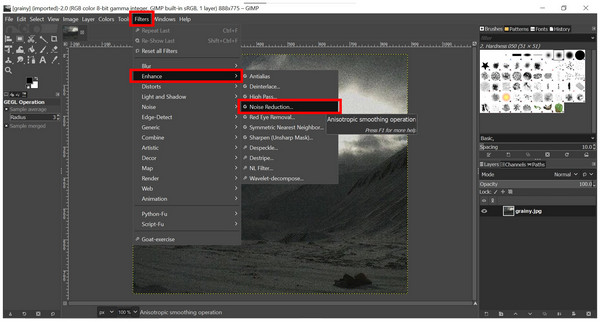
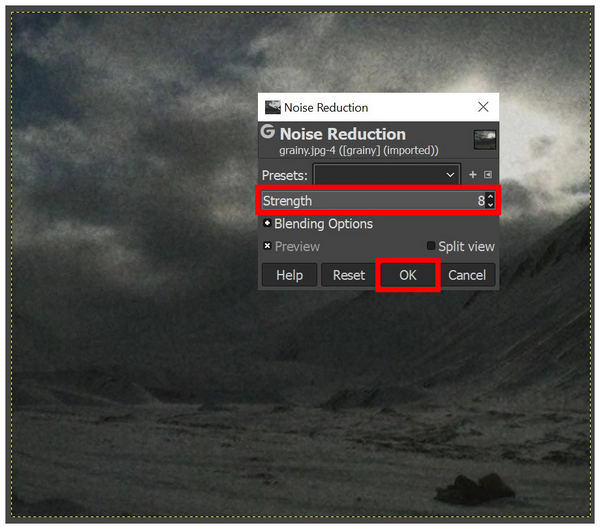
1.Open GIMP and add the file that you want to denoise. Once it has been added, select the Filters tab, hover on Enhance, and click on Noise Reduction.
2.In the Noise Reduction menu, simply adjust the Strength bar to modify the intensity of noise reduction. Click on OK once you are done.
Since GIMP is a direct competitor of Adobe Photoshop, their developer managed to get an advantage when it comes to ease of use in terms of noise reduction. This makes the tool a good option for users looking for a free image-denoising program.
If you are using traditional image editor software, learning how to balance your adjustments, such as the intensity of noise reduction and preserving original image detail, is very important. This is even more critical for users of Adobe Photoshop where too much adjustment may cause unnecessary changes. Because of its complexity, new editors should try using online photo editors first.
Since noise reduction settings usually involve reducing the sharpness of the image, learning the right balance to preserve the right amount of sharpness while still clearing a significant amount of image noise is very important. Unfortunately, this skill is quite tricky to learn and requires a little practice.
Avoiding image noise can be done by basic adjustments such as reducing the ISO settings of the camera that you will use. If possible, setting the ISO to the lowest possible setting should be a good move. For more practical solutions, using a noise reduction filter is also a good option for post-processing videos with strong noise or graining.
Can I completely remove noise from an image?
Yes, you can. Reducing the ISO settings of your camera should be enough to reduce noise. However, using proper lighting will always be the best option to ensure good image texture overall.
How can I denoise a photo without losing detail?
You have to find the right balance between noise reduction and image sharpness. Unfortunately, this skill takes time to develop and is quite challenging at first. The unique condition of photos can also complicate things.
What is the best software for image denoising?
Using an automatic image upscaler will always be a good option to apply general image enhancement. This involves reducing image noise. In that case, AnyMP4 Image Upscaler Online should be one of the options that you should consider.
Can I use my smartphone to denoise images?
Yes, you can. There are image editing applications that are available for mobile devices. Pixelcut, Picsart, and Photoshop Express are some examples.
How can I prevent noise from appearing in my photos?
Using proper lighting will always be the answer to avoid unwanted effects in images. Additionally, learning how to adjust the settings of the camera should also work. As a basic tip, make sure to set your ISO settings all the way down to prevent noise and graining.
Now that we have provided you with a complete guide regarding how to fix and avoid image noise, we hope that this article has provided you with solutions to make sure that this gritty effect will not show up in your future photographs.
To help other amateur photographers struggling with too much image noise, please share this article online.
 Posted by Mark Cristobal to Edit Photo
More readings
 Full Guide to Brighten and Sharpen Blurry Image in Photoshop
Discover these easy steps to sharpen an image using Photoshop efficiently. Learn about the software's extra features and its best alternative tool.
 Top 3 AI Picture Retouching Tools to Enhance Old Photos
Restoring your old photos is a possible thing to do these days. Enhance those old vintage photos of yours to preserve memories. Discover these easy steps.
 Top 5 AI Photo Upscaler Tools to Enhance Image Quality
Enhancing the quality of your images is the best way to improve your photos. Discover how to fix bad image quality by following the steps of the tools.
 Top 3 Ways to Change the Resolution of Photos on iPhone
Learning to increase the resolution of an image on an iPhone is an excellent way to have better photos. Discover the features and their easy-to-follow steps.