Trimming audio is the process of cutting or adjusting the length of a sound clip. It removes unwanted sections, silence, or parts that don’t fit your project. Trimming helps you refine your audio so it perfectly matches your video’s timing and flow. One of the easiest tools to trim audio is iMovie, which offers simple features for cutting and adjusting audio clips. This post will teach you how to trim sound in iMovie effectively. This way, you can manage your audio to complement your video perfectly. By the end of this post, you will learn how to trim, split, and even fade audio.

Why trim audio in iMovie? Trimming sound removes unwanted gaps, noises, or mistakes. It tightens timing, removes distractions, and improves the professionalism of your video. It also helps you manage audio levels, transitions, and create smooth fade-ins/fade-outs that make the soundtrack feel intentional. In short, smart trimming turns raw audio into a clean soundtrack.
iMovie on Mac is not just for video editing; you can also edit audio here. Trimming your audio clips helps refine your project and remove unnecessary parts. What makes iMovie convenient is that you can adjust audio clips using a menu bar or quick shortcuts.
Here’s how to trim audio in iMovie on Mac:
1. To trim sound in iMovie at a specific point, you can trim it directly to the playhead’s position. Move the playhead to the spot where you want to trim the audio.
2. After moving the playhead, do one of the following methods:
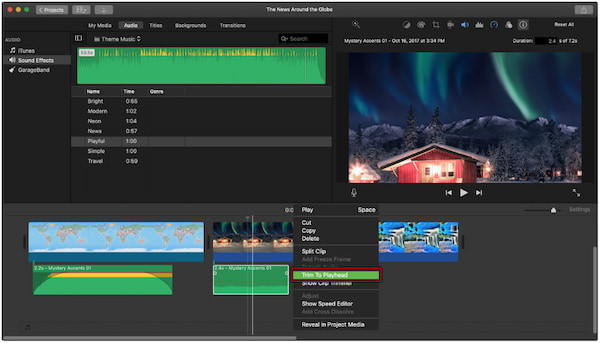
This will instantly cut the audio to match the playhead’s exact position.
Besides trimming, you can fade audio in iMovie to smooth your audio transitions. Simply select your audio clip, then drag the fade handle at the beginning or end of the clip. As you drag, arcs appear to show how much of the clip will fade in or out.
iMovie on iPhone/iPad lacks the same audio editing tools found in the Mac version. Still, you can remove unwanted audio segments in iMovie on iPhone/iPad. If you’re working on a mobile project, you can trim audio clips with a few taps.
Here’s how to trim audio in iMovie on iPhone/iPad:
1. On iOS, trimming audio clips is done by dragging their edges in the Timeline. Open your project in iMovie on iPhone or iPad. Tap the audio clip you want to trim in the Timeline.
2. Drag either the beginning or end handle of the clip to the left or right. Drag left to shorten the audio or drag right to extend the audio.

You can modify the playback speed of your audio. Select the audio clip in the Timeline and tap the Speed button. Drag the slider toward the Tortoise to slow it down or toward the Hare to speed it up.
iMovie works fine for simple audio cuts, but falls short if you need flexible trimming. It cannot split and trim audio clips in iMovie into multiple segments at once. If you are looking for an alternative, AnyMP4 Video Converter Ultimate is an excellent tool. It offers a professional video trimmer, which can also be used to manage audio clips. With it, you can split audio into multiple segments, add or delete segments, trim audio, and apply fade-in and fade-out effects.
Why Choose AnyMP4 Video Converter Ultimate:
Here’s how to trim sound in iMovie alternative:
1. Get started by obtaining the free download of AnyMP4 Video Converter Ultimate. Install the software on your system and allow the installation process to complete. Once finished, open the software to start the audio trimming process.
Secure Download
Secure Download
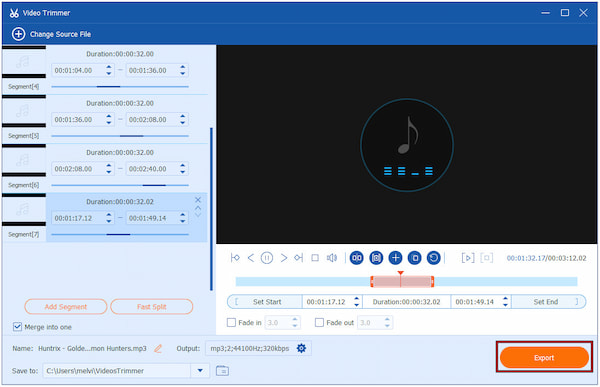
2. As soon as it starts, the Converter tab will open by default. Proceed to the More Tools tab and select the Video Trimmer tool. In the pop-up window, click the big + button to import the audio file you want to trim.
3. Manually drag and set the audio’s start and end points to trim the clip. To split a long audio file, click the Fast Split button to divide it into several segments. You can also add or delete segments to keep only the portions you need.

Creative Tip: Apply Fade in or Fade out effects to make your audio smoother. You can also adjust how long the fade lasts for smooth and professional-sounding transitions.
4. Once everything is set, click the Output selector to configure the final audio settings. You can change the format, encoder, sample rate, channel, and bitrate. Finally, click Export to generate your trimmed audio file.
While you can edit sound in iMovie, the tools for trimming and editing audio are limited. Fortunately, AnyMP4 Video Converter Ultimate’s video trimmer includes professional-level tools for trimming and editing audio. It allows you to cut audio precisely, split long files, manage multiple segments, and even apply fade-in and fade-out effects.
Can I trim sound clips in the iMovie app on iPhone or iPad?
Yes, you can trim sound clips in the iMovie app on iPhone or iPad. However, the editing options are more limited compared to iMovie on Mac.
What are the steps to fade audio in or out when trimming in iMovie?
To fade audio in or out of a clip in iMovie, you need to use the fade handles. Simply drag the fade handles inward to create a fade effect.
Is there a way to batch-trim multiple audio clips in iMovie?
No, iMovie does not currently support batch-trimming multiple audio clips. Each clip must be trimmed individually in the Timeline using the trim handles.
Mastering how to trim sound in iMovie lets you make your videos sound professional and well-timed. While iMovie works well for basic audio edits, you may need more advanced features for precise trimming. For a more powerful alternative, AnyMP4 Video Converter Ultimate is worth trying. It offers advanced audio trimming, fast splitting, customizable fade effects, and support for multiple formats.
 Updated by Mark Cristobal to Edit Audio
Related Articles
 How to Trim Sound on TikTok - The Ultimate Guide on Audio Editing
When you are not satisfied with a music prelude that's too long, click here to learn 5 ways to trim sound on TikTok and delete unwanted parts easily.
 MKV Cutter - How to Trim MKV File on Mac and Windows PC
What is the best MKV cutter? How do I trim an MKV file? How to cut MKV files for free? Get 3 MKV cutters to split or trim MKV files on Mac and Windows computer.
 How to Compress a Video with iMovie and Its Alternatives on Computer
If you need to compress a video on Mac, you can use the built-in video editing tool on Mac - iMovie. Check this post to downsize videos with iMovie on Mac.
 How to Add Subtitles in iMovie on Mac and iPhone
Want to learn how to make subtitles on iMovie? This article is made for you since we will discuss five simple steps to learn how to use iMovie to add subtitles.