When it comes to music production, one of the most essential skills are audio trimming and cutting which involves removing a specific section of the media. This is very important since you will be able to cut unwanted portions in the file which is very prominent especially in audio production. With that in mind, this article aims to help our readers learn how to cut an audio file on a Mac computer using multiple options available in macOS. We will explore the best options using the built-in QuickTime player, using a third-party multimedia tool, as well as an online-based media editing software.
Before choosing the Mac audio cutter of your choice, you have to learn the most common reasons why cutting or triming audio is important. As such, we have provided three of the most usual situations where you need to trim your audio file.
You have to remove unwanted parts of the audio first to make sure that it will sound great once you use it for personal projects. Some unwanted sections are usually in the start or the end of the media.
Aside from unwanted sections, you have to learn to trim unimportant parts as well. These may include too many guitar riffs, notes that are out of place, or background vocals that do not blend well with the main audio. These are all essential to learn if you want to know how to cut audio files on Mac without quality loss.
Finally, the most common reason why learning how to cut audio on Mac is important is for users to easily cut down background noise that may interfere with the current recording. This is more important for users with no access to a proper studio.
Best Used For: Basic audio cutting for casual and personal needs.
When it comes to basic media editing, QuickTime Player is good enough for most Mac users. This is because you can easily cut MP3 files on Mac using QuickTime Player using the basic video editing options in it.
Unfortunately, since QuickTime Player was originally developed to only be a media player software, its editing tools are limited and more on the basic side. This includes the video trimmer feature which only offers trimming sliders and lacks any accurate and more advanced option.
Despite its deficiencies, QuickTime Player still functions well if you are not sensitive with trimming accuracy. The software is still good enough for personal use.
To learn how to use the program, make sure to read our three-step guide about it below.
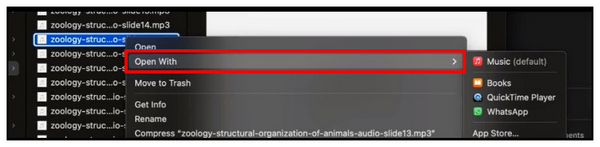
1. Find the audio file you want to edit in QuickTime Player, then right-click on it. Hover your cursor on Open With and then select QuickTime Player.
2. While the audio file is playing in QuickTime Player, use the keyboard combination Command + T to activate the trim tool in the program.
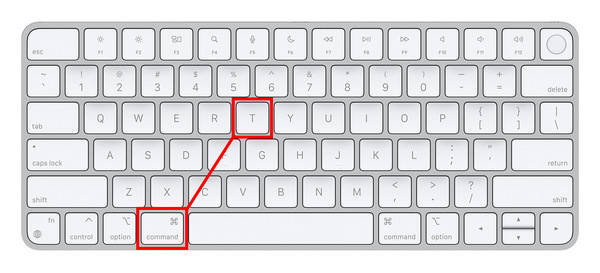
After pressing the keyboard combination, the audio file playback will have a yellow outline with the trimming bars on the start and end portion of the audio. Adjust these Trimming Bars to cut the audio file. Then, click on Trim to confirm your adjustment.

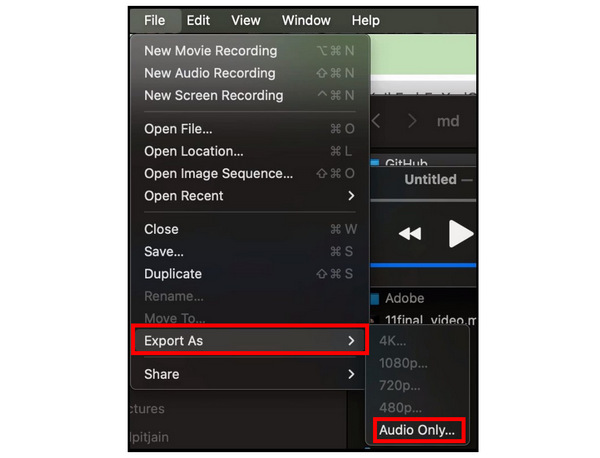
3. To save the trimmed audio, select File in the menu bar and move your cursor on Export As, select Audio Only and choose among the available audio formats how you want the audio to be saved.
QuickTime Player is perhaps the most accessible trimming option since it is a built-in feature on Mac computers it can even be used to edit videos making QuickTime a good tool for cropping videos, trimming, and adding basic filters. However, beware of its limited editing options when using it to trim your videos. It is much more recommended to use more advanced options for editing projects more demanding than personal reasons.
What users say:
Since QuickTime is the most accessible audio cutting tool for Mac computers, it is also one of the most used. Unfortunately, most of its users only use the tool for basic audio cutting since it lacks accurate trimming to specific portions of the video. The reliance on trimming bars alone make its accuracy a hit or miss.
Best Used For: Accurately trimming audio and adding smooth fade-in/out transition.
Due to the limited audio trimming features of QuickTime, relying on third-party multimedia option is the wiser choice if you plan on editing audio files in your Mac computer. In this case, using AnyMP4 Video Converter Ultimate could be the perfect option for you.
Available to both Windows and Mac operating systems, this multimedia software is equipped with a professional-grade Video Trimmer tool that can also read and edit audio files with no problem. Using the software, you have the option to fast split long audios into several segments into an average time. You can also delete specific segments of the audio as well as apply fade-in and fade-out effects to keep the edited audio seamless.
Moreover, the software has wide format support for over 500+ media files including popular audio file types like MP3, AAC, AC3, WAV, and FLAC. These audio media all have customizable parameters like format, encoder, audio channel, and sample rate.
For users who want to apply more advanced audio editing, they may choose to do so using other multimedia tools in the software such as their Audio Compressor, Audio Noise Remover, and Volume Booster features.
With the features of AnyMP4 Video Converter Ultimate now discussed, let us now proceed to the detailed guide on using its Video Trimmer tool which is also optimized for audio editing.
For an easier time learning how to use the program, make sure to read its three-step guide below,
Secure Download
Secure Download
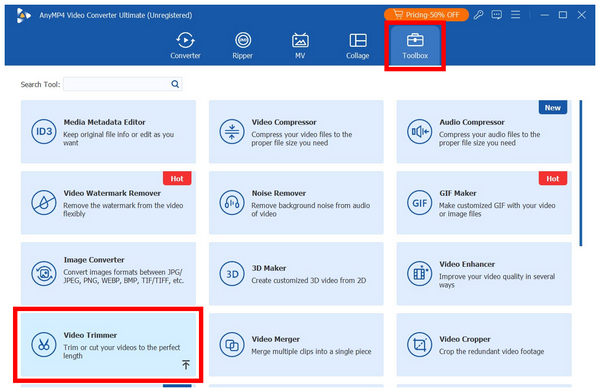
1. Open AnyMP4 Video Converter Ultimate then select the Toolbox tab from its main menu. Then, select Video Trimmer among the available tools.
Select the Add button in the pop-up that will appear to import the audio you want to cut.
2. Once your audio has been imported to the Video Trimmer tool, you have two options to cut it. You may use the Trimming Sliders at the start and end portion of the audio preview. On the other hand, you may change the time in the Set Start and Set End value to set where the audio cut will begin and stop. For a smoother cutting transition, you may enable the Fade In and Fade Out effects.

3. With the audio now trimmed based on your preferences, you may now click on Export to produce the audio that is now cut to your desired length.

Once your video has been exported, AnyMP4 Video Converter Ultimate guarantees that your audio quality is maintained to the original. Media quality preservation is another strong point of the software aside from its highly practical editing tools and superb ease of use.
What users say:
The versatility and ease of use of AnyMP4 Video Converter Ultimate are what makes it one of the best options for users who are still learning how to cut audio and other media files. Fortunately, all editing features are made to be simple in the program. These not only includes the tools in its toolbox, but also the main offerings of the software.
Best Used For: Quickly cutting audio files in short notice or during emergencies.
Since online editing tools are only browser-based and are not connected with the operating system of your computer, they work great as one of the best free audio cutters for Mac. Among these tools, Zight Online Audio Editor is a safe option.
Unlike other online software, Zight Online is not plagued by ads and does not require logging in to use their services. The software is as free as you can get when it comes to online options. Making it a good audio editor tool that can cut and merge songs online.
Despite this huge benefit and advantage, Zight Online also suffers from an inaccurate video trimmer sliders similar to QuickTime. Fortunately, it has a duration based cutter where the minutes and seconds are highly customizable.
However, be careful when using the software for more advanced usage since online tools are infamous for watermarks and quality reduction. Make sure to review the whole audio before using it as an editing asset.
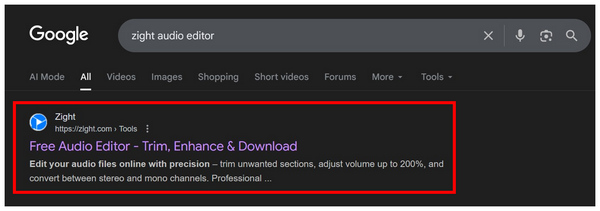
1. Search for Zight Audio Editor in your chosen search engine, then select Zight’s link.
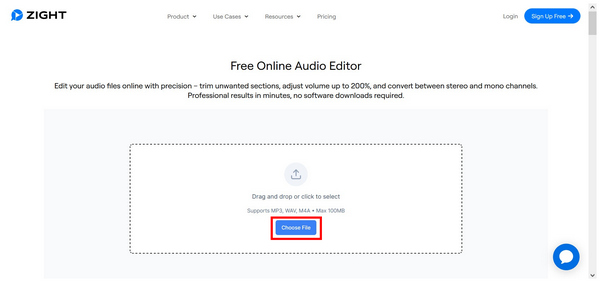
In Zight Audio Editor’s website, click on Choose File button or click-and-drag the audio file you want to edit to the upload box. Wait for the video to be uploaded.
2. Once the audio is uploaded in the editor, you may click any section of the playback to select it as the trim point.

For more accurate editing, scroll down and adjust the sliding bars or the Start Time and End Time value in the Trim Audio section of the online tool.

3. With the audio now trimmed, scroll down further to find the Download Edited Audio tab. Click on the Download button to save the edited audio on your computer.

Zight Online Audio Editor surprisingly works well for an online software. This is a welcome addition for users in critical situations or for those looking for one time video trimming. On the other hand, we greatly advice those who plan on editing professional grade videos to avoid browser-based tools.
What users say:
Zight is good enough especially when compared to other online tools. This was made possible by the presence of time-based trimming in the browser tool. It also helps that the software does not require any login requirements and provides other editing options like video cutter and video trimmer. However, be mindful when using the tool since it noticeably decreases the audio quality of the files edited in it.
With the best options to cut audio files on Mac now discussed, we hope that the versatility of the software we have provided is enough to ensure that your video trimming needs are met. If you are still unsure which among them is the most reliable option, keep in mind that the limitations of QuickTime and Zight Online keeps them from being a reliable professional video trimmer. As such, we highly recommend AnyMP4 Video Converter Ultimate which you can download using the link provided below.
Secure Download
Secure Download
 Updated by Mark Cristobal to Edit Video
More readings
 4 Best Method on How to Cut MP3 Without Quality Loss
Want to trim MP3 files and remove unwanted parts? Here are 4 efficient methods about how to cut an MP3 file on your computer, smartphone, and online.
 4 Efficient Methods to Cut and Merge Songs Online for Free
Want to mix songs online for free? Learn more about the 4 most popular online music cutters to trim and merge songs online for free from the article.
 2 Effective Ways to Check the Audio Bitrate on Mac
Knowing the audio stand is a must, especially if you are in the media field. Let's see how we can check the bitrate of audio in Mac to avoid low-quality sound.
 3 Easy Ways to Trim a Video on MacBook Quickly
Looking for the best method to trim a video clip on Mac? You are lucky since this article shows the easiest methods and the concrete guide.