The term bitrate refers to the quantity of data conveyed in audio. In general, greater bitrates result in better audio quality. The Bitrate will determine audio integrity. According to some of the producers and engineers, We may have the best-sounding recording ever made, but it would sound worse on the other end if you played it at a low bitrate. Understanding bitrate is critical for audio recording, production, and distribution. To understand Bitrate, you must first understand what an audio file is and what distinct sorts of audio files exist.
In accordance with that, through this article, we will help you how to check the Bitrate on a Mac computer. We will give you an amazon tool to use and the process in terms of the command line. For that, please ensure you will read it until the last so that you will not find amiss any information you need for your audio files.

AnyMP4 Video Converter Ultimate is an excellent tool for different tasks for our audio and video files. As its main features, users are using it to convert their media files like audio and videos into a new media format.
AnyMP4 Video Converter Ultimate is a tool that we can use to check the Bitrate of our audio using the Mac computer. However, it is also compatible with Windows. From that, by knowing the elements of our audio, we can now evaluate if the audio is low or high in quality.
To view the audio bitrate on Mac, here are the steps.
1. We need to get the fantastic AnyMP4 Video Converter Ultimate. We can download it using the download tabs below. Then install it on our Mac computers as we proceed.
Secure Download
Secure Download
2. After the installation process, we can evaluate the software. By default, you will go to the Converter tab.
Drag and drop the audio files into this software that you want to check the bitrate. Surely, you can use the Add Files button to import the audio files or folder into this tool
Then click the View Media Info option next to the audio file, and you will see the audio bitrate, encoder, sample rate, channel under Audio Stream.
Others know of AnyMP4 Video Converter Ultimate as a compressor to minimize their audio file size. From those key features, we can also say that this converter possesses the ability to check the elements within our media files.
Furthermore, Then, additionally, we can see if it meets the standards for uploading or other tasks. As we know, the higher the bitrate, the larger the audio file size. If you find the bitrate is not what you need, and want to compress the audio file, we can follow this software to compress your audio file.
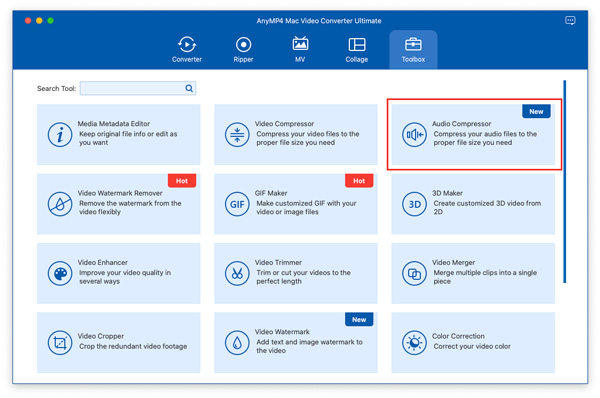
Then let us proceed with its Toolbox, located in the upper corner of the interface. That feature will show different tools from a new tab on the screen. From the list of tools, please choose the Audio Compressor option.
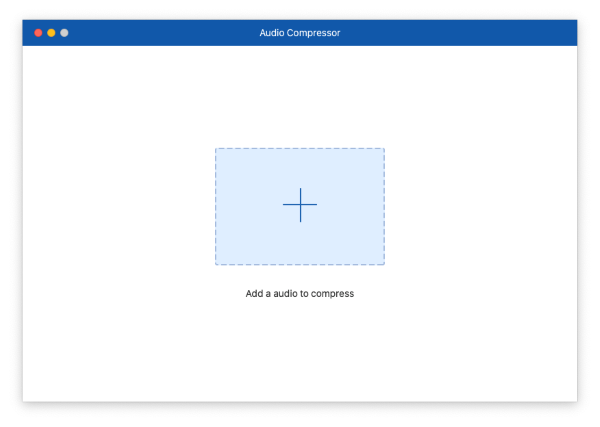
In this step, the tool will require you to embed the audio you want to evaluate. Kindly hit the Add button from the center portion of the screen. This will enable a file tab to exist where you can select and get the audio from your Mac storage.
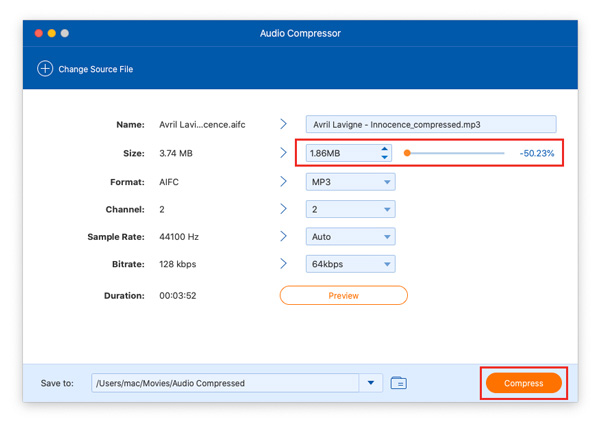
From the editing timeline of the tool, please see your audio file information from a small tab existing on the screen. From this tab, we can see the name of our audio, together with the Size, Format, Resolution, Duration, and Bitrate. All of these elements are available for modification if needed. Remember, there is also a button for previewing the files for a check-up.
If modification was done on your audio Bitrate, we need to click the Compress button to finalize and get the result for our audio.
That is the fantastic AnyMP4 Video Converter Ultimate for checking the elements of our audio, like the Bitrate. We can also see how flexible the tools are in changing the audio bitrate, viewing it, even compressing it. No wonder AnyMP4 Video Converter Ultimate is a fantastic tool for any process for our media files. Grab it now and take advantage of all of the features it possesses.
There is also another way to follow in terms of checking the audio Bitrate in our Mac computer. That is through the use of the command line. As an overview, this procedure is more complicated than the first method because the process uses a command to know the details of our audio files. In that case, we need to be familiarized with the procedure with every detail and step so that we will not commit mistakes with the process. Mac users may rapidly determine the Bitrate of any audio file using the OS X command line.
1. To begin, open Terminal (through /Applications/Utilities/ or Spotlight) and then type the following command, pointing to a filename, to determine the bit rate for that audio file, afinfo filename |grep "bit rate".
2. After that, the command will output a bit rate of 320000 bits per second.

3. The bit rate is shown in bits per second but in full notation, so 320000 equals 320kbps, 192000 equals 192kbps, and so on. Using this on a file titled "thunderstorms.m4a," for example, would result in the following, $ afinfo /Users/Paul/Downloads/thunderstorms.m4a | grep "bit rate" bit rate: 192000 bits. The Bitrate of the m4a audio file in this example is 192kbps.
The afinfo command is built into Mac OS X and, when used without the grep command, will return extended information about audio files, as documented here. It can be a handy tool for many, particularly audio fans and professionals.
1. What is a command line for seeing the Bitrate of audio?
The command line is a horizontal line on a user interface that allows the user to enter commands. A command prompt is typically located on the left side of a screen, together with a blank line going to the right where commands are input. Command line interfaces were once the most frequent sort of computer interface. It is one of the important commands that enable us to use whatever we want to use.
2. Can I check the audio bitrate on Windows?
On Windows, you can use a free tool called Pazera Free Audio Extractor to identify the Bitrate or frequency of an audio file, such as an MP3, or the audio in a video file, such as a MPEG or MP4. This tool features the sophisticated FFMPEG library and a user-friendly and speedy interface. In addition, we also have AnyMP4 Video Converter Ultimate, which can give all of those features with a more straightforward process, including viewing the audio bitrate.
3. What is the suggested audio bitrate for high-quality sound playback?
Size is essentially when it comes to audio Bitrate. The higher the number of kilobits per second, the better the sound quality. 320kbps is ideal for most general listening. Of course, CD-quality music with a bitrate of 1,411kbps sounds better. To select the appropriate audio Bitrate, you must first examine your requirements. If you find the bitrate takes more space on your device, and want to change it, you can use a bitrate converter to make it.
Those are the two effective ways we can use to know the Bitrate of our audio. We can see that AnyMP4 Video Converter Ultimate is very easy to utilize. It is a very smooth and user-friendly medium, unlike the Command-Line of a Mac OS device'. For that, we can say that AnyMP4 Video Converter Ultimate is the best tool to use in this process.
 Posted by Angelica Liwanag to Edit Audio
More readings
 3 ways to Make Low-Quality Audio Online and Offlin
If having high-quality audio becomes a problem for you, then you need this article. We will show the best 3 ways to reduce audio quality online and offline.
 5 Top-picks Music Compressors: Reduce Song Size
Compressors for music help the user maintain the correct file size of their audio. Here are the five best five compressing tools to make it possible easily.
 Does AirPlay Compress Audio? Answer and Tips Are Here
AirPlay is doing great in mirroring media files for Apple products like iOS or Mac. However, does AirPlay compress Audio when playing it? Let's see in this article.
 FLAC Audio Compression to Make Big FLAC File into Smaller
FLAC files come with larger file sizes compared with other formats. For that, we will discover the best audio FLAC compression methods. See here for more.