At a Glance:
To convert MIDI to MP3 with the best audio quality and data privacy, a dedicated desktop tool like NCH Switch Audio Converter is highly recommended for its stable offline batch processing. For a 100% free open-source alternative, VLC Media Player offers reliable local conversion. If you want to preserve the exact, authentic instrument sounds produced by your computer's native system synthesizer, using AnyMP4 Screen Recorder to capture the live system audio stream while playing the file via VLC Media Player is the most precise method.
Are you tired of the awful synthesized electronic sounds of generic online converters, slow upload speeds, and concerns about the privacy of your original MIDI files? Unlike standard audio formats, MIDI files are essentially digital sheet music—they contain performance data rather than actual sound waves. To turn this data into a rich, high-quality audio file, you need the right tools and rendering logic. In this guide, we will explore the absolute best ways to convert MIDI to MP3, leverage dedicated MIDI to MP3 converters, and ensure you get high-quality audio without compromising your data privacy.

How We Test
| Batch Processing | Conversion Speed | Max File Size | Best For | |
|---|---|---|---|---|
| NCH Switch Converter | 100% Local Offline (Zero IP Risk) | Ultra-Fast (Static local rendering) | Unlimited | Handles extensive nested directories |
| VLC Media Player | 100% Local Offline (Safe Engine) | Moderate (Standard stream rendering) | Unlimited | Tedious (Requires individual manual file setups) |
| AnyMP4 Screen Recorder | 100% Local Offline (Direct Internal Routing) | 1:1 Playback Speed (Real-time recording) | Unlimited | Manual (Requires tracking track length in real-time) |
When dealing with a massive library of vintage game tracks or your original musical compositions, uploading them to a third-party web server is a major intellectual property risk. NCH Switch Audio Converter is one of the most stable and trusted desktop solutions available. Operating entirely offline on your computer, it reads the MIDI score data and renders it locally. This ensures absolute data privacy and allows you to process extensive folders of files simultaneously using local hardware acceleration without web-based speed throttling.
1. Launch NCH Switch on your computer. When I first opened the interface, it felt a bit like software from the Windows 7 era, but it is incredibly responsive. Click the large green Add File(s) button on the top toolbar, or simply drag an entire folder of MIDI files directly into the blank main window.

2. Look at the bottom left corner for the Output Format dropdown menu. Click it, scroll down the alphabetical list, and select .mp3.
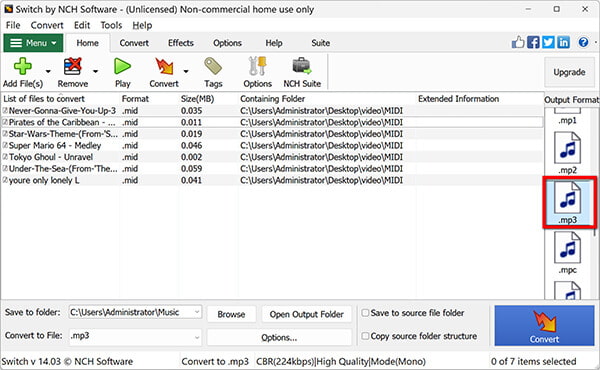
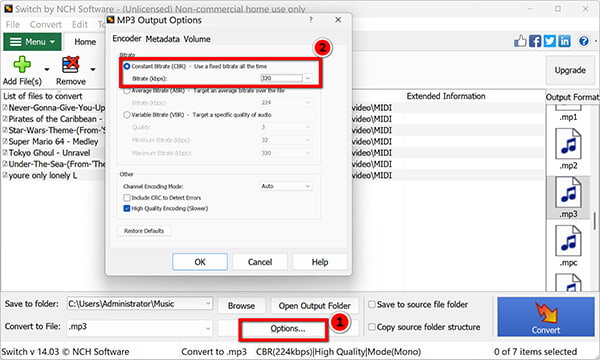
3. Immediately to the bottom of that output MP3, you can find Options…, and a small setup box will pop up.
Go to the Encoder options. I highly recommend changing the Bitrate settings here: set the "Bitrate Mode" to Constant Bitrate (CBR) and drag the slider all the way to 320 kbps. Leaving it at the default 128 kbps will make your brass and string tracks sound muddy. Click OK.
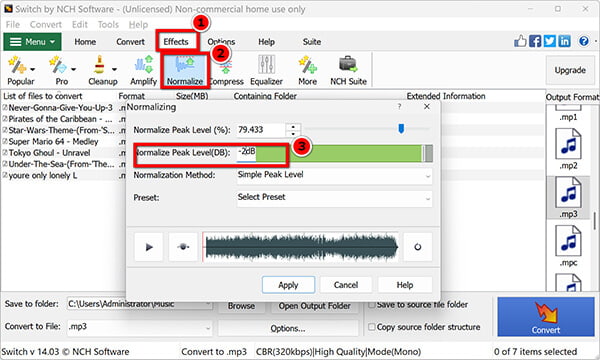
4. In the main toolbar, go to Effects or check the volume settings, and look for Normalize. Enable it, or manually drop the output volume gain by -2 dB. Many multi-track MIDIs have massive velocity layers that will easily redline and clip your final MP3 if rendered at full blast.
5. In the "Save to Folder" field at the bottom, click Browse to choose where your finished files go. Finally, hit the big Convert button in the bottom right corner. A progress bar will show up, and it usually takes less than three seconds per MIDI file when running locally.

What I Love:
Downsides:
VLC is globally recognized as a versatile modern media player, but it also houses a powerful, hidden local transcoding engine. If you want a completely free, open-source tool that handles MIDI conversion offline without ad pop-ups or file size paywalls, VLC's local conversion feature is an excellent choice.
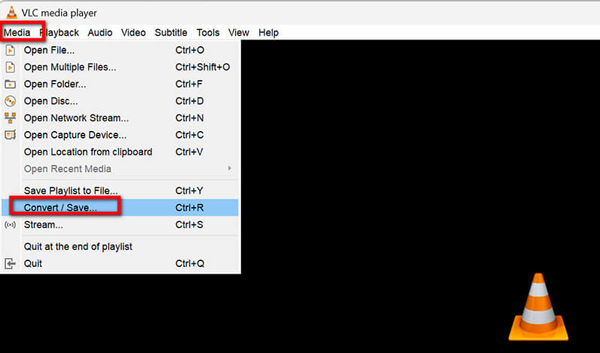
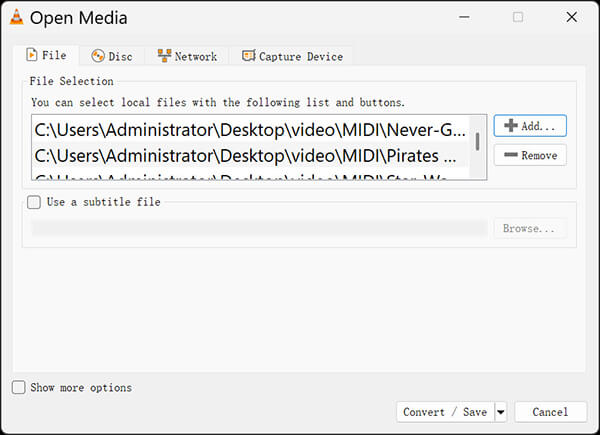
1. Open VLC Media Player. In the top menu bar, click Media and select Convert / Save (or just press Ctrl + R on your keyboard).
2. A "Open Media" window will appear. Click the Add... button on the right to browse and select your MIDI file. Once the file path appears in the list, click the Convert / Save button at the very bottom.
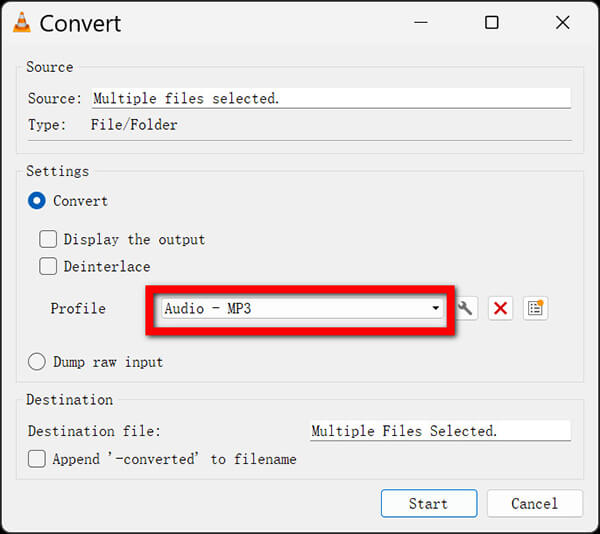
3. Now you will see the Convert settings box. Look for the Profile dropdown menu under the Settings section and select Audio - MP3.
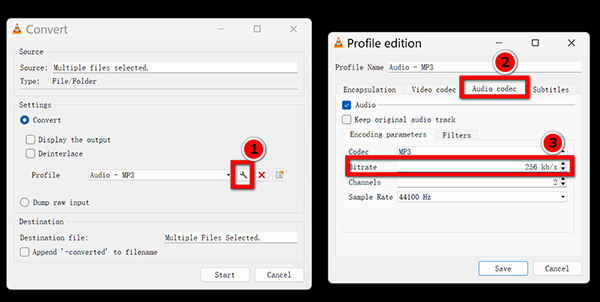
4. Click the small Wrench icon right next to the profile selection. Go to the Audio codec tab, change the Bitrate from its default setting to 320 kb/s, and set the Sample Rate to 44100 Hz. If you leave these default, the rendered MP3 will sound noticeably hollow. Click Save.
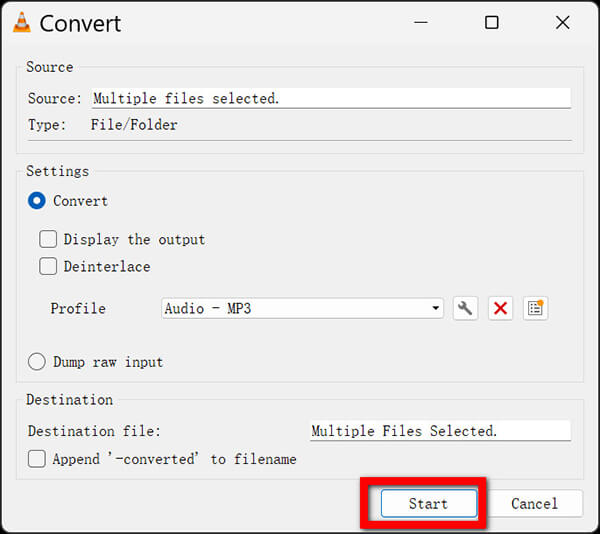
5. Click Browse next to "Destination file" to name your output file (make sure the extension ends in .mp3), then click Start. VLC will look like it is playing a video very quickly—this is just the progress bar showing the local rendering timeline.
Crucial Troubleshooting Tip (If VLC Throws a SoundFont Error):
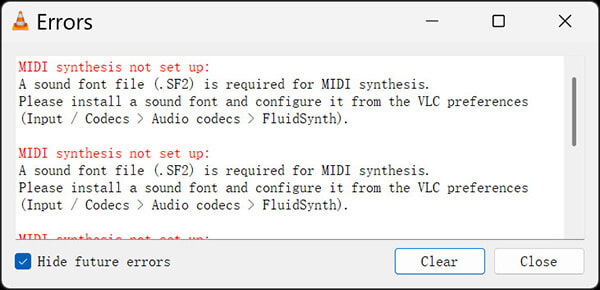
When I first hit "Start" on a fresh installation, VLC completely threw a fit and gave me an error saying: "SoundFont file (.SF2) is required for MIDI synthesis." This happens because VLC doesn't come with built-in instrument sounds.
How to fix it in 2 minutes:
1. Go online and download a free, lightweight SoundFont file (like FluidR3_GM.sf2 or GeneralUser_GS.sf2—just google them, they are completely free and safe). Save it anywhere on your hard drive.
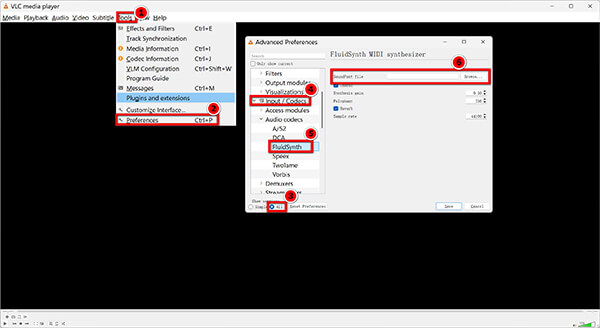
2. Inside VLC, click Tools ➔ Preferences in the top menu.
3. At the bottom left corner under "Show settings," click the All radio button to unlock advanced settings.
4. In the left-hand sidebar, navigate to Input / Codecs ➔ Audio codecs ➔ FluidSynth.
5. Click Browse next to the "Soundfont file" field, select the .sf2 file you just downloaded, and hit Save. Restart VLC, and the conversion will now run flawlessly without any errors.
What I Love:
Downsides:
Because MIDI is purely instruction data, the exact way it sounds depends heavily on the specific software synthesizer decoding it. If you want your final MP3 to sound exactly like what you hear when playing it on your computer—preserving the specific retro vibe or native instruments—the absolute best method is real-time audio capture using AnyMP4 Screen Recorder.
By playing the MIDI file through your computer's built-in player (like VLC Media Player, which automatically calls your sound card's native synthesizer) and capturing the digital stream directly from the system sound, you bypass generic converter rendering flaws entirely.
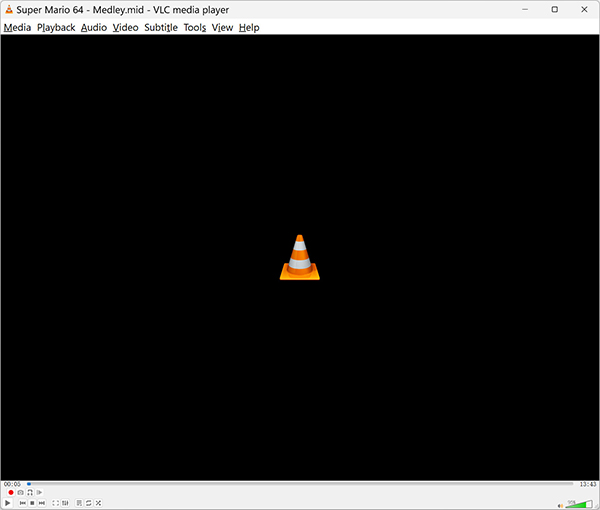
1. Double-click your MIDI file to open it in VLC Media Player (or your default OS player). Hit the Pause button immediately so it does not start playing yet, and drag the playback slider back to 00:00.
2. Free download, install and launch AnyMP4 Screen Recorder.
Secure Download
Secure Download
On the main dashboard, you will see a few big square options—click on Audio Recorder.

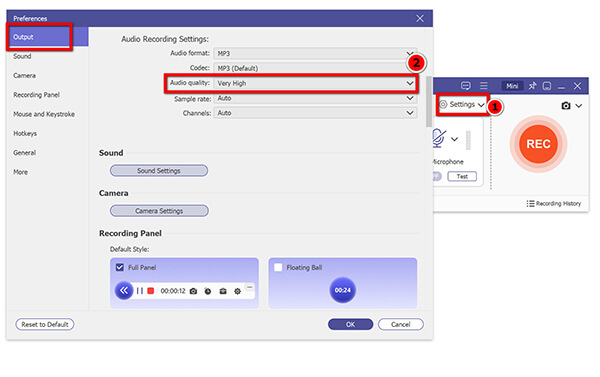
Note: Click the Settings dropdown option to find Output Setting option. Change the Audio Format to MP3 and Audio Quality to Very High. Click OK.
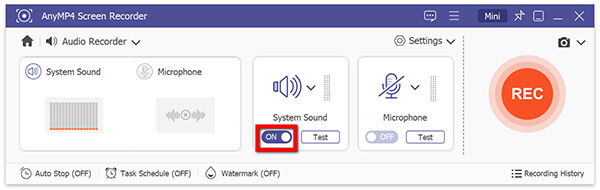
3. Inside the Audio Recorder interface, toggle the System Sound switch to ON. Next, make absolutely sure the Microphone switch is toggled to OFF. I learned this the hard way: if your microphone is left on, the software will record your mouse clicks and room background noise alongside the music.
4. Click the big red REC circle. The software will give you a 3-second countdown. As soon as the countdown hits zero, quickly jump over to VLC Media Player and press Play.
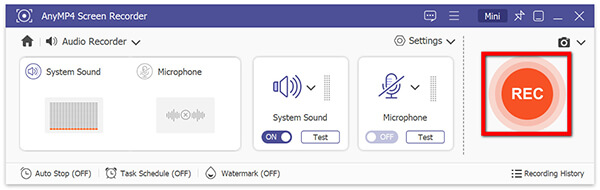
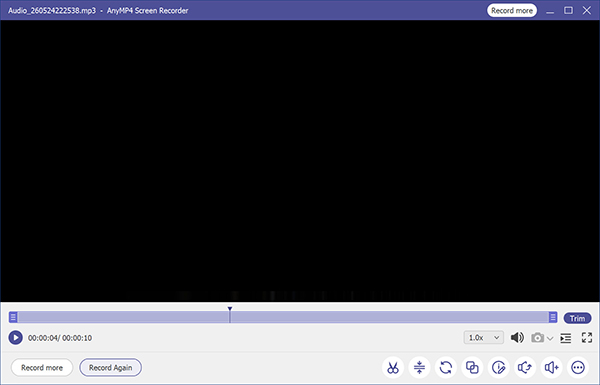
Let the song play all the way through. When it ends, click the red Square (Stop) button on the floating recording toolbar. A preview window will open up where you can use the built-in sliders to trim off any dead silence at the very beginning or end before clicking Save.
What I Love:
Downsides:
Depending on why you are handling MIDI files, the standard advice might not fit your specific goal. Here is how you should handle your files based on your profile:
Why does my converted MP3 sound different from the original MIDI file?
Since MIDI is just data instructions, its final sound depends entirely on the digital instruments and Soundfonts loaded into the playback system. When using standard conversion software, the tool replaces your system’s sound synthesizer with its own built-in instrument library. To keep it sounding exactly the same, use AnyMP4 Screen Recorder to capture your system's native playback audio stream.
Can I batch convert MIDI to MP3 without losing audio quality?
Yes. By utilizing a dedicated desktop application like NCH Switch Audio Converter, you can process entire folders simultaneously while locking the output profiles to high-fidelity parameters across all queued tracks locally on your computer.
Is it safe to use online converters for my original MIDI compositions?
Generally, it is not recommended for confidential or copyrighted material. Free web servers present data privacy blind spots regarding where your files are stored. For original creative work, stick to secure offline tools.
How can I adjust the bitrate when changing MIDI to MP3?
Before triggering the conversion or recording process, navigate to your software’s advanced audio encoder settings or profile configuration panel. Locate the Audio Bitrate option and manually select your preferred quality tier.
Can I convert an MP3 back into a MIDI file?
While polyphonic audio-to-MIDI tools exist, the process is highly imperfect. Converting data to audio (MIDI to MP3) is straightforward, but extracting separate, clean notation data out of a flat audio file (MP3 to MIDI) usually results in a chaotic file that requires extensive manual cleaning in a DAW.
To convert MIDI to MP3, there are various methods. If you need to batch process thousands of files seamlessly with local safety, NCH Switch Audio Converter is your workhorse. If you prefer a completely free open-source path, VLC Media Player gets the job done offline. However, if you demand absolute acoustic fidelity that mirrors exactly what you hear out of your speakers, utilizing an audio recorder via the system audio loopback method is the undisputed winner for accuracy.
To maximize the frequency spectrum and dynamic range retained after rendering, always configure your audio output settings to a 320kbps bitrate and 44.1 kHz sample rate prior to conversion or recording.
Secure Download
Secure Download
 Updated by Alice Thorne to Convert Audio
More readings
 Convert Video to MP3 with The Ultimate Way and Top 10 Online Ways
This article gives you the ideal ways of converting videos to MP3 with the best video to MP3 converter applications for Windows 10/8/7/XP and Mac OS.
 Top 5 Best Methods to Convert AMR to MP3 Online and Offline
What should you do to convert AMR to MP3? Go through the tutorial below to gain 5 best AMR to MP3 converter to solve the problem with ease.
 How to Convert M4A to MP3 in 2026 (High Quality & Batch)
Learn 5 fast ways to convert M4A to MP3 on Windows/Mac and Online. Video conversion with zero quality loss and custom bitrate (up to 320kbps).
 How to Use MP3 to Lossless Audio Converter: A Full Guide
Do you want to learn the difference between lossless audio vs MP3 files? This guide will provide answers about the basics of MP3 quality and lossless audio.