Video editing has become a favorite activity for many people these days. Among the many editing techniques, one of the most common and exciting is reversing a video. This effect is a favorite because it can make ordinary clips look creative, entertaining, and sometimes even magical. It turns simple actions like pouring water, jumping, or running into visually engaging moments. CapCut makes this effect easy to achieve with its built-in reverse feature. It gives you the flexibility to quickly reverse videos with just a few clicks or taps. This guide will teach you how to reverse a video on CapCut. We will guide you through the steps on both desktop and mobile versions. Our goal is to help you master this simple yet powerful effect, enabling you to make your edits truly stand out.
Can you reverse a video on CapCut? Yes!
CapCut can reverse videos and is available on desktop and mobile. CapCut is an all-in-one video editor for creating engaging content. Its Reverse tool lets you play a video backward. This feature is often used for creative storytelling, special effects, or social media edits.
On desktops, you can reverse videos by importing a clip into the timeline and applying the reverse option. Meanwhile, on mobile devices, the process is just as simple through the app’s editing panel. CapCut provides a straightforward and user-friendly way to achieve this effect across different platforms.
CapCut is a flexible editing software used by both beginners and professional editors. It allows you to reverse a video, adding a creative twist to your video projects. This makes it perfect for social media clips, TikTok edits, or cinematic sequences. The CapCut desktop version simplifies this process, allowing you to reverse any video effortlessly.
Here’s how to reverse video in CapCut PC:
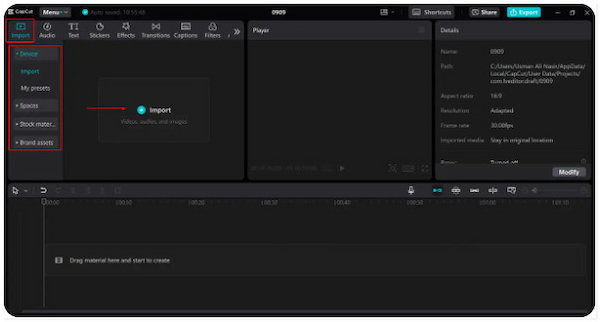
1.Open CapCut on your Windows PC and select the Create Project option. In the editing window, click Import to add the video you want to reverse. Optionally, drag and drop the video file into the workspace for quicker upload.
Note: The free version would add watermarks to the saved videos, which is annoying. You can use video editing tools to remove CapCut watermarks.
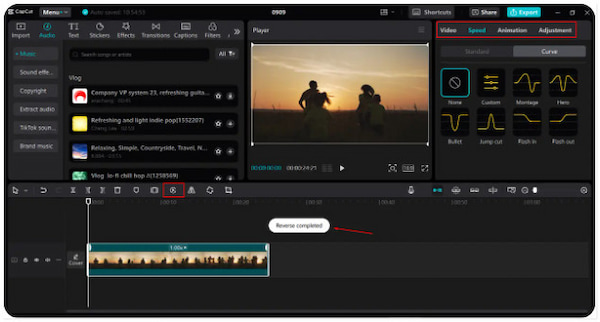
2.Drag your video to the timeline or click the video itself to begin editing. Once placed, select the video and click the Reverse button located in the upper-right navigation. CapCut will automatically process the clip and reverse it.
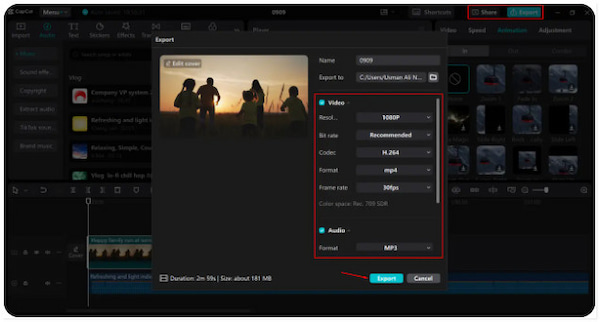
3.Once you’re satisfied with your reversed video, click the Export button. Configure your preferred video quality, format, and other output settings as needed. Once exported, your video is ready to share or save for future use.
CapCut video reversing on PC is quick and straightforward. Please note that the steps provided apply to both Windows and Mac versions of CapCut. This means you can follow the same process regardless of your device. However, there’s a catch: The processing time can be a bit slow, especially for longer or high-resolution videos.
Are you looking for similar tools that offer the same functionality? Check our top CapCut alternatives.
In addition to the desktop version, CapCut offers a mobile app for users. It has almost all the same features as the desktop version, allowing you to reverse clip on CapCut right from your smartphone. Although the process differs slightly from the desktop version, it remains just as simple to use. Just so you know, the steps below apply to both Android and iOS devices.
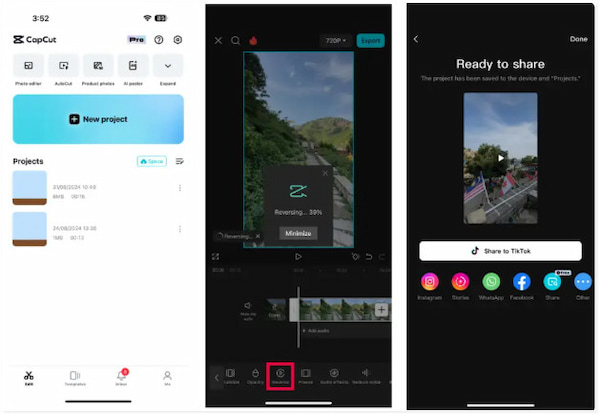
1.Open CapCut on your mobile device and tap New Project. From your gallery or camera roll, select the video you want to rewind and move it into the timeline.
2.Tap the video in the timeline to bring up the editing options. Scroll through the tools and select Reverse. CapCut will then process your clip and instantly make it play backwards.
3.Once the video is reversed, tap the Export button located in the upper-right navigation. Select your preferred resolution, quality, and frame rate, then save the video to your device.
That’s how do you reverse a video on CapCut app on Android and iPhone. The steps are straightforward and slightly different from the desktop version, but they achieve the same creative effect. However, a smaller screen size may feel limiting when working on precise edits.
Sometimes CapCut suddenly freezes, lags on playback, or certain buttons stop responding. In such cases, a full app restart often clears the temporary glitch. Like most editors, CapCut builds up short-term memory allocations while you use it. Closing it terminates those in-memory tasks, releases occupied resources, and forces CapCut to relaunch its editing engine cleanly.
Corrupted or partially indexed media is a common source of the Reverse tool failing on a specific clip. Re-importing forces CapCut to rebuild the file’s internal index. Also,it re-analyzes codecs, durations, and audio waveforms. If the original import was disrupted, bringing the clip back in can restore effects like reverse to process correctly.
If the app feels slower, the cache may be bloated or holding stale render previews. CapCut caches generated media to accelerate the editing process. However, these files can become outdated or too large, resulting in mismatches or slow project loads. Clearing the cache removes those temporary artifacts, allowing CapCut to generate fresh previews.
When recurring crashes persist, features won’t load even after restarts. A reinstall can reset the app’s core files and dependencies. Over time, setting conflicts, corrupted libraries, or partially applied updates can break functions. Reinstalling delivers a clean application bundle and default configuration. This eliminates hidden conflicts and restores missing components.
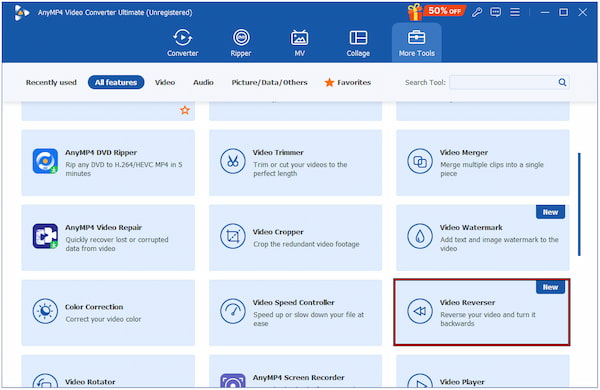
CapCut is a widely used video editor that offers creative features, including the ability to reverse clips. However, there are instances where it doesn't operate as intended, leading users to seek alternative options. AnyMP4 Video Converter Ultimate is one such excellent tool you can rely on. It is an all-around media conversion and editing software compatible with Windows and Mac. This software offers a Toolbox kit boasting more than 20 editing tools. It comes with a professional Video Reverser that makes it simple and efficient to rewind videos. With it, you can make the entire video clip backwards or choose a specific segment you want to reverse.
Here’s how to reverse a video on CapCut alternative:
1.Start by downloading the AnyMP4 Video Converter Ultimate for free. Install the video reverser editor and finish the installation process. Ensure to click the correct download button for your operating system. Once completed, run the software to begin reversing your video.
Secure Download
Secure Download
2.As soon as it launches, it will open in the Converter tab by default. Move to the More Tools tab and select the Video Reverser tool from the list. In the Video Reverser window, click + and select the target video you want to rewind.
3.Drag the progress bar or set specific times in Set Start and Set End to select the part of the video you want to reverse. To reverse the entire video, keep the full range selected. Once done, click Export to process your clip and make it play in backward.
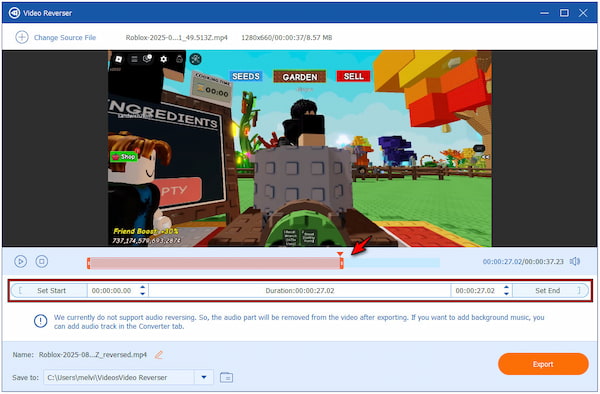
Important Note: Audio reversing is not currently supported. If you need sound, you can add a separate audio track to the output video.
AnyMP4 Video Converter Ultimate is a powerful alternative to reverse a video on CapCut. Its Video Reverser tool gives you the flexibility to reverse an entire video or just a specific portion precisely. In addition to video reversing, you can also crop, rotate, trim, and compress video.
Knowing how to reverse a video on CapCut lets you add creativity and fun to your edits. Whether you’re using the desktop version, online, or the mobile app, the process is straightforward. CapCut makes it easy to transform ordinary clips into engaging and entertaining content. However, if you’re looking for a more professional and precise tool, AnyMP4 Video Converter Ultimate is an excellent alternative. Its professional Video Reverser allows you to reverse an entire video or select only specific parts with full control.
 Posted by Mark Cristobal to Edit Video
More readings
 How to Make a Video Longer Online and Offline
Is your video too short? Have you ever thought about how to make a short video longer? This post gives you three methods to make it longer and optimize them.
 How to Change Video Thumbnail to Make it Attractive
Does your video thumbnail is unattractive? Did you know that you can easily replace it? Please find out how to fix it here!
 How to Edit Videos on Android [Beginner's Guide]
The easiest way to edit videos on Android can only be shown here. Check out the simple and various ways to create eye-catching videos here.
 2 Ways to Make a Video Slow Motion For Watching and Editing
Are you looking for a video speed changer to slow down the playback speed of your video? Lucky you! Check right here the techniques to make it possible.