Have you ever wanted to breathe life into your captured moments, turning your Live Photos into dynamic videos? In iPhones, the Photos app offers a native solution for this purpose. It allows you to convert Live Photos into engaging videos with just a few taps. Meanwhile, if you’re seeking additional creative control and customization, tools like AnyMP4 Video Converter Ultimate come equipped with an MV Maker feature, promising an enhanced video-making experience. In this section, you will learn how to make a Live Photo a video using iPhone’s Photos app and the versatile AnyMP4 Video Converter Ultimate. Continue your exploration for additional details!
| Make Live Photo a Video | Add Theme | Crop & Rotate | Effect & Filter | Add Watermark | Add Background Music | Save in Various Formats |
|---|---|---|---|---|---|---|
The iPhone’s Photos app provides a straightforward solution for making the Live Photo a video. In the recent iPhone update, the iOS 26, they include a direct Save as Video option to turn the Live Photo into a video using the Photos app. After converting the Live Photo into a video, you can use the built-in video editing of the app to enhance your video further.
Here’s how to save a Live Photo as a video on an iPhone:
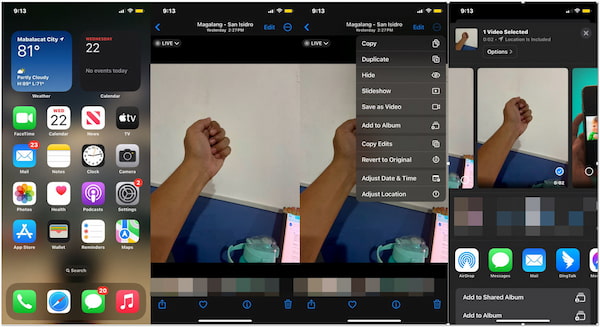
1.On your iPhone, locate and open the Photos app.
2.Find the Live Photo you want to convert into a video.
3.Once the Live Photo is open, tap the Meatball Menu button.
4.Select the Save as Video option from the context menu.
5.The Photos app will save the Live Photo as a video in your Camera Roll.
6.Tap the Share button and choose a platform to share the converted Live Photo.
Note: The step may vary depending on your iOS version. Here, we use iPhone XR with an iOS 26 version to demonstrate the conversion of Live Photo into a video.
The Photos app’s Save as Video feature is a quick solution to make the Live Photo into a video. Users don’t need to install additional apps for the Live Photo conversion. Also, you can loop your live photo before sharing it. However, converting it into a video will only give you a 3-second video clip.
If you want to make a video from photos longer than 3 seconds, software like AnyMP4 Video Converter Ultimate is a viable solution. Can I make a Live Photo video with AnyMP4 Video Converter Ultimate? Definitely! Although its primary function is to convert videos to other formats, it is infused with powerful and unique features. One remarkable feature it offers is the MV Maker, allowing you to elevate your video creation and slideshow making.
Not to mention, it has a built-in feature that allows you to convert your photos into a video. It boasts easy-to-use editing features for enhancing your video creation, allowing you to add theme, effect, filter, watermark text/image, and background music. You can also utilize the video editing tools to rotate, crop, trim, and flip the content. What’s more, the software lets you save your creation into various video formats with up to 8K resolution.
Here’s how to turn a Live Photo into a video using AnyMP4 Video Converter Ultimate:
1.Beforehand, obtain the AnyMP4 Video Converter Ultimate by clicking the Free Download below. Install the software on your computer and complete the necessary installation process. After the installation, click the Start Now button.
Secure Download
Secure Download
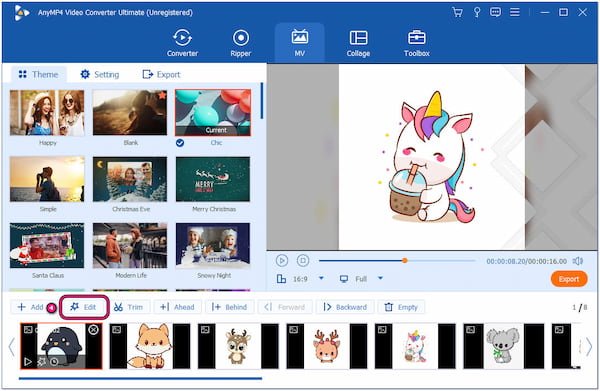
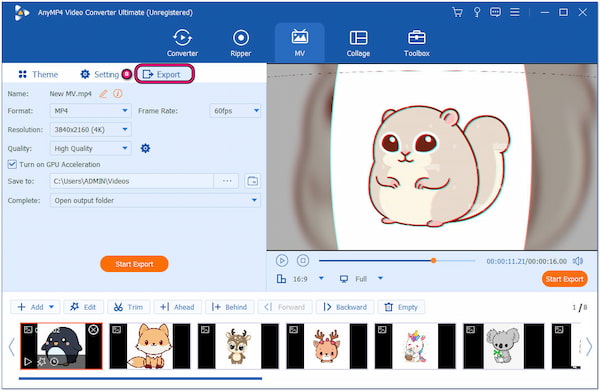
2.Navigate to the MV tab once the AnyMP4 Video Converter Ultimate is launched. Within the MV tab, click + Add and select Add Files or Add Folder. Select the photos you want to include on your video from a local folder that will appear on your screen.
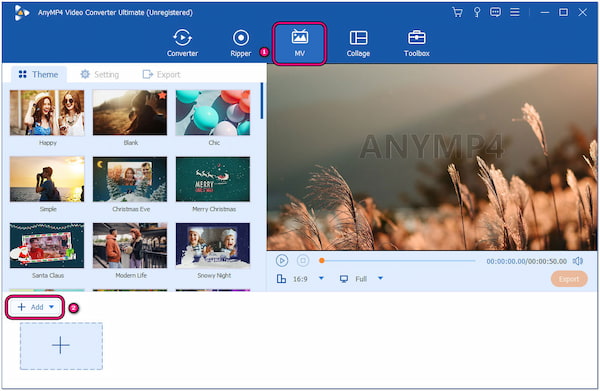
3.After loading the photos, select a Theme depending on your concept. The software provides various Themes for different purposes. It includes Simple, Stripes & Waves, Wedding, Christmas, Nature, Holiday, New Year, Urban Rhythm, Splash, Vigor, and more.
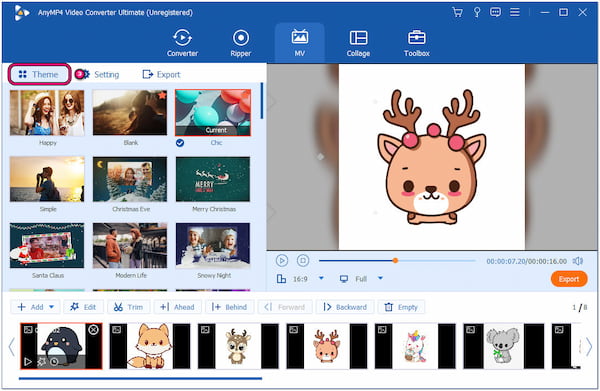
4.After selecting a Theme, you can now start editing your photos. To start the task, click Edit next to the + Add button. Choose your editing option according to your concept.
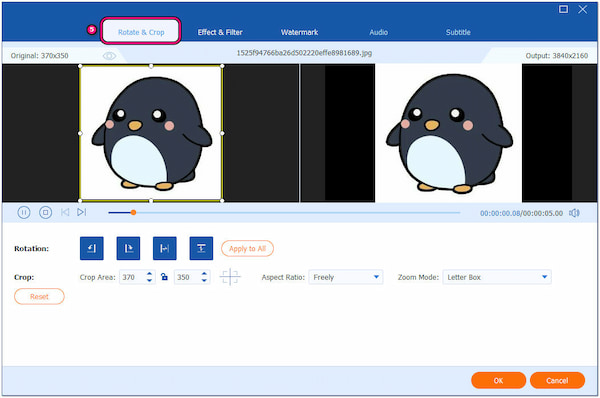
◆ Rotate & Crop: This section lets you Rotate and Flip each photo. Additionally, you can Crop their size depending on your requirements. You can choose various dimensions, such as 16:9, 16:10, 4:3, 21:9, 5:4, 1:1, 9:16, or Freely.
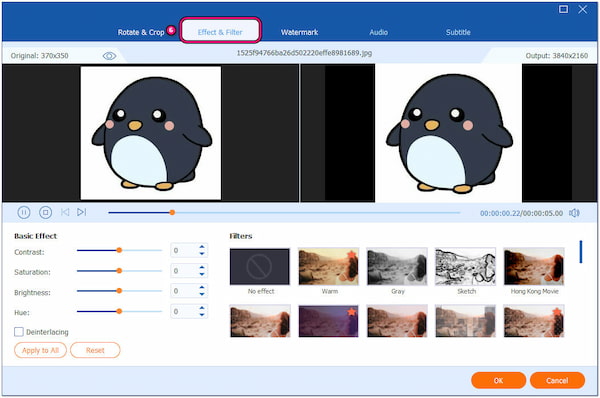
◆ Effect & Filter: This section allows you to configure the basic effect by adjusting the Contrast, Saturation, Brightness, and Hue. You can also add Filter and choose from the available selections, including Warm, Gray, Sketch, Modern, Pixelate, and more.
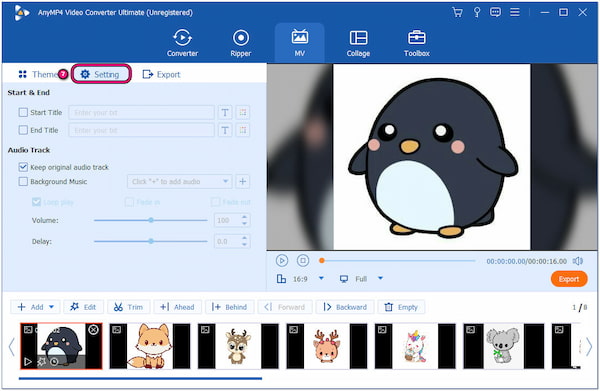
5.After the enhancement of the photos, head to the Settings tab. In this section, you can add a Start and End Title for your video creation or slideshow making. What’s more, you can import your favorite music as the Background Music of your video.
6.Once done, hover your cursor over the Export tab. Give your video creation a Name, select your desired output Format, and choose 8K for the video resolution. Next, choose a path folder and click Start Export to save the video creation.
That’s how to make multiple Live Photos into a video with AnyMP4 Video Converter Ultimate. This software not only lets you create videos from photos but also edit and enhance them. Suppose you require a specific tool that you did not find in the Edit window of MV Maker. You can search for it on the Toolbox kit, which boasts more than 20+ editing tools.
Can I have a video as my lock screen iPhone?
NO! iOS does not support setting a video as the lock screen wallpaper. However, you can use a Live Photo as a dynamic lock screen background. To set it, go to Settings, select Wallpaper, select Choose a New Wallpaper, and pick the Live Photo from your camera roll.
How do I turn a Live Photo into a still?
To turn a Live Photo into a still image on your iPhone, open the Live Photo in the Photos app, tap Edit, then tap the Live icon. It will turn off the Live Photo effect. Afterward, tap Done to save the photo as a still image.
How do I save a motion picture as a GIF?
To save a Live Photo as a motion picture, open the Live Photo in the Photos app, tap the LIVE dropdown menu, and select Loop to create a looping effect. However, if your device doesn’t support this feature, you can use the GIF Make of AnyMP4 Video Converter Ultimate. For making a GIF on an iPhone, you can check the details here.
What is the difference between a Live Photo and a normal iPhone?
The main difference between a Live Photo and a normal photo on an iPhone is the addition of a short video clip and audio in the Live Photo. While a normal photo is static, a Live Photo captures a few seconds of motion and sound before and after the photo is taken.
To bring the How to Make a Live Photo a Video exploration to an end, it’s clear that the iPhone’s Photos app and the sophisticated MV Maker feature in AnyMP4 Video Converter Ultimate offer distinct yet effective pathways. The Photos app’s simplicity makes it an accessible choice for quick and hassle-free conversions, perfect for those who prefer a straightforward approach. On the other hand, the MV Maker in AnyMP4 Video Converter Ultimate provides a platform for more intricate video customization, allowing users to craft their videos with precision.
 Posted by Angelica Liwanag to Edit Video
More readings
 How to Screen Mirror iPhone to Smart TV (Smsung/LG/Philips)
This article contains helpful methods for knowing how to cast from iphone to TV, so that you can watch your iPhone content on a bigger screen.
 My iPhone Has No Sound on Videos - Troubleshooting Guide
Is your iPhone silent when playing videos? Discover common reasons and solutions in our My iPhone Has No Sound on Videos guide.
 How to Send GIFs on an iPhone (SMS, Snapchat, and Whatsapp)
Let us create a light vibe when chatting by sending GIFs using your iPhone. This article offers steps to send animated images on iPhone via messaging apps.
 Top 6 Methods to Merge Two/Multiple Videos on iPhone (Guide)
How to combine videos together on iPhone? Here are 6 ways to merge 2 or multiple videos on iPhone without quality loss.