Free Download100% Clear & Secure
Free Download100% Clear & Secure
Quick Summary
You’ve just finished downloading a high-quality video or received a massive project file from a Windows-using client, and it’s in the MKV (Matroska) format. You try to open it on your MacBook, but QuickTime won't budge, and Final Cut Pro treats the file like it’s invisible. MKV is like a "Swiss Army Knife" of containers, and it can hold everything from multiple audio tracks to 3D subtitles, and but Apple’s ecosystem is notoriously picky. To play MKV on Mac or edit it in professional software, you usually need to convert MKV to MOV.
In this guide, I’ll walk you through 5 tried-and-tested ways to make this switch. I’ve personally benchmarked these tools to ensure they maintain Original quality while offering the Fastest speed possible.

How We Test

| Platform | Conversion Speed | Max File Size | Lossless (Remux) | Batch Support | Best For | |
|---|---|---|---|---|---|---|
| AnyMP4 Video Converter Ultimate | Desktop | Ultrafast (70X) | No Limit | Yes | Yes | 4K/8K Movies & Pro Editing |
| AnyMP4 Free Online Converter | Web-based | Moderate | No Limit | No | Yes | Medium files without install |
| Convertio | Online | Slow (Cloud-based) | 100MB (Free) | No | Limited | Small files & Quick tasks |
| VLC Media Player | Desktop | Average | No Limit | No (Complex) | No | Free users with basic needs |
| FFmpeg | Command Line | Instant | No Limit | Yes | Manual | Tech-savvy users & Lossless |
This is the "heavy lifter" in my toolkit. AnyMP4 Video Converter Ultimate is a comprehensive video suite designed for users who don't want to compromise on quality or time. It is particularly famous for its hardware-acceleration technology, which leverages your NVIDIA, AMD, or Intel GPU to speed up the Transcoding process by up to 70 times. Beyond just converting, it features a massive "Toolbox" that handles everything from 3D video creation to advanced Video encoding settings for 8K resolution. It’s the tool I turn to when I have twenty 4K drone clips that need to be QuickTime compatible by yesterday. The interface is clean, beginner-friendly, and avoids the cluttered look of older conversion software.
1. Load MKV Files
Free download this program, and open it after successful installation.
Secure Download
Secure Download
Click the large + icon in the center or the Add Files button at the top left. Select all your MKV files.
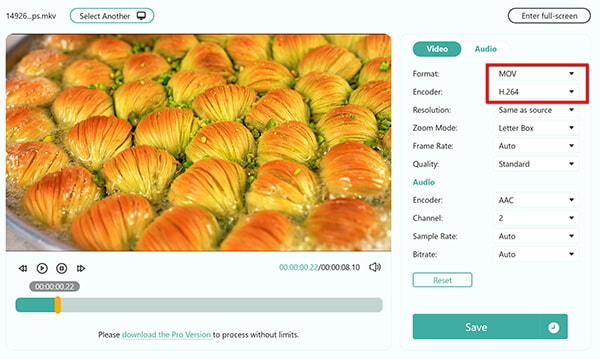
2. Set MOV Output Format
Click the Output Format dropdown menu in the top right corner. Go to the Video tab, find MOV in the left sidebar, and select Same as Source.
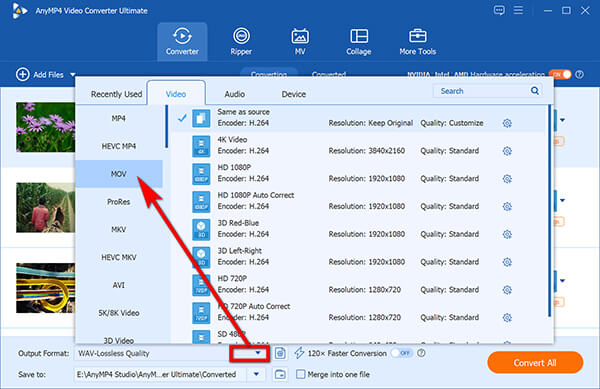
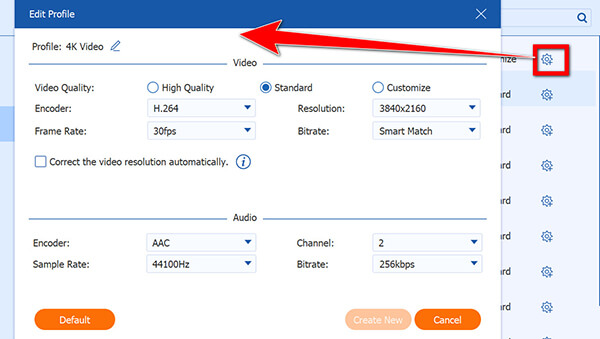
Refine Settings (Optional): Click the Custom Profile (gear icon) to manually adjust the bitrate or frame rate, or choose between the H.264/HEVC codecs.
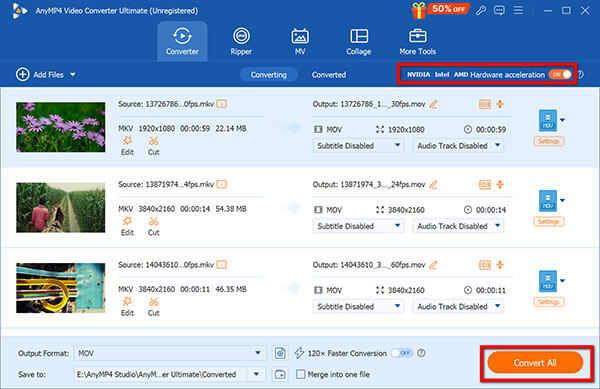
3. Convert MKV to MOV
In the bottom-left corner, set the folder where you want your new MOV files to land. Click the Convert All button and watch the progress bars fly.
Do not forget to enable the Hardware Acceleration icon (usually a blue lightning bolt) at the top of the interface. Ensure it is highlighted to save yourself 20 minutes of waiting.
My Experience: I remember a project where I had to import MKV to Final Cut Pro for a client presentation. I had 40GB of footage and only 30 minutes. Using the GPU acceleration in AnyMP4, I finished the conversion in under 5 minutes. It’s the "peace of mind" tool, and you know it won't crash when the file size gets into the double-digit gigabytes.
Most people think of VLC as just a video player, but it’s actually a Swiss Army knife for media manipulation. It’s a free, open-source project that has been around for decades, and its ability to read almost any codec is legendary. While the conversion interface is a bit hidden and can feel "old school," it is incredibly powerful because it allows for Remuxing. This means it can take the existing H.264 video stream from your MKV and simply "wrap" it in an MOV container without re-encoding. It’s a great way to maintain Original quality without spending a dime.
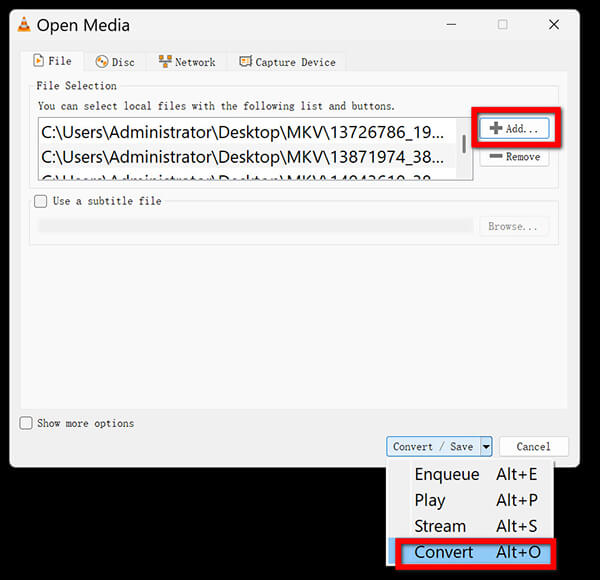
1. Open Convert Menu
Open VLC and go to Media > Convert / Save (or press Ctrl + R).
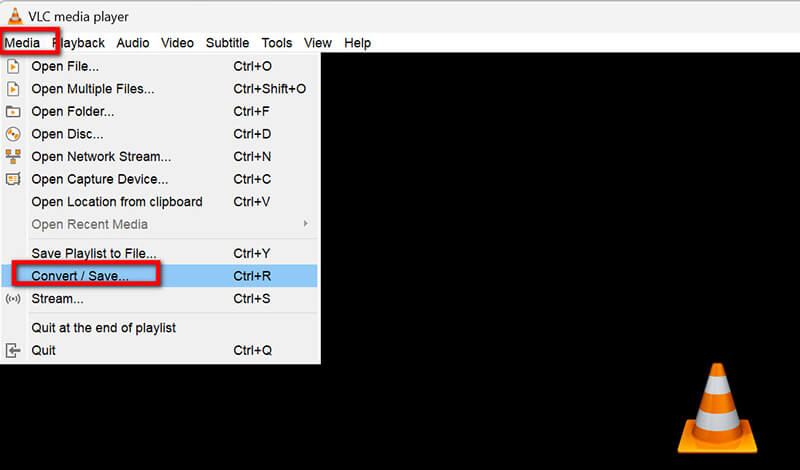
2. Add Your File
Click Add to browse for your MKV file, then click the Convert / Save button at the bottom.
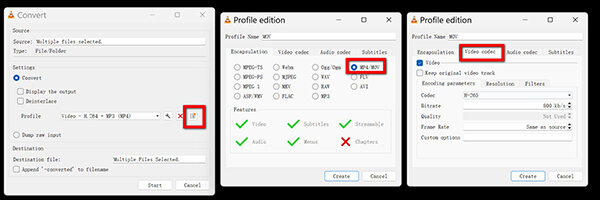
3. Create an MOV Profile
In the Profile section, click the Wrench icon (Edit selected profile).
Encapsulation: Select MP4/MOV.
Video Codec: This is the most important step; check the box labeled "Keep original video track." This ensures you are remuxing, not re-encoding.
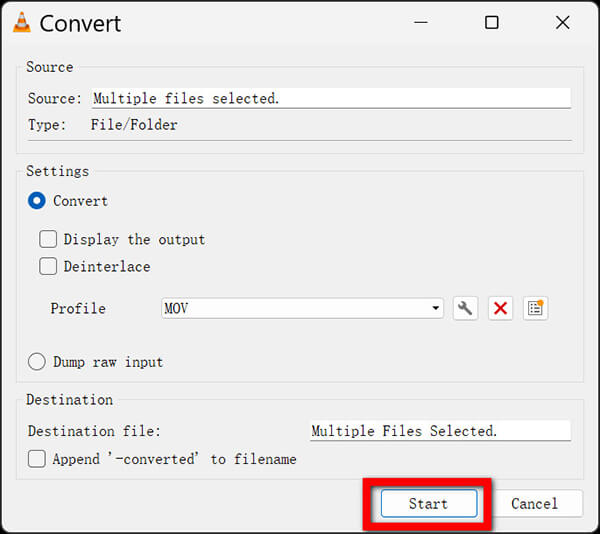
4. Save and Start
Give your profile a name (e.g., "MOV Lossless"), click Save, select your destination file path, and click Start.
My Experience: VLC is my "emergency" tool. If I’m on a friend’s computer and need to fix a file, VLC is usually already installed. It’s not the prettiest process, but once you figure out the "Keep original track" checkbox, it feels like a secret cheat code for infinite quality.
FFmpeg is the engine that actually powers most other conversion tools. It is a command-line utility, which means there is no "buttons" or "windows", and just you and the terminal. While this sounds intimidating, it is the most precise and Fastest speed method for Remuxing MKV. If you want a 1:1 clone of your video in a new container, FFmpeg does it in seconds because it doesn't waste time "looking" at the video; it just moves the data. It is the gold standard for professionals who need to ensure Bitrate and metadata remain untouched.
1. Install FFmpeg
Download FFmpeg and add it to your System Path (or use brew install ffmpeg on Mac).
2. Open Terminal
Navigate to the folder containing your MKV file.
3. Type the Command
Enter the following:
ffmpeg -i input_video.mkv -c copy output_video.mov
4. Execute
Hit Enter. You will see a wall of text as FFmpeg scans the streams.
Within seconds, a new MOV file will appear in the same folder.
My Experience: Using FFmpeg makes you feel like a hacker. The first time I converted a 5GB movie in 3 seconds using -c copy, I thought the program had glitched. It hadn't, and it’s just that efficient. If you can get past the "scary" text interface, you’ll never go back to slow converters again.
AnyMP4 Free Online Video Converter is a web-based utility designed for users who need a quick fix without the commitment of a download. It’s surprisingly robust for a browser tool, supporting a variety of formats beyond just MOV. Since it processes files through your browser, you don't have to worry about the "cloud" holding your data forever. It’s an excellent choice for social media clips or short screen recordings that need to be QuickTime compatible for a quick email or Slack upload.
1. Upload MKV File
Go to the AnyMP4 Free Online Video Converter page. Click Upload File to select your MKV file from your local drive.
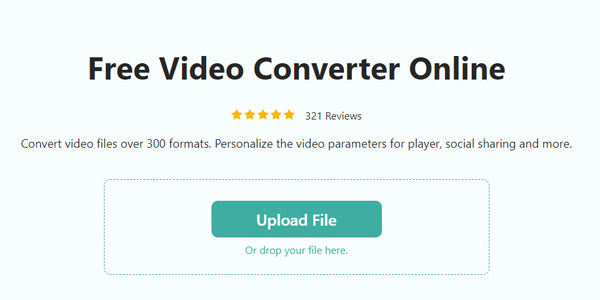
2. Select MOV
In the bottom format list, click the radio button for MOV.
Adjust (Optional): Click the Gear icon next to the file to check the H.264/HEVC codec settings.
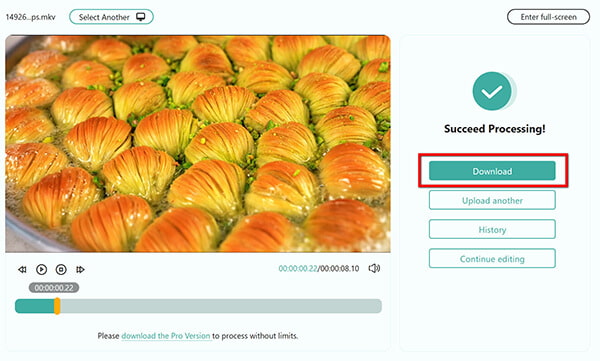
3. Convert and Download MOV
Click Save, wait for the software to convert MKV to MOV, and then download the converted MOV file.
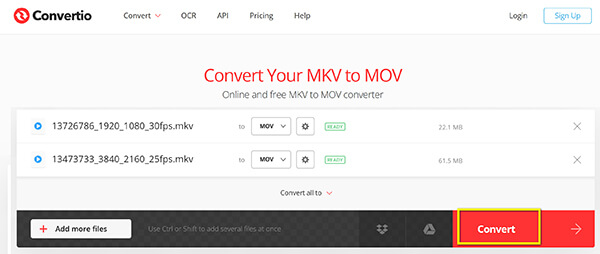
Convertio is perhaps the most famous online conversion brand in the world. It’s a highly polished platform that integrates with Google Drive and Dropbox, making it a favorite for office workers who live in the cloud. It handles the Transcoding on its own servers, so it doesn't slow down your computer’s CPU. However, because it’s a business, the free tier is strictly limited to 100MB, which can be a major hurdle for modern high-definition video.
1. Upload MKV
Drag your MKV file into the red box on the Convertio homepage (https://convertio.co/mkv-mov/).
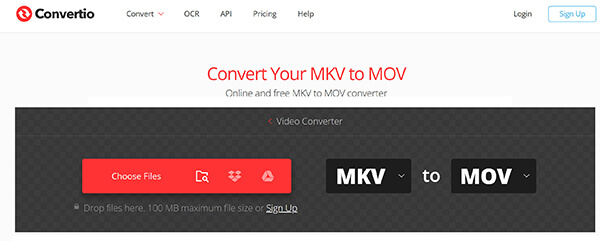
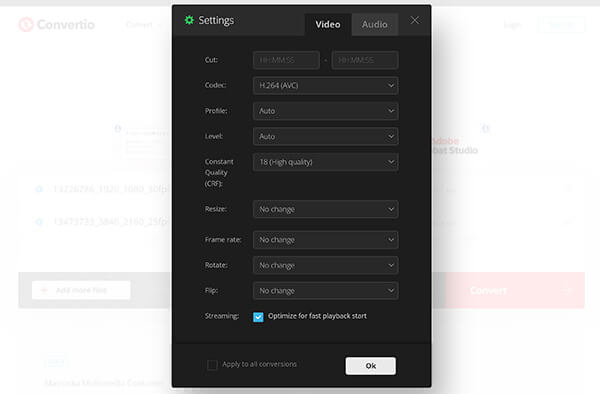
2. Advanced MOV Options
By default, this tool will select MOV as the output format.
You can click the Settings (wrench) icon to change the volume, codec, or even flip/rotate the video.
3. Convert MKV to MOV Online
Click the red Convert button. Once the server finishes the task, click the blue Download button.
My Experience: I only use these when I’m on my Chromebook or at a public library. They are "life-rafts", and they’ll save you in a pinch, but you wouldn't want to live on them. If you’re trying to convert a 4K vlog for YouTube, the upload time alone will make you want to pull your hair out!
Can I convert MKV to MOV without losing quality?
Yes! This is called Remuxing. Using a tool like AnyMP4 (in "Copy" mode), VLC, or FFmpeg, you essentially move the video data into a new container without re-encoding it. Since the data itself doesn't change, the quality remains 1:1.
How to convert large MKV files to MOV for free?
For large files, avoid online converters. Instead, download Handbrake or use VLC. These use your local hardware and have no file size limits, though they may take longer than a GPU-accelerated pro tool.
Why can't QuickTime open my MKV file?
It’s a matter of QuickTime-compatible standards. Apple developed MOV as a proprietary format for its ecosystem. MKV is an open-source "Matroska" format that Apple simply hasn't integrated into its native apps, pushing users toward its own standards like MOV and MP4. Besides, you can also play MKV on Mac with MKV player.
Will converting to MOV make my file size bigger?
Not necessarily. If you use Remuxing, the size stays almost identical. If you re-encode (Transcoding), the size depends on your Bitrate settings. A higher bitrate equals a larger, better-looking file.
Choosing the right way to convert MKV to MOV depends entirely on your needs. If you’re a professional needing Batch processing and the Fastest speed, AnyMP4 Video Converter Ultimate is a no-brainer investment. If you’re a hobbyist who loves free tools, VLC or FFmpeg will give you that perfect Original quality for zero dollars. Converting doesn't have to be a headache. Once you find the method that fits your workflow, you can stop worrying about file extensions and get back to what matters: creating and watching great content.
Secure Download
Secure Download
 Updated by Alice Thorne to Convert Video
More readings
 The Best MKV to MPEG Converter to Transcode MKV to MPEG Files
When you want to convert MKV to MPEG for DVDs, you can learn more about the most efficient method to transcode the MKV files with ease from the article.
 MKV Cutter – Best 10+ MKV Video Cutter to CUT MKV Files Losslessly
Read and get your best MKC cutter. Here're 10+ top-rated video cutters with the detailed pros and cons. You can choose any one to trim MKV files.
 5 Best MOV to MP3 Converters (2026): Pro Quality & Speed Tested
Extract 320kbps MP3 from MOV files with our top 5 tested tools. Features detailed reviews, batch guides, and expert tips for lossless audio extraction.
 Convert MOV to WAV - 2 MOV to WAV Converters to Convert MOV Files
How to convert QuickTime MOV to WAV for free? This post shares 2 great MOV to WAV converters to help you extract WAV audio from MOV file.