5 Fixes to Solve DaVinci Resolve Recording Black Screen
Quick Answer:
A DaVinci Resolve recording black screen originates in the Resolve viewer rather than in the capture application, because the viewer is rendered on a GPU surface that a full-screen capture does not read. Recording the Resolve window resolves the majority of these cases. The remaining cases require a change to the GPU processing mode inside Resolve.
1. DaVinci Resolve viewer black in recording? Use AnyMP4 Window mode. That is Fix 1.
2. DaVinci Resolve OBS black screen? Switch Window Capture to Windows Graphics Capture.
3. Every recorder fails? You can still record DaVinci Resolve without black screen frames. Change the GPU mode.
4. Two-GPU laptop? Put both apps on one card.
5. Plays in VLC, black in Resolve? Remux the file.
6. Two cases have no fix: Remote Monitor and HDCP output.
The recorded file shows the timeline, the scopes, and the cursor while the viewer area stays a black rectangle, the symptom usually reported as DaVinci Resolve screen recording black. Most users call it a DaVinci Resolve recording black screen, then reinstall Resolve, which changes nothing, and update a driver that was already current, which changes nothing either. Most search results attribute the problem to the recorder, a driver, or an arbitrary preference, and most of those attributions are incorrect.
The five causes below fail at different layers of the capture stack, and each one requires a different correction.

Which DaVinci Resolve Black Screen Do You Have? A 60-Second Answer
Five distinct causes appear under the query DaVinci Resolve screen recording black, and all five produce an identical black viewer in the exported file. Identify the cause before changing any preference.
| What you see |
What it means |
Go to |
| UI and cursor record, viewer black |
Capture missed the GPU surface |
Fix 1, then 2, then 3 |
| Everything black, desktop included |
Wrong monitor or missing permission |
Fix 4 |
| Only Remote Monitor black |
Protection by design |
Fix 5 |
| Plays in VLC, black in Resolve |
VFR, MKV, or 10-bit HEVC |
File section |
| Viewer black before you press REC |
Resolve GPU or codec decode |
Fix 3 |
Here are three checks to settle it in ten seconds.
Record your empty desktop with Resolve closed. If that file is black too, the problem is permission or the wrong monitor. Not Resolve.
Play the recording in VLC, not in Resolve. If VLC looks clean, the file is fine. Resolve is refusing it.
Try one more recorder on the same window. If both fail, the problem is Resolve. If only one fails, the problem is that recorder.
Why the DaVinci Resolve Viewer Goes Black When Recording
Resolve renders the viewer through the GPU, using CUDA on NVIDIA hardware, Metal on macOS, and OpenCL on the older AMD cards that still support it. The timeline, the menus, the inspector, and the scopes are 2D elements drawn by the operating system.
The viewer is therefore a separate canvas stacked above the desktop, and most capture applications copy only the desktop layer. That layer contains the menus and the cursor, while the viewer sits above it and stays outside the captured region.
BitBlt, the oldest capture path in Windows, copies pixels from the desktop and cannot read a layer that the GPU composites on top. Enabling hardware acceleration does not alter that behaviour.
The same mechanism explains why full-screen capture fails while window capture succeeds, and why two capture applications on one machine produce different results, since they request different pixels.
It also explains why the fix order matters. Capture first, because it is free and quick. Resolve's GPU path second, because it costs a restart. Everything else after that.
|
Skill level |
Fixes which symptom |
Time to fix |
Needs a restart |
Works on macOS |
Cost |
| Fix 1: AnyMP4 |
Easy |
Viewer black only |
2 minutes |
|
|
Trial or paid |
| Fix 2: OBS |
Medium |
OBS preview black |
3 minutes |
|
|
Free |
| Fix 3: Resolve |
Medium |
All recorders fail |
4 min + restart |
Resolve |
|
Free |
| Fix 4: OS |
Easy |
Laptop only |
3 min + restart |
Both apps |
Partly |
Free |
| Fix 5: Remote |
Medium |
Remote only |
5 minutes |
|
|
Studio |
Fix 1: Record DaVinci Resolve Without Black Screen (AnyMP4)
Best for: tutorial creators and editors who work in the Edit or Color page, where full-screen capture returns a black viewer. It also covers users who prefer a single application for capture and trimming.
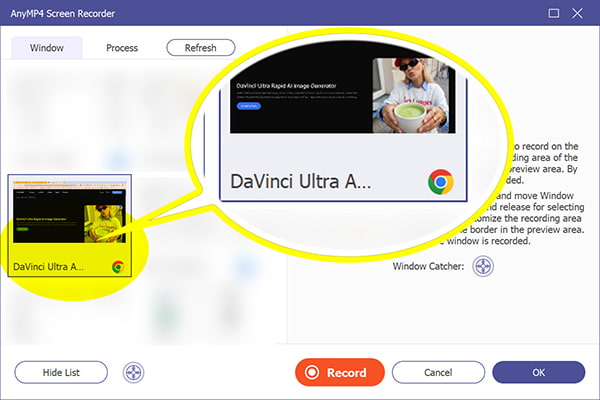
Most people start with full screen. That is the mode that records the UI and misses the GPU viewer. AnyMP4 Screen Recorder has a Window mode. It targets the Resolve window's own surface instead of the composited desktop. That is the fastest route. It lets you record DaVinci Resolve without black screen output.
The recorder writes MP4, MOV, MKV, and WMV, captures up to 4K at 60fps, and encodes the H.264 or H.265 codec on the GPU. System audio and microphone input are written to separate tracks, window lock keeps the capture bound to the Resolve window during a switch to another application, and the home screen exposes the Video, Audio, Game, windows, webcam, and Phone modes.
1. Select one recorder mode
Free download this software on your Windows or Mac computer after a successful installation.
Select Screen Recorder from other recorder options based on your needs.
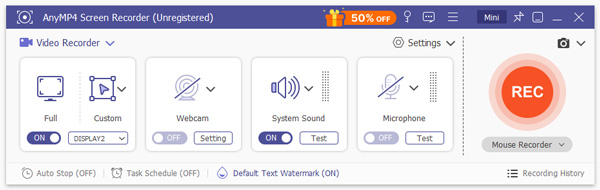
Set the capture area to Window, open the area dropdown, select Window, and choose DaVinci Resolve from the list. Hovering over the target window performs the same selection. Full Screen must remain unselected here, because that is the mode that returns a black viewer.
2. Customize the output
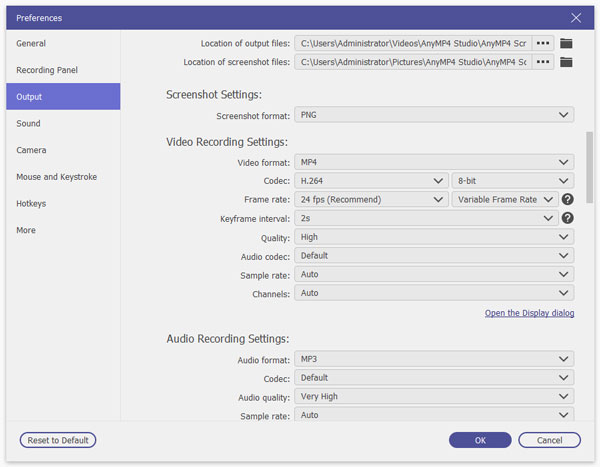
Before starting the capture, open the Output Setting inside the Settings dropdown and select MP4, H.264, 60fps, and a frame size that matches the timeline. 1080p is sufficient for tutorial delivery, and 4K is justified only when the footage will be cropped for vertical output.
Skip H.265 10-bit here. Resolve's free build on Windows does not decode 10-bit H.265 properly. A plain H.264 capture imports without black frames. That one choice saves an hour later.
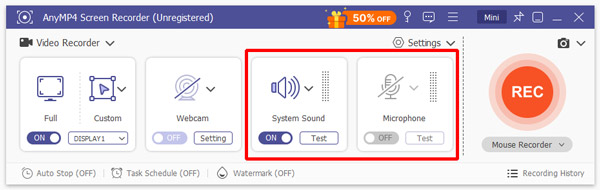
3. Turn on both audio sources
System sound carries the Resolve playback and the microphone carries narration, so the two are written to separate tracks. That separation allows the music to be muted in post while the voice track remains intact.
4. Start REC, then press play
Wait two seconds after REC before starting playback in Resolve, otherwise the opening frames are lost. Allow the render to finish before the capture begins, because a loading frame is what gets recorded otherwise.
Record five seconds and stop the capture, which opens the built-in preview. A visible interface with a missing viewer indicates an incorrect capture mode.
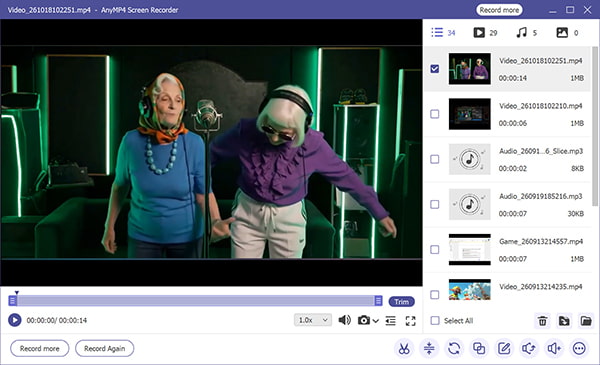
Limit: Window mode sees only the surfaces the OS passes on. With a few drivers, Resolve's viewer is not one of them. It also cannot record Remote Monitor or HDCP output. No setting changes that.
Fix 2: OBS Window Capture Shows DaVinci Resolve Black? Switch the Capture Method
Best for: editors who already run OBS. You get a free fix and no second app to install.
A DaVinci Resolve OBS black screen usually originates in the window hook rather than in Resolve. OBS is free and captures Resolve correctly, but its default capture path is the weakest part of the configuration.
Window Capture depends on a hook that some GPU windows do not answer, and the result is a black region inside an otherwise correct frame.
A single dropdown corrects the problem without a reinstall. Windows Graphics Capture reads the window through the newer compositor and therefore sees the surfaces the older path cannot reach.
1. Add a Window Capture source.
Click plus under Sources, pick Window Capture, then choose the DaVinci Resolve window. If the preview is black, keep going.

2. Change the capture method
Right-click the source, open Properties, and change Capture Method to Windows 10 (1903 and up), then allow the preview to rebuild. That entry corresponds to Windows Graphics Capture.
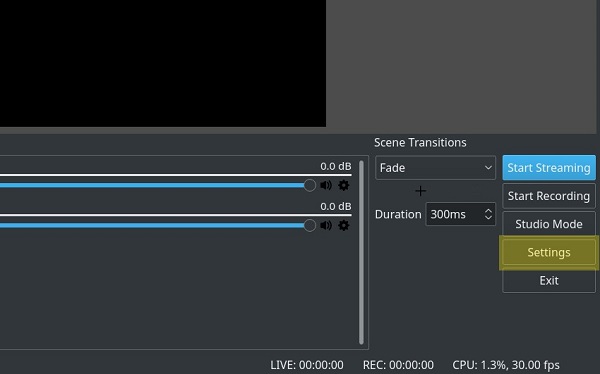
3. Still black? Use Display Capture
Delete the window source, add Display Capture, and select the monitor that displays Resolve. Remove anything that must not appear on camera beforehand, because this mode captures the entire screen.
4. Record 15 seconds.
Start OBS with administrator rights, using right-click and Run as administrator on the shortcut. Record Resolve playback for 15 seconds and inspect the resulting file, because the preview can misreport the result while the file cannot.
Set Output to MP4. Set Video to 60fps, not Any. A constant frame rate avoids the black-frame problem later.
That DaVinci Resolve OBS black screen can come back after a driver update. Check the dropdown first.
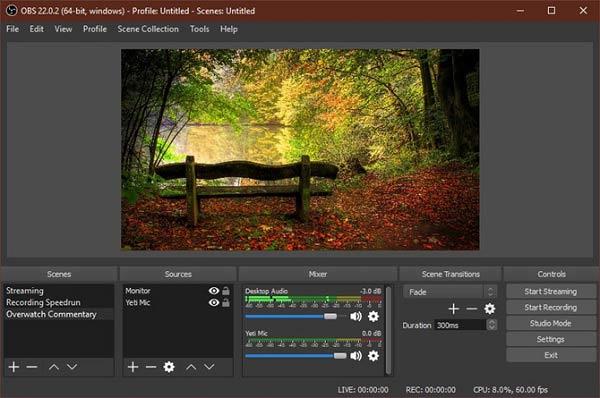
Stay on OBS instead? The OBS capture settings are one dropdown away.
Limit: the window hook can fail again after a Resolve or driver update, and Display Capture includes every window on the desktop, including chat clients.
Fix 3: DaVinci Resolve Screen Recording Black in Every App? Change the GPU Mode
Best for: anyone whose viewer is black in every recorder. Also anyone with a black viewer before REC. This is the root-cause fix on Resolve's side.
Resolve's Auto mode picks an API and a GPU. Some driver mixes then produce a surface capture tools cannot read. Force one API instead. That is what the GPU Processing Mode setting is for. The compositor then gets something it can see.
1. Open GPU Configuration
The setting is located under Preferences and then System. Its position varies between releases, so locate the GPU section and disregard the memory section.
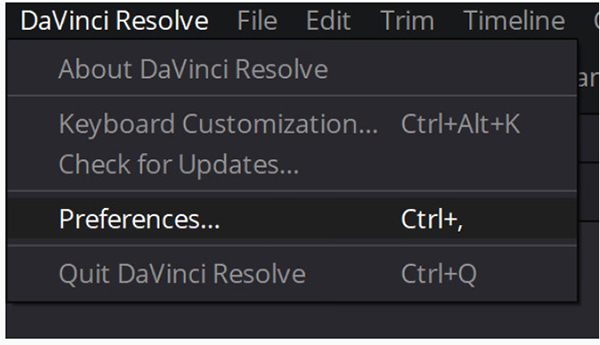
2. Change GPU Processing Mode from Auto
CUDA applies to NVIDIA hardware, Metal to Apple Silicon or an AMD Mac, and OpenCL to older AMD cards under Windows. OpenGL is deprecated on macOS and unreliable with current drivers, so it should not be selected.
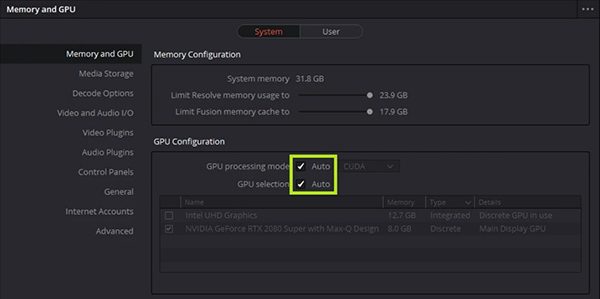
3. Untick Auto under GPU Selection
Select the adapter that drives the display, and verify that choice first on a laptop. Leaving the integrated chip selected while the viewer renders on the discrete card is the most common misconfiguration in this scenario.
4. Restart Resolve
Load the same timeline and record 15 seconds. Keep the setting if the viewer appears, and revert it if playback degrades, because the objective is a working capture rather than a permanent configuration change.
Limit: a different API can slow heavy timelines. It may also disable some GPU effects. It is a test, not an upgrade. When it doesn't matter: if Window mode works, leave this alone.
Fix 4: DaVinci Resolve Recording Black on a Laptop? Match Both GPUs
Best for: laptop users with two graphics chips. Resolve's UI records fine, the viewer does not.
On a hybrid laptop Resolve renders on the discrete card while the capture application reads the output of the integrated chip. Both applications run on different displays, and the viewer never reaches the recording.
1. Open Windows Graphics settings
Settings > System > Display > Graphics. Windows 10 keeps it under Graphics settings and the link still works.

2. Add both executables and match them.
Add Resolve.exe and the recorder's exe. Set both to High performance, or both to Power saving. They must match. One high and one low recreates the bug.

3. Restart both apps.
Close both. Reopen both. Record 15 seconds.
If the viewer remains black, set both applications to Power saving. Some laptop designs route the internal display through the integrated chip, which makes the discrete card the wrong target.
Limit: 4K playback can stutter on the integrated chip, the discrete card increases battery drain, and Macs with Apple Silicon do not expose this switch.
Fix 5: DaVinci Resolve Remote Monitor Black Screen Is by Design
Best for: colorists and editors who conduct client reviews through DaVinci Remote Monitor or Resolve Live.
The DaVinci Resolve Remote Monitor black screen is a protection measure rather than a defect. The application streams the viewer to a client through Blackmagic Cloud, and because the window is not an ordinary one, the feed turns black when the operating system or another application attempts to capture it. Reports on the Blackmagic forum describe the same behaviour.
No fix beats it. The DaVinci Resolve Remote Monitor black screen is here to stay. Record the viewer instead.
1. Record ten seconds
If the main Resolve viewer is fine and only Remote Monitor is black, you are hitting protection. Stop changing OBS settings.
2. Record the internal viewer
Apply Fix 1 to the main Resolve window while the client is on the call, which keeps the color-managed image and changes only the window. Clear the layout first, otherwise the recording shows panels instead of the picture.
3. Render a review file instead
ProRes 422 Proxy or H.264. Send that. It is faster than a screen recording and the grade stays intact.
4. Let the client record their own screen instead. With the client's consent, the Remote Monitor application is captured on their own machine, so the protected surface never leaves their system.
Limit: you lose the client's stream and their notes. Remote Monitor needs Studio. Free users never see this.
DaVinci Resolve Screen Recording Black After Import? Fix the File
The file plays correctly in VLC and shows black frames in Resolve, which places the fault in the file rather than in the recorder. Three causes apply: variable frame rate, MKV, and 10-bit HEVC.
| Symptom |
Likely cause |
Fix |
| Plays in VLC, offline in Resolve |
VFR or MKV container |
Remux, then force CFR |
| Audio fine, video black |
10-bit HEVC on the free build |
Transcode to DNxHR |
| First seconds black |
REC started after play |
Trim the head |
| Random black frames |
Dropped frames, VFR |
Record 60fps CFR |
1. Remux the MKV
In OBS, open File and then Remux Recordings, select the MKV, and write an MP4. The operation rewraps the file in seconds without re-encoding. If black frames persist in the MP4, the container was not the cause, and this MKV to MP4 remux guide performs the same operation outside OBS.
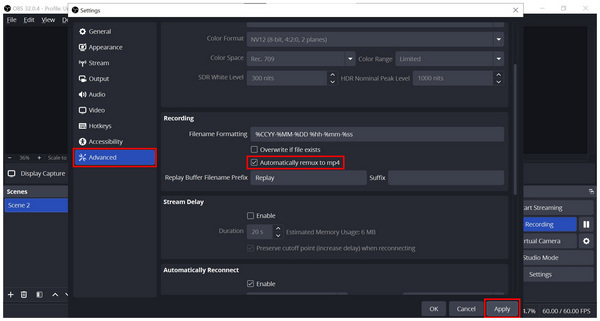
2. Record constant frame rate from now on
Open OBS Settings > Video > FPS to choose 60, not Any.
Under Output, select MP4 and NVENC H.264. Variable frame rate is the leading cause, and clips recorded with it either show black frames or drift out of sync during import.
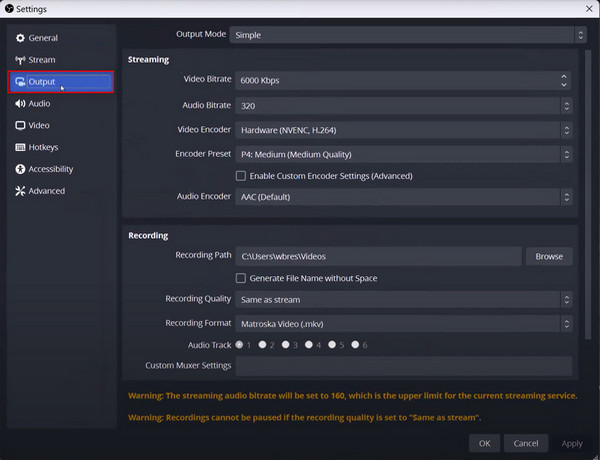
3. Transcode 10-bit HEVC
Use Shutter Encoder or HandBrake and select DNxHR HQ on Windows or ProRes 422 on a Mac. The frame rate must remain constant, and the operation should be limited to clips that fail, because the resulting files are large.
4. Import it again
Right-click the clip, open Clip Attributes, and verify the frame rate and the color space. A viewer that stays black may indicate that the free build cannot decode that codec.
This MKV vs MP4 comparison resolves the container choice in a single table for anyone who is unsure which format to use next time.
Note: transcoding consumes time, disk space, and a small amount of quality. Re-recording is faster for a 30-second clip, while transcoding suits long recordings or footage that cannot be repeated.
Record DaVinci Resolve Color Page Without Black Frames
The Color page is the most difficult part of Resolve to capture, and the viewer is not the cause there. Scopes, HDR grades, and color-managed timelines create a difference between the image on screen and the image retained by an 8-bit SDR capture.
1. Record in a Rec.709 timeline
Duplicate the timeline and set its color space to Rec.709 with Gamma 2.4, which matches what viewers see on YouTube and what an 8-bit recorder retains accurately.
2. Render HDR instead of recording it
A capture of an HDR viewer is not accurate. Render ProRes 422 HQ or DNxHR HQX from Resolve instead, and record the narration separately.
3. Grab stills
Scopes change very little between frames, so the snapshot tool or a system screenshot can be cut into the edit as a still. Recording 60 frames per second of a static waveform consumes bitrate without adding information.
4. Check the result on an SDR screen
Inspect clipped highlights and crushed shadows. Their absence indicates that the recorder applied a tonemap that cannot be removed, and the capture has to be repeated in the Rec.709 timeline.
Limit: an HDR screen recording serves as a teaching aid and not as a color reference. Color accuracy requires rendering the clip and narrating it.
New to the page? This DaVinci Resolve color grading guide covers the layout.
FAQs About DaVinci Resolve Recording Black Screen
Why does DaVinci Resolve record a black viewer while the rest of the interface records fine?
The viewer is a GPU surface and the menus are 2D elements drawn by the operating system, so full-screen capture records the menus and omits the viewer. Window capture corrects this, and a GPU mode change corrects the remaining cases.
Does OBS work with DaVinci Resolve, or should I use a different recorder?
OBS requires one change: Window Capture set to Windows Graphics Capture. Display Capture also works because it reads the entire desktop. If an update breaks the hook again, a recorder with a dedicated Window mode is the more stable choice.
Why is my DaVinci Resolve screen recording black only on a laptop?
Two adapters produce two outputs: Resolve renders on the discrete card while the capture application reads the integrated chip. Assign both applications to the same GPU in Windows Graphics settings, and match the configuration rather than assuming which adapter is faster.
Can I screen-record DaVinci Resolve Remote Monitor or Resolve Live?
No. Both surfaces turn black when the operating system or another application attempts to capture them, which is a protection measure. Capture the internal viewer, render a review file, or let the client record their own screen.
Why does my recording play in VLC but show black in DaVinci Resolve?
VLC plays any container, while Resolve requires a constant frame rate and a codec it can decode. VFR, MKV, and 10-bit HEVC violate one or both requirements. Remux to MP4, force 60fps CFR, and transcode to DNxHR if the viewer remains black.
Is 4K 60fps overkill for recording DaVinci Resolve tutorials?
In most cases, yes. 1080p at 60fps keeps menu text legible and the file size manageable, and 4K is only necessary when the footage will be cropped. A 4K screen recorder helps in that case because the higher bitrate preserves text after scaling.
Conclusion
That is how to record DaVinci Resolve without black screen frames.
If the viewer is a black rectangle in your DaVinci Resolve recording, the cause is a GPU surface rather than the recorder, and the correction has to match the layer that failed.
- • Viewer black, UI fine: Window mode, Fix 1.
- • Already on OBS: Windows Graphics Capture, then Display Capture, Fix 2.
- • Every recorder fails: Resolve's GPU mode, Fix 3.
- • Laptop with two chips: match the assignment, Fix 4.
- • Client review: record the internal viewer, Fix 5.
- • Plays in VLC, black in Resolve: remux or transcode, file section.





 Add your comments to join the discussion here