Messaging has come a long way, from simple texts to voice chats. iMessage allows sending audio messages by tapping a button. What if it doesn’t work when you need it the most? If you’ve ever been in a situation where audio recording is not available on iPhone, you’re not the only one who has experienced that. Why does it stop working? And more importantly, how can you fix it? This post will explain its reasons and find solutions that work. And if nothing works? I’ll share an alternative solution that ensures you can still record and export audio from your iPhone.
Why is audio recording not available on iPhone iMessage? If your iPhone’s iMessage cannot record audio, a few common issues are likely messing things up. I know how frustrating it is when you need to send a quick voice message, and it won’t go through. Let’s figure out why it’s happening and how you can fix it:
• Unstable network connection.
• iMessage is turned off.
• The recipient’s iMessage is disabled.
• The recipient is a non-Apple device user.
• Outdated iMessage version.
• Insufficient storage space.
If you keep seeing audio recording not available on iPhone iMessage, don’t stress. You only need to turn on iMessage for audio recording to work. When iMessage runs long, it encounters internal glitches that stop the audio recording from working.
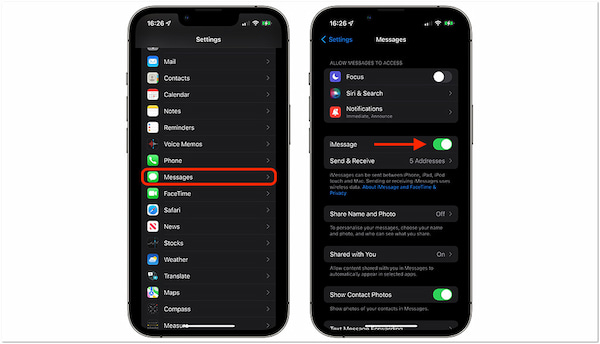
1. Swipe the Message app away from the App Switcher to close it completely. If you’re using an older iPhone, double-click the Home button to access the recently used apps. Next, proceed to the Settings app, locate the Messages app, and tap it.
2. Toggle off the iMessage switch and wait for about a few seconds. Then, toggle iMessage back on and wait for it to activate. Once it’s activated, open the Message app and try to record audio on the iPhone.
Sometimes, a simple troubleshooting technique works more often than you’d think. Remember, you can only use the audio recording feature if the iMessage is turned on.
If your saved audio recording goes to Voice Memos and won’t play, don’t panic. Apple has changed how the Messages app handles audio messages over different iOS versions. It leads to confusion when trying to access or play saved recordings. So, where do audio messages go?
iPhone with iOS 11 or Earlier:
The audio message recorded from the Messages app automatically goes to the Voice Memos app. Open the Messages app and locate the audio message you want to save. Then, long-press the audio message and tap Save to make it visible inside the Voice Memos app.
iPhone with iOS 12 or Later:
On iOS 12 or later versions, things changed. It has expired, and you cannot play it if you haven’t manually saved an audio message. The audio message disappears automatically 2 minutes after being played. But if you save it, it will still go to the Voice Memos app.
Why is audio recording not working on iPhone? I understand how disappointing it is when you try to record an audio message and your iPhone won’t work. Trying the usual fixes might work, but have you considered checking your iMessage version? An old version can mess with certain features, including recording audio messages. Updating the iMessage is pretty straightforward and could fix the issue immediately.
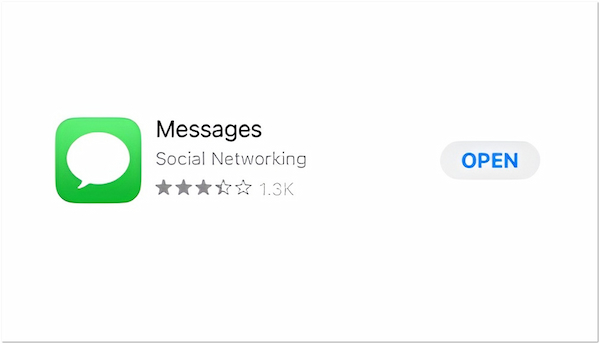
1. Open the App Store and enter iMessage on the search bar to search. There are two ways to determine if you’re iMessage is outdated or not:
• If you see an UPDATE button next to it, tap it to install the latest version.
• If you see OPEN instead, your iMessage version is updated.
2. Swipe the Message app away from the App Switcher to close it completely. If you’re using an older iPhone, double-click the Home button to access the recently used apps. Next, proceed to the Settings app, locate the Messages app, and tap it.
If updating iMessage didn’t fix the issue, you’re not out of options yet! Bugs in outdated iOS versions can cause this problem, so check for software updates. Otherwise, you can consider using an alternative iPhone voice recorder.
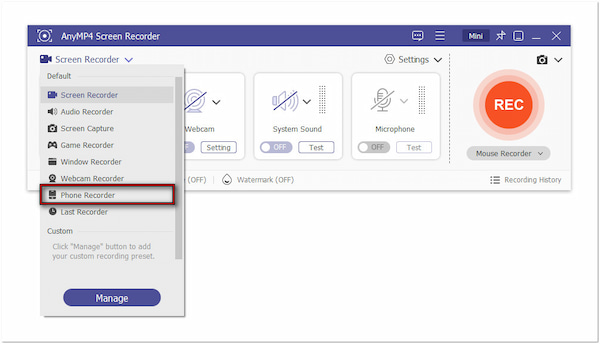
If you’ve tried all the common fixes and still audio recording is not available on iPhone, it’s time to consider an alternative. Instead of struggling with iMessage’s built-in audio recording, you can safely record iPhone audio using AnyMP4 Screen Recorder. This multifunctional screen recording software offers seven unique recording modes, including Phone Recorder. This recording mode is optimized to screen activities and audio from iOS and Android devices. Therefore, you can use this software to record iPhone audio when the built-in function isn’t working. You don’t have to worry about the export format as it supports iPhone audio formats.
Here’s how to record iPhone audio and export it safely:
1. Get started by downloading the AnyMP4 Screen Recorder for free. Install the iPhone audio recording software and wait for the installation process to complete. Once the installation is finished, open the AnyMP4 Screen Recorder on your computer.
Secure Download
Secure Download
2. Upon launching the software, it will enter the Screen Recorder mode by default. This recording mode is optimized for capturing the computer screen, so you need to switch to a specific mode. Click the dropdown arrow next to it and choose the Phone Recorder mode.
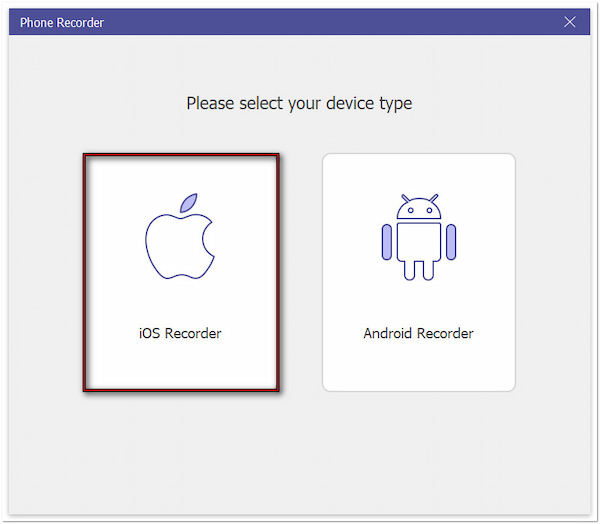
Select the iOS Recorder option as your device type to proceed with the process. But beforehand, get a wired cable and connect your iPhone to the computer. Once the computer recognizes your iPhone, tap Allow to grant computer access to your phone.
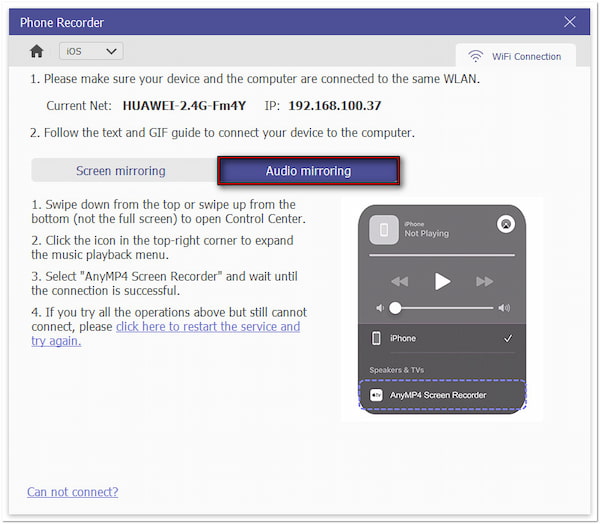
3. In the Phone Recorder window, switch to the Audio Mirroring section. Switch to your iPhone, then swipe up/down from the bottom/top to access the Control Panel. Tap the Music Playback menu to expand, and select AnyMP4 Screen Recorder. Wait for a few seconds until the Phone Recorder window turns into a Music Player.
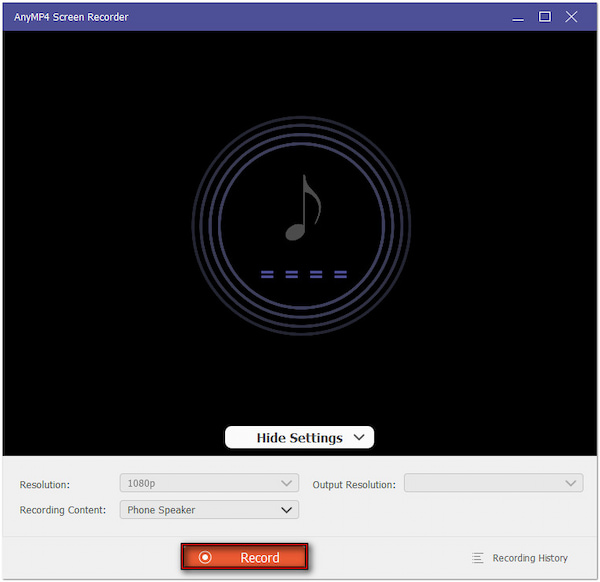
4. Before recording audio, click the Recording Content field to configure the recording settings. Select the Phone Speaker as your audio source to capture sound from your iPhone. Then, click the Record button to start recording audio on your iPhone.
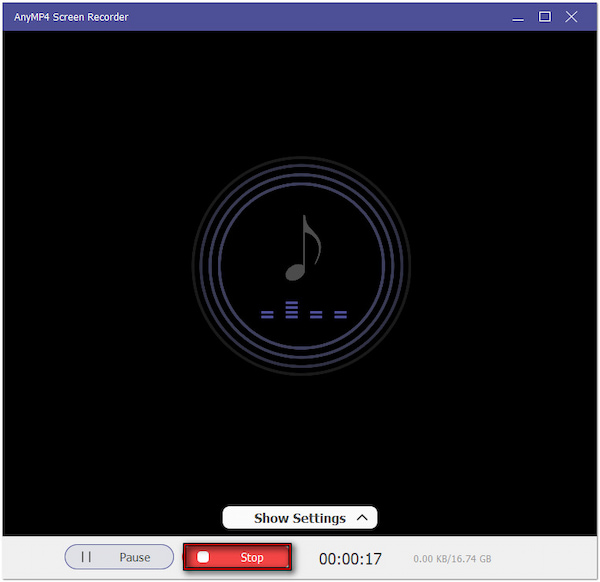
5. During recording, go to any music platform and play a sound for recording. It will reflect the audio from your phone speaker on the computer afterward. Once done, click the Stop button to end the iPhone audio recording.
Afterward, the software will take you to the preview window, where you can replay the recording and make adjustments. Use the advanced trimmer to cut unnecessary recording or the Sound Booster tool to enhance the audio volume.

AnyMP4 Screen Recorder provides a convenient solution for recording iPhone audio when the built-in option is not working. Also, you can use this software when your iPhone screen recording has no sound. Like the audio recording, the Screen Mirroring option will reflect the sound from your iPhone to the computer.
Dealing with Audio Recording Not Available on iPhone can be disturbing! But, with the solutions we’ve explored, you can quickly get things working again. But if you’re still stuck after trying all the fixes, there’s a better alternative. Instead of relying on the built-in feature, why not safely record and export iPhone audio with AnyMP4 Screen Recorder? Its Phone Recorder allows you to capture high-quality audio without limits, ensuring you’ll never miss an essential recording. So, don’t struggle with unreliable recording; get AnyMP4 Screen Recorder now.
 Posted by Riley Mitchell to Record Audio
Related Articles
 Troubleshoot iOS Screen Recording Not Working
What should you do if your iOS 27 beta/26/18/17/16/15/14/ screen recording not working, you can learn more about the best solutions to record iOS screen with ease here.
 How to Fix VLC Not Recording on Computer
Do you know that you can record screen with VLC Media Player? You can learn it here to record screen with VLC, and solve the VLC not recording problem.
 5 Easy Methods to Record a Phone Call on iPhone XR/X/8/7
How to record a phone call on iPhone since there is no built-in method? The article shares 5 best methods to record some important phone calls on iPhone.
 11 Best iPhone Screen Recorder Apps
Don't know how to find a suitable iPhone screen recorder app? In this article, we list 10 best iPhone screen recorder app for you to refer.