Suppose you have multiple mobile devices or just upgrade to a new Android phone. It is annoying that you cannot get all your contacts in one place. That is why you need the right method to transfer contacts from one Android to another. In fact, Android gives you a few options to get it.
This article shares 5 ways to sync your contacts between Android devices, from your phone to tablet or from old phone to the new one. You should read them carefully and find the most appropriate method for your situations. If you are ready, let's start it.
When transferring contacts between phones, you may focus on several factors, like ease to use, data loss, time consumption and more. From this point, we recommend AnyMP4 TransMate. It can meet all you need on contact transfer no matter you are average people or tech savvy.
Secure Download
In a word, it is the easiest way to transfer contacts between Android devices.
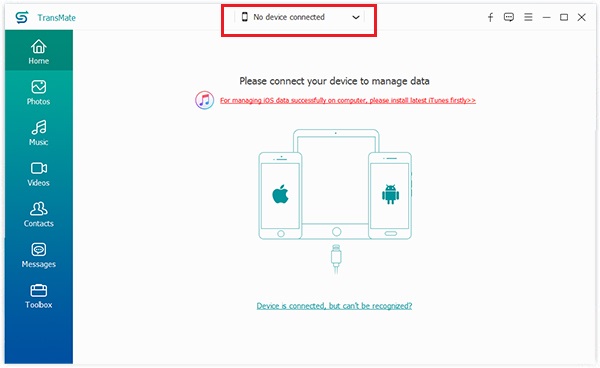
Step 1. Connect the Android phones
Download the contact transfer for Android and install it on your PC. There is another version for Mac. Connect both source and target Android phones to your computer with USB cables. Once you launch the software, it will detect your phones.
Step 2. Preview and manage your contacts
Unfold the drop-down list on the top of the window and choose the source Android phone. Head to the Contacts tab from the left-hand column and you will be presented all your contacts on the right panel. Preview them and the Trash icon on the top ribbon allows you to remove unwanted items.
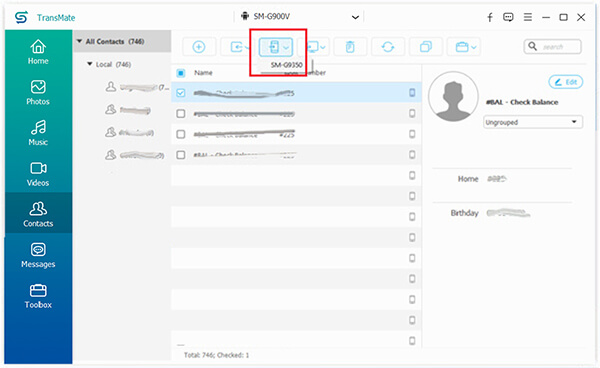
Step 3. Sync contacts between Android
Tick the checkbox next to each contact you want to transfer, click the Phone icon on the top ribbon and choose the target Android phone. A few seconds later, you will get the selected contacts on both phones.
SIM card does not only receive the signals, but also offers some storage capacity for storing your contacts. When you upgrade to a new phone, you may keep use the old SIM card. It means that SIM card can transfer your contacts to new phone. Today, most SIM card can store thousands of contact items.
Step 1: On the source Android phone, open the Contacts app, and tap the Settings menu with a three-line icon.
Step 2: Tap Manage contacts -> Import/Export contacts -> Export contacts, and select SIM card as the destination.
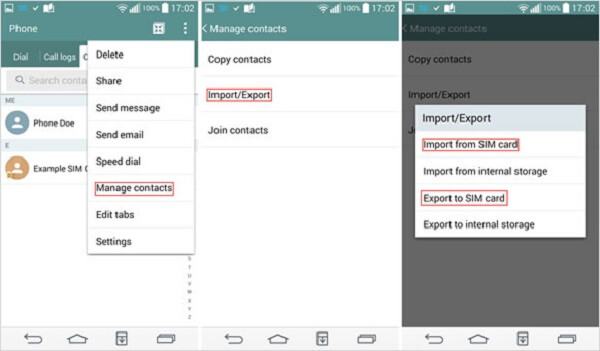
Step 3: Wait for all your contacts export to finish. Take off the SIM card and insert it into your new Android phone.
Step 4: Turn on the target Android phone, and run the Contacts app. Go through the Import/Export contacts option and choose Import from SIM card.
Note: This need you to take off the SIM card from the source phone and insert into the target device. However, some prepaid mobile phones have been packed and do not allow you to take off the SIM card. This method is not available to these phones.
When you set up a new Android phone, you need a Gmail account. It also an option to transfer contacts from one phone to another. After setup, the contacts sync will happen automatically. Firstly, you must have a Gmail or Google account. Moreover, make sure to put both your phones online. Then you can follow the steps below to finish it.
Step 1. On the source Android device, go to Settings -> Accounts -> Add Account, select Google and sign in your Gmail account.
Step 2. Make sure to turn on the Sync Contacts options in Settings -> Accounts -> Google. Once your phone is online, your contacts will go to the Contacts tab in your Gmail account.
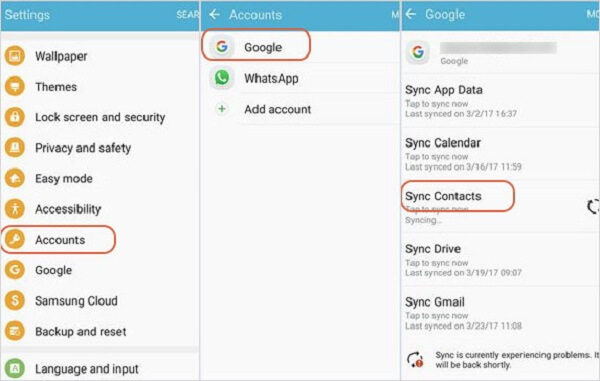
Step 3. Next, switch to the new Android phone, open the Settings app and sign in the same Gmail account. Then tap Sync Now in Settings -> Accounts -> Google -> Contacts.
Note: This way is faster than transferring contacts from Android to Android using Bluetooth. However, it takes longer time than the USB cable.
Many Android users utilize SD card to expand the internal storage. It can store photos, documents and music. When it comes to contacts, you can export them as a vCard file and save on SD card. In another word, SD card can help you to transfer contacts from one Android to another too.
Step 1. Run the Contacts app on the source phone, and tap the Settings menu at the upper right corner. Choose Export under Manage Contacts, select all or desired contacts, and tap Export to VCF file.
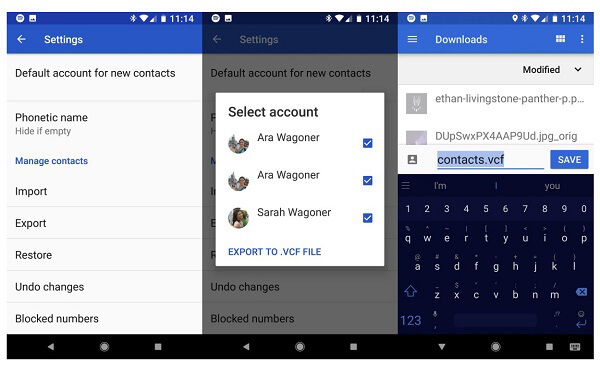
Step 2. Rename the VCF file and tap Save to export contacts. Once it is done, move the VCF file from the internal storage to the SD card.
Step 3. Take off the SD card from the source phone and put it into the target Android phone.
Step 4. Tap Settings -> Manage contacts -> Import/Export contacts -> Import from SD card in the Contacts app, and select the VCF file on the SD card.
Note: The design on each Android phone is various, so the details may be different on your phone. However, the procedure is similar on most Android devices.
Some famous manufacturers have released services to help users. If you want to transfer contacts from Samsung to Samsung, Smart Switch can help you to do it quickly. Before contacts transfer, make sure to install the Smart Switch app on both Samsung devices and connect them to the same Wi-Fi network.
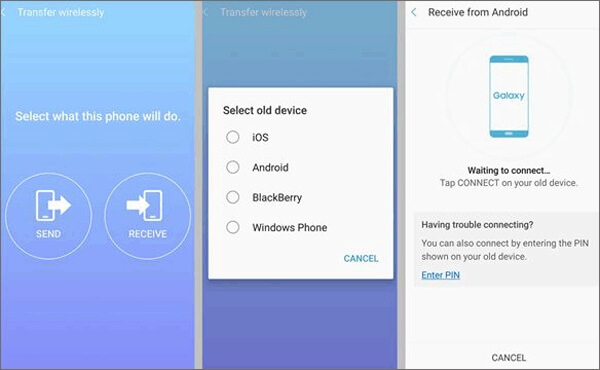
Step 1: Run the data transfer app on both devices, and select transfer files wirelessly. The app also works on the connection of USB cable.
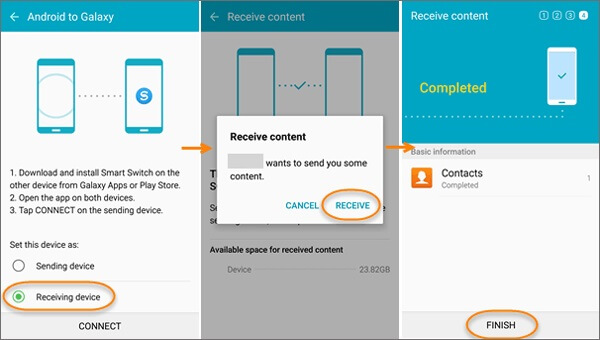
Step 2: On the target phone, tap Receive and select Android to move one. Switch to the source phone, tap Send, select Contacts and other data types you want to move to the other phone.
Step 3: After selecting, tap Send again on the source phone, and tap Receive on the target phone to start accepting the contacts. When the Completed screen pops up, tap Finish.
Note: It may take a while to finish the process if you have a lot of contacts.
Conclusion
This article tells you 5 verified methods to transfer contacts from one phone to another. SIM card is suitable when you upgrade to a new Android phone and still want to use the old SIM card. If you have a Gmail account or SD card, they can help you to do it too. The Smart Switch app is available to the latest Samsung phones. AnyMP4 TransMate allows you to sync all or specific contacts between Android phones quickly. Encounter other problems when syncing contacts between Android? Please leave a message below.
 Posted by Ted Klarso to Mobile Transfer
Related Articles
 8 Proven Ways to Transfer Music from iPhone to iPhone 17/16/15/14/13/12/11/XS/XR/X/8/7/6
How can you sync music from one iPhone to another one? This article gathers the easy 8 ways to make it via iTunes, Wi-Fi, Bluetooth, Finder, Apple Music, AirDrop, Home Sharing, and other apps.
 How to Transfer Data Between Android and iPhone with Top 5 Software
How to transfer data from iPhone to Android or from Android to iPhone? Here are 5 ways of moving files between iPhone and Android with top 5 applications to make it with/without computer.
 A Step-by-step Guide to Transfer Messages from iPhone to Android
Transferring messages from iPhone to Android phone or tablet does involve a few steps, but it's not complicated. If you're making the switch, here is a step-by-step guide.
 4 Ways to Transfer Videos from PC/Mac to iPhone with/without iTunes
Wondering how to transfer videos from PC/Mac to your iPhone? In this post, we will show you 4 easy-to-use methods to transfer videos efficiently on PC and Mac.
