There is a rising situation of iPhone users stating that Messages cannot show past messages and texts. The phone displays the messages are indexing, and because of this, users cannot access the history of their messages. This incident usually happens after your phone updates, mainly the iOS 13 software update. Does this involve the Messages app? Or something to do with the phone? Let’s learn all the additional details below to fully understand what it means when your messages are in the middle of the indexing process. Please finish the article to grasp the solution for fixing this issue.

Before we dive into solving this issue, we must know what message indexing means. Usually, when an iPhone undergoes a software update, your iPhone, iPad, or any iOS device reindexes almost all of your content. Contents like the devices’ photos, videos, app data, and of course, the messages. Sometimes, it will only take a little time for the phone to reindex its past messages and be functional simultaneously. However, there are times that it will not function properly. So, it is indexing the message for too long if it takes too much time to reindex those messages.
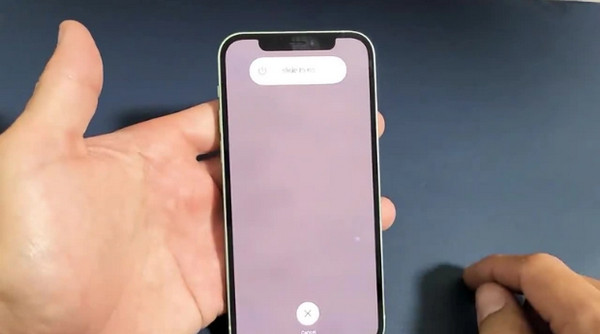
An example is after you update your iPhone to its latest software. Try accessing the Messages app and searching your past messages using keywords. If your iPhone shows the message immediately, then the device reindexed successfully. But if, on the other hand, your device finds it hard to deliver results and says, More results will be shown once the messages finish indexing, that is the concern for this article.
iPhone devices possess cutting-edge technology, but even the most advanced can malfunction. As long as it's manageable, it's normal. Take note that if these steps do not work, we recommend getting your device checked. These solutions are only alternatives or to understand; these are remedies. Now that you know how and why this happens, we will show you the steps to fixing this incident, so you will see if you need to take it with an expert.
If this incident continues to happen for a few more minutes or more, you now need to be creative to fix this issue. We will provide multiple solutions to resolve the concern for messages to finish indexing. If the first few solutions do not resolve the issue, skip on to the next.
The most basic way to fix an issue to anything is to restart your phone. Even in this situation, this is applicable. Do this every time you encounter a technical problem on your iPhone. Sometimes our devices just need a little reset.
1. Press and hold the Power and Volume Down buttons simultaneously. By doing this, you will see a slider appear. Slide the Power icon to the right to shut down your phone.
2. After 20-30 seconds, it has finally shut down. Finally, press the same buttons again to power your phone. It is pretty simple, and we recommend you always take this step first.
This can be a universal solution fo fix iPhone messages issues like messages not delivered, messages not syncing, and more.
All iPhone devices have a setting section dedicated to Search and Index. Tweak this setting section to ensure that the process of indexing your device because of the software update is functioning well. Do this by providing that the messaging app is included in the list of the apps.
1. Launch the Settings application built-in on your iPhone, then tap Siri & Search. On this portion, scroll down until you find the applications. Look for Messages, then tap it to access the settings.
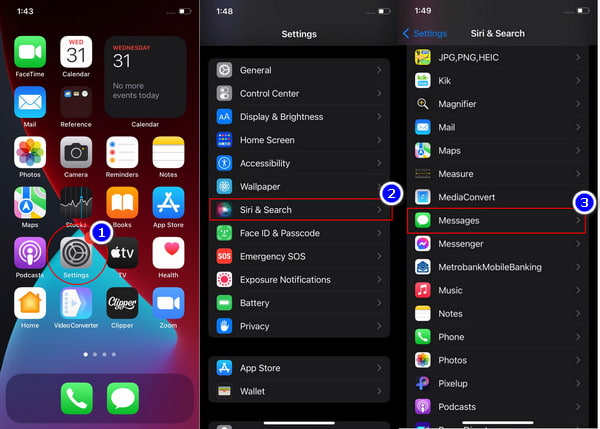
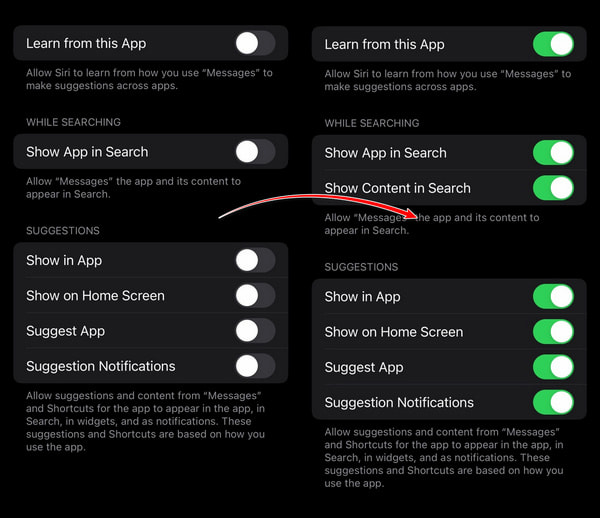
2. Ensure that these settings are toggled on. If they are already enabled, toggle them off, then re-open them.
After this procedure, go back to the Messages app and check if the messages finished indexing. Or you can use the Spotlight to search for your iPhone messages to see if they are indexed. If this process is done, you check all your texts.
Sometimes, this situation is caused by iCloud. Sometimes, there are complications related to iCloud syncing to the iPhone messaging app. To make sure that this app is functioning right, reset iCloud Messages. Before that, do not forget to download iCloud messages for a backup for avoiding any data loss.
By doing this, you are restarting the indexing process of Messages.
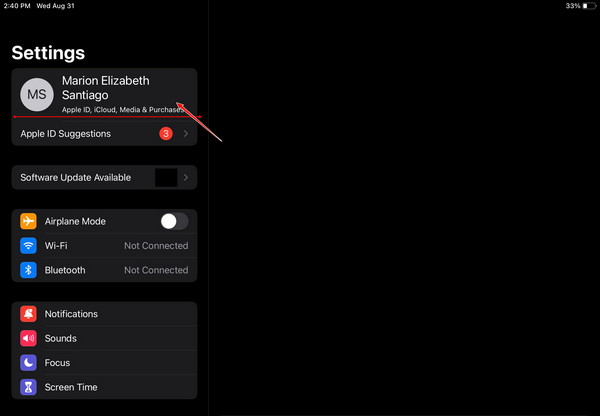
1. First, access the Settings app on your iOS device. Note that this is applicable both on iPhone and iPad devices. Tap on the Apple ID settings to access iCloud.
2. Following, tap on iCloud to access the applications that are in sync with it. By default, all of them are enabled. In this case, turn them off.
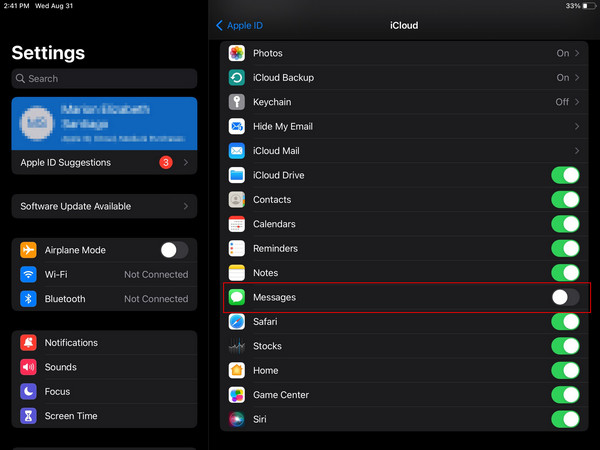
3. After toggling off the sync of the iCloud on the Messages, restart your device. Repeat the first step, then toggle it on again. This procedure will continue the messages’ indexing process of the device.

Take note that before you do this, you need an excellent internet connection so your iOS device can communicate with the iCloud server and function well in re-syncing the iCloud to the Messages. By doing these steps, you are speeding up the indexing process. There are more procedures to do, so do not worry if these first three steps do not work.
This incident is common if your phone’s software recently updated its latest version. But note that messages indexing error is only applicable in the iOS 13 update. Make sure to run the newer versions of iOS 13 or, much better, iOS 15.
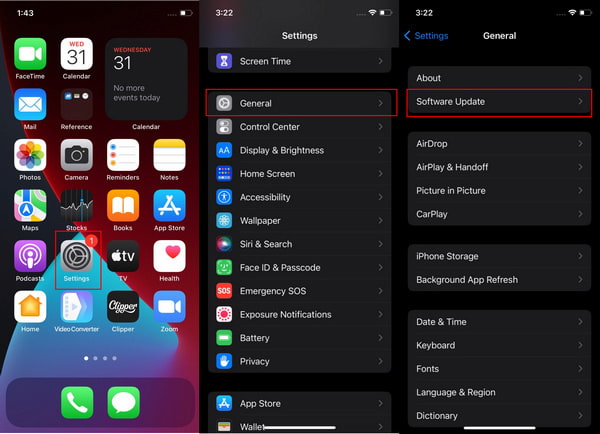
1. Open the Settings application. Scroll down and navigate to find the General settings. Upon tapping, select Software Update to proceed.
2. After accessing it, click on Download and Install below. After clicking on it, wait for the device to update automatically.
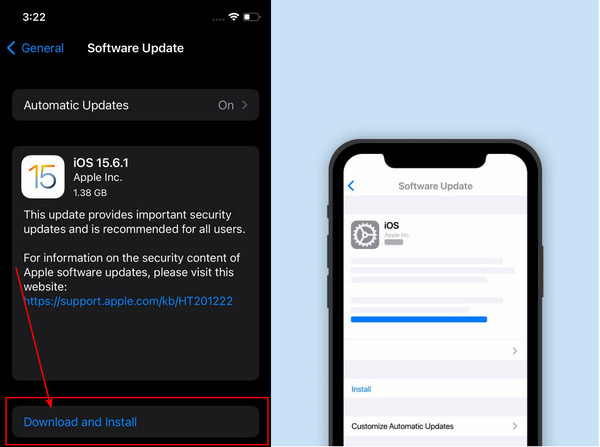
During the update, you should connect iPhone to Wi-Fi. If you have no Wi-Fi connection, just check this article to update iOS without Wi-Fi.
These are the simple solutions you should take to try and fix the issues of indexing messages. We recommend that if these solutions still do not work, you should go to an expert and have it checked. Alternatively, read the next part of this article to figure out how to view your messages using your PC.
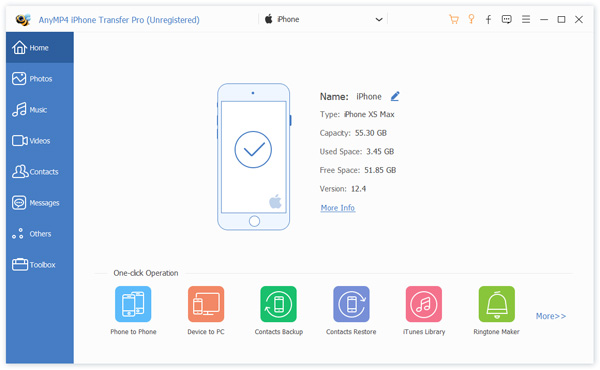
If there is an emergency and you need to view your messages immediately, you will need software that will allow you to access files on your phone directly. We will present you AnyMP4 iPhone Transfer Pro. This ultimate iTunes alternative can easily access and copy your photos, pictures, music, videos, contacts, and of course, text messages to your PC!
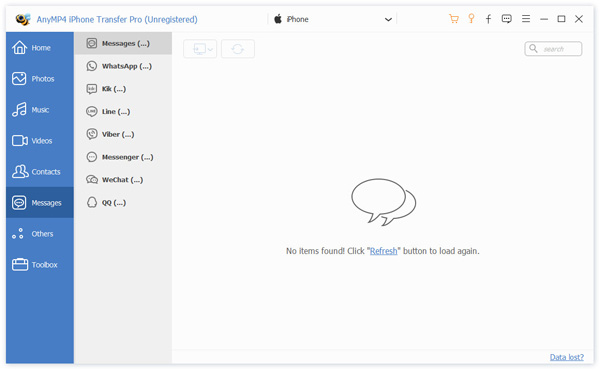
Using this program, you must connect your iPhone to the computer with the light cable to view your messages. Then use the Messages feature to view the texts and search for keywords in the history of your it if you want to recall a conversation.
This software possesses many functions. We will list them below to show you what these functions are.
Recommendation
These are the steps to access or transfer iPhone messages on a computer using AnyMP4 iPhone Transfer Pro.
1. Go on and download the software from the website. Click on Free Download. Install and Launch it
Secure Download
Secure Download
Afterward, select Messages on the left side of the functionality selections to open its features.
2. Connect iPhone to this PC by inserting the light cable into your iPhone and the other PC. Automatically, your iPhone will prompt a question if you trust the device you’re being connected to or not. Tap Trust. Afterward, the program will load and analyze your device.
3. After backing up the device, you can search and access the messages, search for the history, and save the conversations by clicking the Export to PC option at the top.
And with those simple steps, your iPhone messages are now accessible on this computer using this program!
1. How long does it take for iPhone messages to finish the indexing process?
After you update the software of your iPhone to iOS 13, the Messages app will reindex all your messages. The time it reindexes depends on how many texts are to be indexed. It might take a day if you have long message history for years.
2. Where do deleted texts go on an iPhone device?
Once an SMS is deleted on your iPhone, it will not be removed permanently. First, the network provider receives a copy of it. It is only marked as deleted by the iPhone’s internal database.
3. Can you see the iMessage history on iCloud?
Suppose you received or sent someone a message on a synced device. As long as the device is synced to an iCloud, it is accessible.
Thank you for making it to this part of the article! We are glad that you made efforts to finish this article. We hope that we have helped fix this issue of message indexing. Please continue to use AnyMP4 programs for your future multimedia endeavors. We will be glad if you share this article with your friends and family. Visit our website for related content like this. Thank you!
 Posted by Angelica Liwanag to iOS Tips
More readings
 iMessage on PC: Getting iMessage even without macOS or iOS Device
No macOS or iOS for iMessaging? Do not worry because we can use other mediums using iMessage. It includes our Windows device. Thus, let us learn how to get iMessage on a PC quickly.
 5 Ways to View iPhone Messages (SMS and iMessages) on PC
Reading messages on a PC from an iPhone is a possible thing to do. Through the help of this fantastic software. Thus, let's see how we can use them through this post.
 How to Block Messages on iPhone: Ease Unwanted Messages
We block text messages on iPhones to protect our privacy and peace of mind. Therefore, join us in this article as we learn the best methods to do it.
 5 Verified Solutions to Fix iMessages Not Syncing or Updating on Mac
When you find your iMessage is not syncing between iPhone and Mac, don't panic. This guide shows you 5 solutions to fix this problem.