Editing audio files is an essential multimedia editing skill, as properly using good sound design dictates the overall quality of your media projects. Whether you are using videos or audio-only, your audience must enjoy a good auditory experience. In this case, learning how to fade out audio in GarageBand holds importance for users who want to provide good sound design for their audio projects. Without further ado, let us now proceed with the article to start editing your files with a smooth audio fade-out.

| Audio Fade-Out Options | Best Used For |
|---|---|
| Master Track Fade Out (GarageBand) | Adding fade-out effects directly in the master track automatically. |
| Volume Automation (GarageBand) | Adding manually adjustable fade-out effects that can be controlled where they start and end. |
| Video Editor Fade Out Audio (AnyMP4 Video Converter Ultimate) | Adding fade-out effects at specific points in the video via an adjustable slider or with a time stamp. |
We will start this guide by featuring the easiest option for how to fade audio in GarageBand via Master Track fade-out editing. This will be featured first, as the option using this method can apply audio fade-in and fade-out effects automatically, making it both the quickest and easiest solution.
1. Open GarageBand and select Mix on the program’s taskbar. Then, select Create Volume Fade-Out on Main Output.
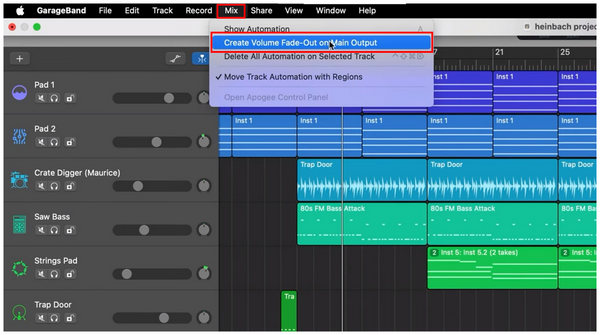
2. If you check your file’s master track, a fade-out effect is now added to it.
Using this shortcut in the Mix tool is the fastest way to add fade-out effects to your audio editing projects.
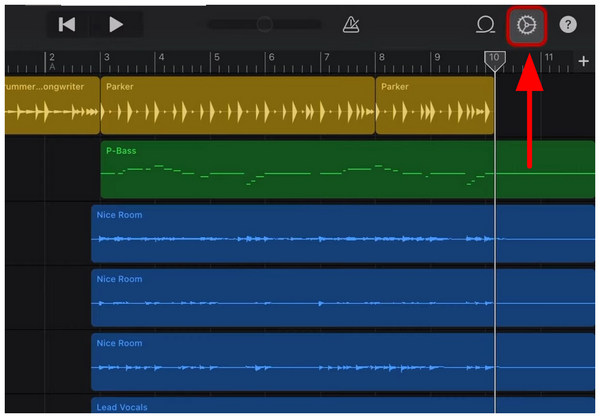
1. Select the Settings option in the upper-right portion of your GarageBand iOS menu.
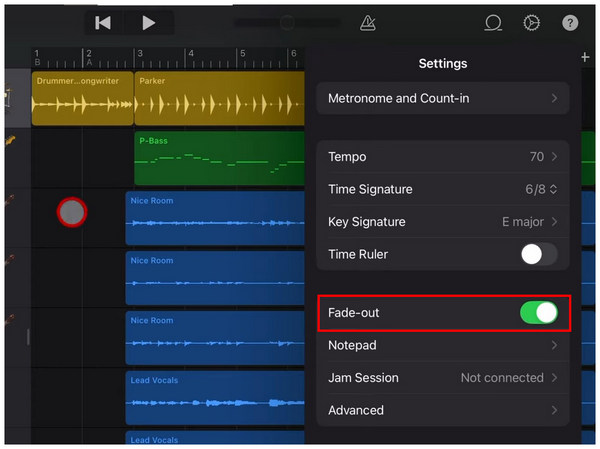
2. Under the Settings tab, enable the Fade-out setting. GarageBand will then automatically add fade-out effects to your media’s master track.
Since most mobile versions of cross-platform tools are designed to be easier, learning how to fade a song in GarageBand for iOS devices is simpler as well.
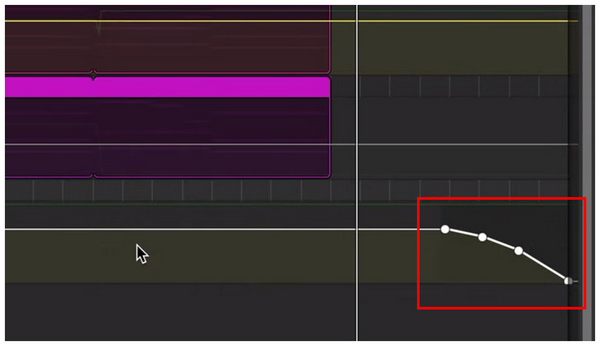
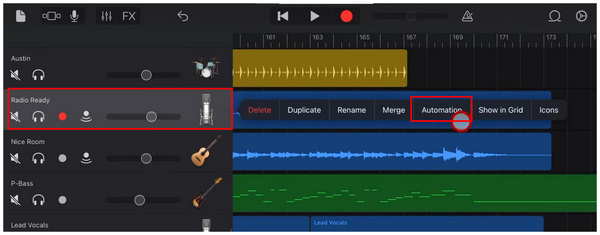
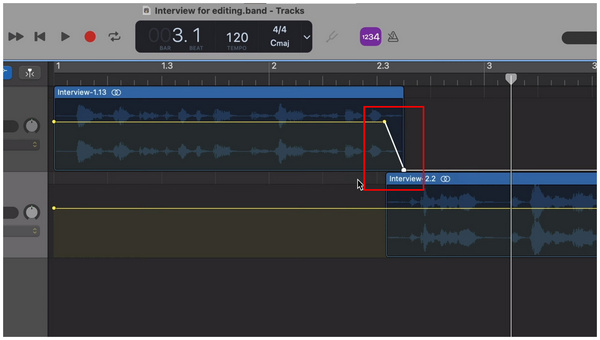
1. Select the track you want to add a fade-out to, then click on Automation.
2. Next, select the Edit Lock tab to enable track editing. Then, add two Volume Points by tapping in the track you are editing to set where the fade-out effect will start and end.
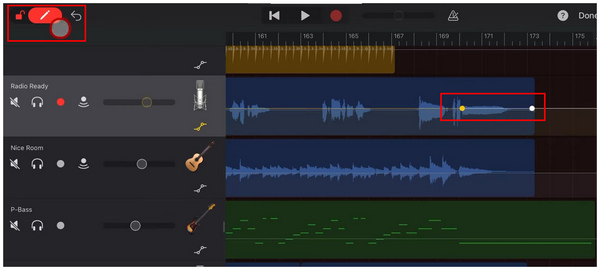
3. To add the Fade Out effect, drag the second Volume Point you have added downwards. This adjustment is what will make the audio volume have a fading effect.

If you want to learn how to fade in music in GarageBand, the same principle applies, as you only need to edit the volume point from the beginning of your audio file instead of its ending portion.
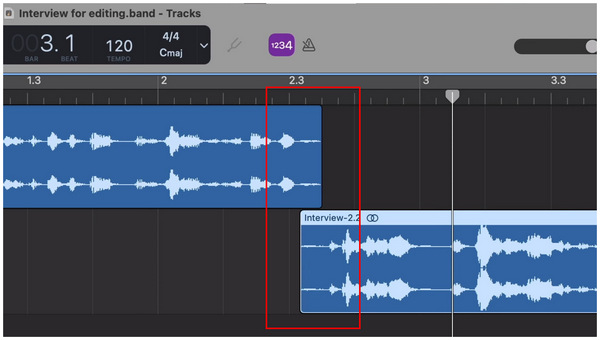
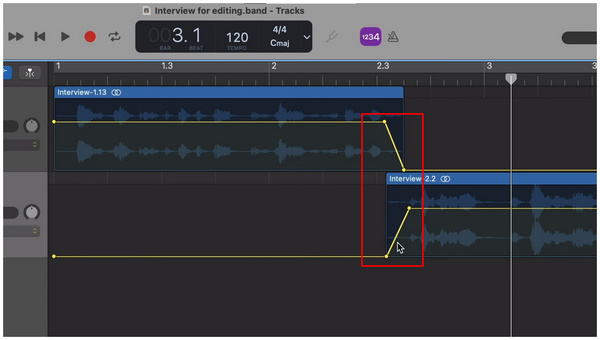
1. Line up the audio files you want to add a crossfade effect to. The section where the audio will end and begin should be where they are connected.
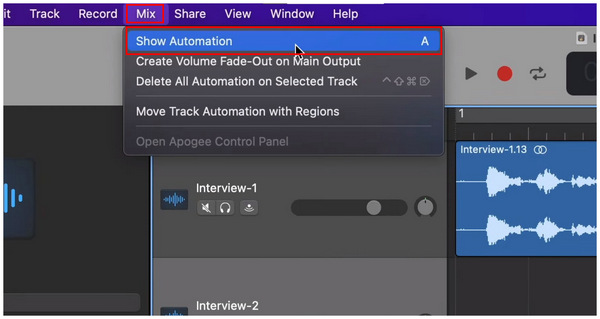
2. ext, click on Mix and then select Show Automation.
3. Add Volume Points to the first audio. Then, add the Fade Out effect on the second volume point.
Then, add another Volume Point on the second audio. Make sure to lower the volume on the first point to add a fade-in effect.
Since crossfade is inherently more complicated, it requires more setup when compared to the fade-out effect only. However, it highly improves the audio quality of your file if it is set up properly. Learning the concept will also help you learn how to fade in and out in GarageBand.
With the options to fade out audio files in GarageBand now discussed, let us now move forward to an alternative option that can add fading audio effects to videos with AnyMP4 Video Converter Ultimate.
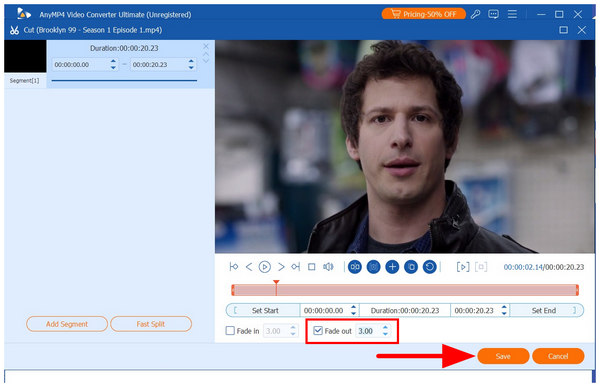
Unlike GarageBand, which uses volume points and automatic fade-outs, AnyMP4 Video Converter Ultimate’s video editor tab uses a time-based option where you can set a specific number of seconds when the fade-out effect will start.
This design made adding fades possible within a single click. It was also easy to apply since both the Fade In and Fade Out options in the program can be activated via checkboxes. These adjustment options support batch processing, which allows a more practical and faster audio editing process.
Finally, the software also has commendable format support, as it can read 500+ media formats and convert videos optimized for YouTube, TikTok, or mobile devices.
To learn how to use one of the best audio and video editing tools for Windows and Mac, make sure to read our tutorial about AnyMP4 Video Converter Ultimate.
You may also download the tool for an easier time following our guide.
Secure Download
Secure Download
1. Open AnyMP4 Video Converter Ultimate and select the MV Editor tool. Then, click on the Add button to import the video you want to have its audio edited.

With the video now added, click Trim.

2. In the video editor tool, select the check box beside Fade Out. Then, edit the time value depending on where you want the fade-out effect to start. Click on Save to confirm your fade-out settings.
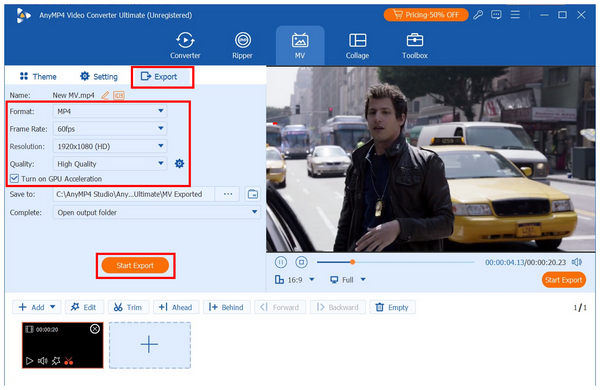
3. Back in the MV Editor tab, click on the Export section. There, you can apply more adjustment options to your video, such as Format, Frame Rate, Resolution, and Quality. To confirm your editing tools, click on Start Export.
Now that we have discussed the best alternative option for adding music to videos or editing audio fade effects, you now have the option to edit both video and audio files without dealing with complex volume points and audio fading setups.
Zero-crossing error is a short but audible audio click after the fade-out effect is applied. This happens when the volume point you have set is still in the audio media. To prevent this, make sure to set the ending volume point beyond the media in the editing timeline.
A linear trap is the abrupt drop of volume during the fade-out effect. To avoid this mistake from occurring, make sure to prolong the length between your volume points. This will give your fade-out effect a smooth transition instead of an abrupt drop-off.
Reverb tail occurs when the end of the fade-out effect is cut abruptly, causing the audio to be clipped unnaturally. To prevent this error, you may extend the reverb tail of your audio project within the settings of GarageBand. This error could also occur in other software, which makes this solution also effective for errors such as cutting clips in After Effects.
Ghost fade causes your audio to have two separate fade effects. This happens when you add an audio fade effect to a single track and the master track itself. To avoid this issue, only add a fade effect to one track.
A crossfade dip occurs when the transition between the two audio files is too low. This gives the effect that the volume has been cut, which defeats the purpose of crossfades. To avoid this issue, make sure the audio you are transitioning is overlapped and not connected via crossfade.
Why can't I hear my fade in GarageBand?
Failing to hear the fade effect in GarageBand occurs if your audio-fade volume is too low. This may give the effect that your audio cuts abruptly. You can fix this issue by prolonging the fade effect duration.
How do I crossfade two tracks?
You need to overlap both tracks. Then, add a volume point for each of them. Finally, adjust the volume points so that the first track fades out into the second track. The second track should then fade in. You may apply this principle in other software, making it also applicable for adding audio fade in Premiere Pro.
What is the shortcut for automation?
For GarageBand on a Mac computer, the shortcut is the A key. This will automatically enable the automation option. You can then add volume points to your audio track.
Is adding fade in GarageBand difficult?
No, it is not. However, it is not as automated as adding fade-out effects. You need to learn how to apply volume points to add fade-ins.
Why do crossfades sound good?
Crossfades add a smooth transition between each audio. This sounds good since it eliminates the dead air when transitioning between different audio files. This is also useful for video or audio editing.
Now that we have provided a full tutorial for different options to fade out audio in GarageBand, we hope that you will now enjoy a smoother audio editing experience. For video editing and a more beginner-friendly option, make sure to use our proposed alternative in AnyMP4 Video Converter Ultimate, which you can download below.
Secure Download
Secure Download
 Updated by Mark Cristobal to Edit Audio
More readings
 2 Ways to Speed Up Audio in GarageBand
Are you having questions such as how do you speed up a song on GarageBand? Read this article to learn two methods that can provide you with answers.
 How to Fade in and out Audio in iMovie on MacBook Pro/Air/iMac
With your project opened, you can follow our comprehensive guide to fade audio in iMovie on Mac without damaging the video and audio quality.
 Davinci Resolve Separate Audio from Video Smoothly with Ease
Are you wondering how to separate audio from video Davinci Resolve? Read this simple guide to learn it quickly and with the best alternative following.
 How to Fade Audio in Premiere [Easy & Advanced Techniques]
Unsure how to fade audio in Premiere? Don't worry! This guide will cover both beginner-friendly and advanced techniques for smooth audio transitions.