How to Add Music to DaVinci Resolve Using Two Options (2026)
Among modern video editing software, DaVinci Resolve is gaining traction among graphics-focused multimedia practitioners. This was made possible by the program’s freeware nature, coupled with its advanced video editing features, most especially for graphic effects work. However, these elements will not be complete without proper sound design. In this case, this article aims to provide a detailed guide on how to add audio to DaVinci Resolve, utilizing two options available within the program.
Method 1: Quick Add Audio Track in Davinci Resolve (Using the Edit Page)
Best Used For: Quickly adding an audio track during video editing.
We will begin this article by providing a guide for the most basic option in DaVinci Resolve to add an audio track to an MP4, using the regular Edit page. Similar to multimedia editing programs, the Edit track in DaVinci Resolve is where the main editing timeline is located. By adding your audio in this section, you can now edit your project’s audio and video simultaneously.
Fortunately, adding your audio file to the main editing timeline of DaVinci Resolve is easy to do. To learn how to use this option, please read our three-step guide below.
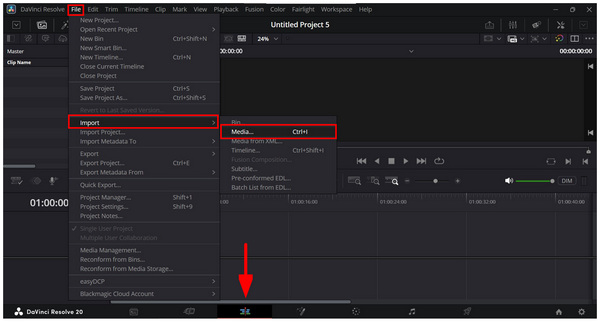
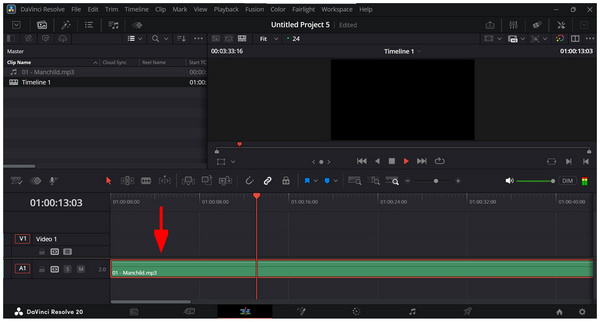
1. Open DaVinci Resolve and go to the Edit page. Then, click on File > Import > Media to open your file manager and look for the audio file you want to add.
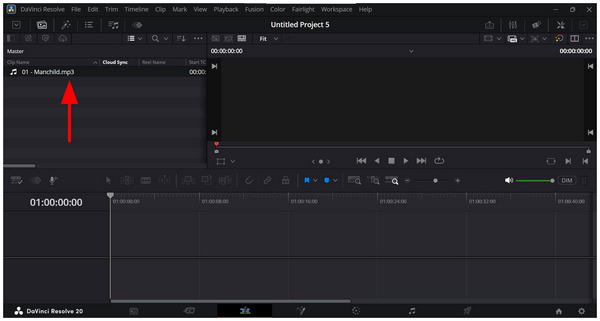
2. Once the audio track you want to use has been added to DaVinci Resolve, click and drag the file down to the Editing Timeline.
3. With the audio track now added to the Editing Timeline, you can now use the audio editing tools of DaVinci Resolve to continue editing your project.
With your audio file now added to the Edit tab of DaVinci Resolve, you can continue working on your project or start editing the audio file using the tools available in the Edit page.
For more advanced audio adjustments, you need to learn how to add audio in the Fairlight page of DaVinci Resolve, which will be highlighted in the next section of the article.
Method 2: Detailed Control to Add Audio Track in Davinci Resolve (Using the Fairlight Page)
Best Used For: Applying advanced editing adjustments to the audio track itself.
If you want to apply more advanced editing works in DaVinci Resolve, or you want to add a second audio track to your editing project, you have to use the more advanced music and audio editor option in the software with the Fairlight page. With this option, you gain access to more advanced editing tools, a professional-quality audio mixer, an audio equalizer, and advanced noise cancellation features.
Unfortunately, the advanced nature of Fairlight options may be overwhelming for beginners. As such, it is only advisable to use this option if you are already experienced with intermediate to advanced-level audio editing.
To learn how to import audio files in this DaVinci Resolve page, make sure to read our three-step guide below.
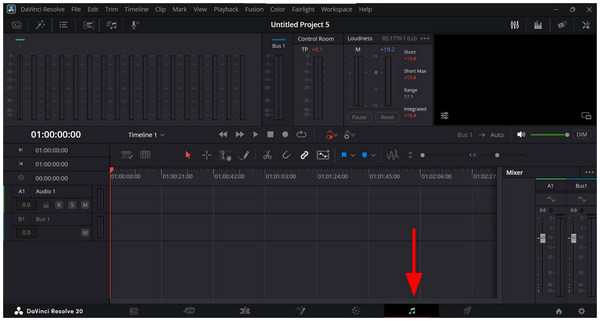
1. Open DaVinci Resolve and then go to the Fairlight page.
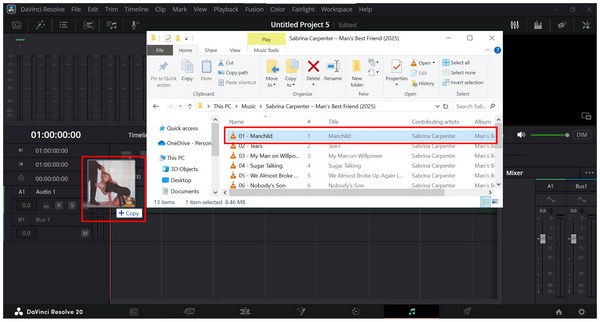
2. Then, open your file manager and click and drag the audio track you want to add to DaVinci Resolve.
3. Once the file has been added to the program, you may now play it to preview if the audio works properly. Afterwards, you can use the more advanced audio editing tools available on the Fairlight page.
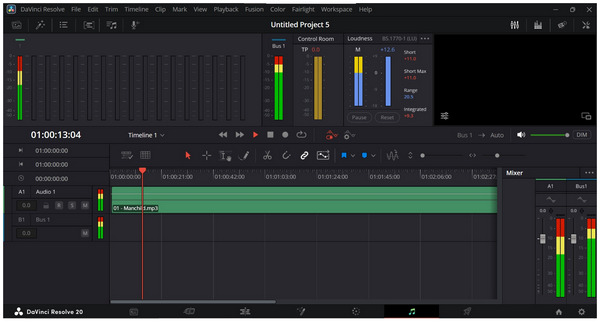
Once your audio has been imported to the Fairlight tab, you can now enjoy editing, mixing, and applying audio effects to the media file you have added. However, be sure to use only adjustments with which you are familiar, as experimenting with these effects may negatively impact your audio.
Part 3. Tips for Better Audio Effects
Use Separate Tracks for Voice, Music, and Effects
If you are already familiar with audio mixing, it is a good option to separate the tracks for the vocals, music, and effects. Using this option, you can balance your audio track to fit its intended use in your project.
Normalize Volume Levels
For improved consistency, you can use audio volume normalizing. This function allows you to set a limit for all audio tracks in your program, ensuring their maximum volume is consistent. It can even be used to complement applied noise reduction effects from the software.
Add Fade-Ins and Fade-Outs for Smoother Transitions
Finally, audio fade-in and fade-out work great as well to enhance the transition between different audio tracks in your project. This works great when used with videos featuring different subjects, as it allows you to balance your audio and video content. It can even be useful if you are only editing an audio file, as a fade-out effect will enhance the way your audio finishes.
Part 4. Easy Davinci Resolve Alternative to Add Audio Tracks
Although adding an audio track in DaVinci Resolve is easy, the program’s traditional video editing background still makes it less beginner-friendly. As such, using an alternative that works by directly adding audio to a media file works best, and AnyMP4 Video Converter Ultimate is exactly that.
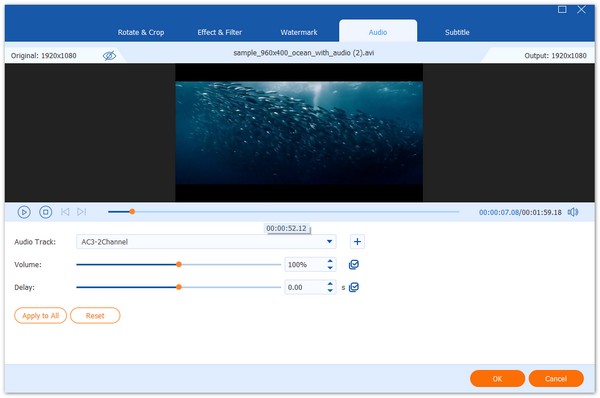
Compatible with both Windows and macOS computers, AnyMP4 Video Converter Ultimate features a dedicated Audio tab in its beginner-friendly Edit window. In this section, you can directly add external audio tracks to the video you are editing without using traditional editing timelines.
Despite the lack of a dedicated timeline, you can still adjust the added audio’s volume and synchronization to the video via delay adjustments. For added practicality, these adjustments may be previewed on the spot within the same Edit tab.
To ensure that your audio track will work properly, AnyMP4 Video Converter Ultimate supports a wide range of audio formats, including MP3, WAV, FLAC, WMA, and other uncommon file types.
For an easier time understanding how AnyMP4 Video Converter Ultimate works better than DaVinci Resolve in terms of ease of use, make sure to read our three-step guide below. Do not forget to download it as well for an easier time following our tutorial.
1. Open AnyMP4 Video Converter Ultimate and select Add Files in the Converter tab to import the video for which you want to add an audio track.
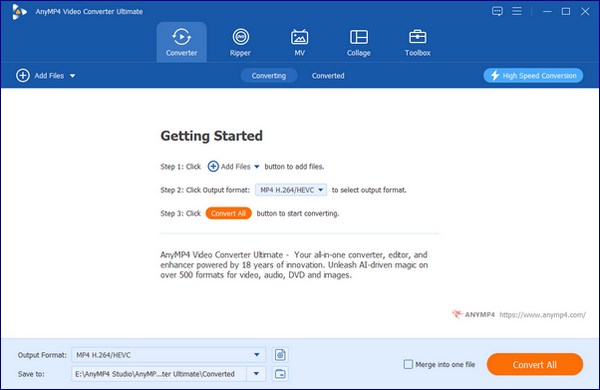
With the video now added to the program, click Edit.
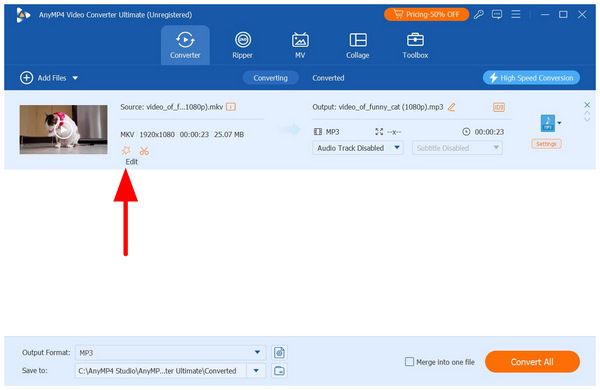
2. In the Edit menu, go to the Audio section. Then click on the Add Audio button. Then, navigate your file manager to find the audio file you want to add.
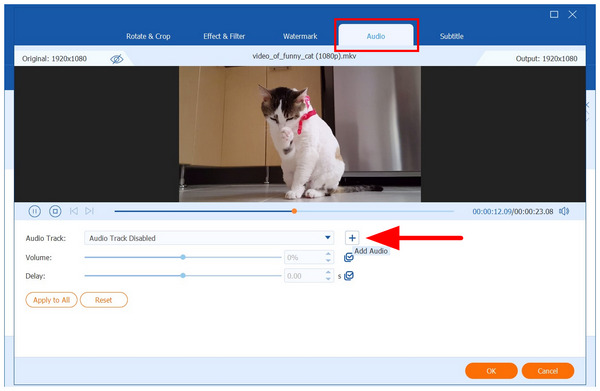
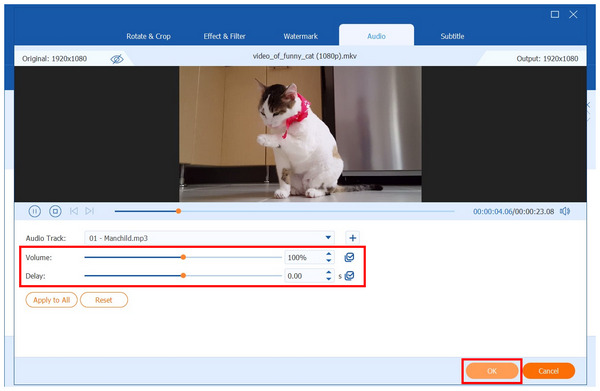
3. With the audio now added, you can control its Volume or Audio Delay according to your liking. Otherwise, simply click on OK to confirm the added audio.
By following this three-step guide, you will now be able to add an audio track to your editing project without needing to use the complex editing timeline interface. This alone makes AnyMP4 Video Converter Ultimate a highly practical tool, especially for users who are not yet accustomed to traditional editing tools like DaVinci Resolve.
Part 5. FAQs About Adding an Audio Track in DaVinci Resolve
Can I record audio directly in DaVinci Resolve?
Yes, you can. This was made possible by the Fairlight page of the program, which offers a dedicated digital audio workstation to its users. Unfortunately, operating it requires skill and experience.
What is the Fairlight panel in DaVinci Resolve, and how do I use it?
The Fairlight panel in DaVinci Resolve is its digital audio workstation. Here, you can apply advanced editing to your audio file. This involves heavy editing tools, recording, and other audio-related options.
Are there keyboard shortcuts for adding audio tracks in DaVinci Resolve?
You can use the combination of Control + I to import files directly into DaVinci Resolve. This shortcut will add the selected media files to the Media Pool. These files will then become available for addition to the editing timeline.
How to add another audio track in DaVinci Resolve?
You can add multiple audio tracks in DaVinci Resolve with no problem. This is true both for the Edit and Fairlight pages of the program. Unfortunately, these options take significant skills to use effectively.
Is DaVinci Resolve beginner-friendly?
No, it is not. DaVinci Resolve is infamously complicated to use. It requires advanced skills to operate and near-professional experience to use effectively.
Conclusion
Now that we have provided our readers with detailed tutorials on adding audio tracks in DaVinci Resolve, we hope that this article has provided you with enough information to edit audio files in your projects more easily. Fortunately, this issue can be resolved by using a beginner-friendly editing tool, such as AnyMP4 Video Converter Ultimate, which can be downloaded using the link below.