Free Download100% Clear & Secure
Free Download100% Clear & Secure
Quick Summary:
When I first started editing videos in my bedroom, I was obsessed with making my footage look like a Hollywood blockbuster. I would immediately slap the most intense, moody filters onto my timeline the second I imported my clips. The result? Absolutely disastrous. Many beginners jump straight to creative filters before fixing their exposure, leading to muddy, unprofessional footage.
It took me years of trial and error in the post-production workflow to realize that creating a beautiful video isn’t just about applying a cool preset. It’s a two-step dance: correction, then grading.
In this comprehensive guide, we are going to dive deep into color correction vs color grading. Whether you are editing a school project, a YouTube vlog, or a short film, mastering the visual storytelling aspect of color is your ticket to a professional outcome. Let’s get started!

If you think of your video as a house, color correction is laying the concrete foundation. You can't paint the walls or hang up beautiful artwork if the floor is crooked.
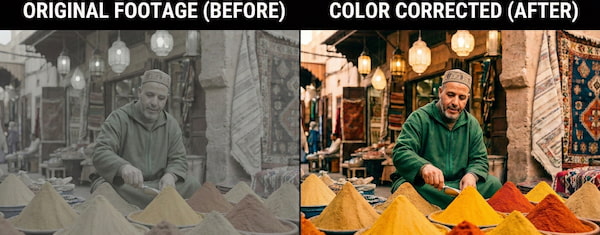
Color correction is the highly technical, foundational process of adjusting your video clips so that they look as natural and accurate as possible. The goal here is simple: make the image look exactly like what your human eye saw on the day of shooting. When you shoot on modern cameras, especially if you are shooting RAW footage or flat log profiles, the initial image comes out looking gray, washed out, and entirely lifeless. Color correction brings it back to reality.
During the color correction phase, your main job is to fix the mistakes that happened on set. Even professional cinematographers have to deal with clouds blocking the sun or artificial lights casting a weird yellow tint. Here is what we focus on:
If you're ever confused about where to start with color correction, always look at human faces. Our brains are hardwired to recognize accurate skin tones. If your subject’s face looks green or purple, stop what you are doing and fix your white balance immediately!

Once your foundation is perfectly flat and clean, it’s time to decorate the house. This is where the magic happens!
If color correction is about technical accuracy, color grading is entirely about art and emotion. Think of color grading as the 'personality' phase. It’s where you tweak the tones to nail a specific look or dial in the emotional vibe of your shots. When people search for the difference between color correction and color grading, this is usually the fun part they actually want to learn about.
Have you ever noticed that sci-fi movies like The Matrix have a distinctly green, sickly tint to them? Or that post-apocalyptic movies like Mad Max are aggressively orange and yellow? That is color grading in action.
Color isn't just aesthetic; it’s psychological. Use blue, and you’re instantly telling the audience that this character is isolated or the world is cold. Warm golden tones can make a scene feel nostalgic, romantic, or safe. During the grading process, editors manipulate saturation (how intense a color is) and hue (the actual shade of the color) to tell the story without using any words.
To speed up this process, many editors use LUTs (Look-Up Tables). Think of a LUT as a highly advanced Instagram filter designed for professional video. It’s a mathematical formula that instantly maps the standard colors of your footage to new, cinematic colors. However, a LUT only looks good if the footage has been properly color corrected first!
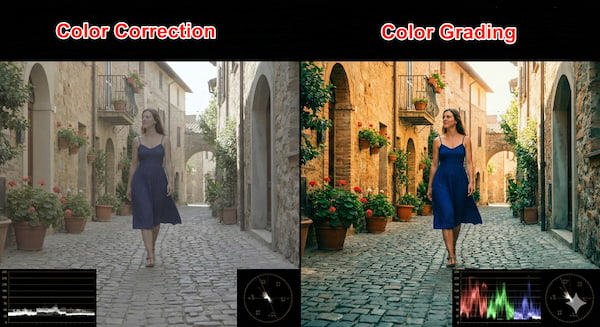
To truly understand color grading vs color correction, it helps to look at them side-by-side. You cannot have a great video without utilizing both steps.
Here is a quick comparison table breaking down color correction vs grading:
| Color Correction | VS | Color Grading |
| Realism and accuracy. | Primary Goal | Artistry, mood, and style. |
| "Does this look right?" | Core Question | "How does this make you feel?" |
| Exposure, white balance, contrast. | Key Adjustments | Color tints, intense saturation, stylistic LUTs. |
| Step 1 (Always comes first). | Workflow Step | Step 2 (Applied after correction). |
| Matching shots from different cameras. | Consistency Focus | Applying a unified "look" over the matched shots. |
To really get a handle on the difference, we need to break down where correction ends and grading begins. Let's look at them side-by-side.
One of the biggest lessons I learned in my editing journey is respecting the sequence of operations.
Why do we care so much about this? Because human psychology demands it.
Don't rely just on your computer monitor, as screens can lie! Trust your scopes (like the RGB parade and vectorscope) to read the actual mathematical data of your colors.
Knowing the theory is great, but you need the right software to bring your vision to life. Let’s look at three phenomenal tools that cater to different levels of expertise.
Secure Download
Secure Download
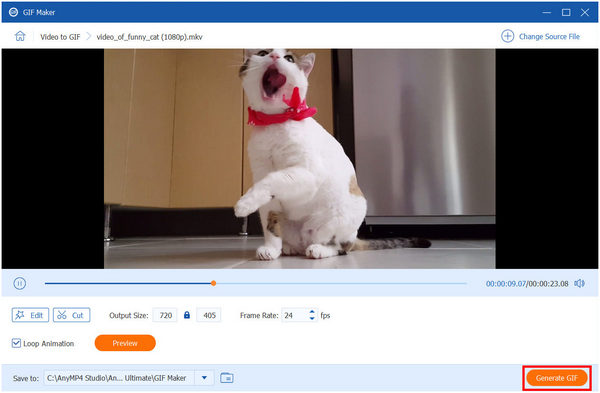
If you are a beginner or someone who needs to make quick, effective adjustments without getting bogged down in overwhelming technical menus, AnyMP4 Video Converter Ultimate is a fantastic choice. While it is primarily known for lightning-fast video conversion, it features a built-in Video Enhancer and basic color adjustment tools. You can easily tweak brightness, contrast, saturation, and hue with simple sliders. It is incredibly user-friendly, making it perfect for students or casual creators who need to fix their lighting before uploading a project to social media or YouTube.
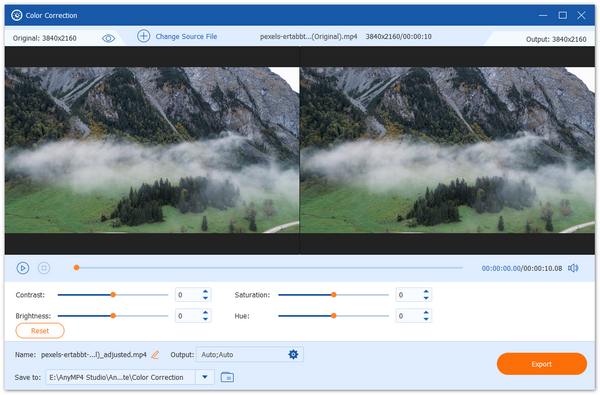
For intermediate to advanced editors, Adobe Premiere Pro is the industry standard, and its Lumetri Color panel is a powerhouse. Lumetri makes it incredibly easy to switch between correction and grading seamlessly. You can use their intuitive color wheels to adjust your shadows, midtones, and highlights independently. Furthermore, Premiere Pro gives you access to essential analytical tools like the RGB parade—which shows you the exact levels of red, green, and blue light in your image—ensuring your exposure and white balance are mathematically perfect.
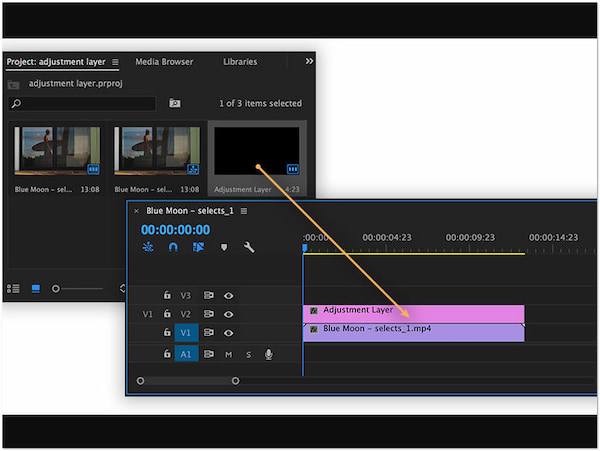
Check Color grading and Color correction in Adobe Premiere Pro here.
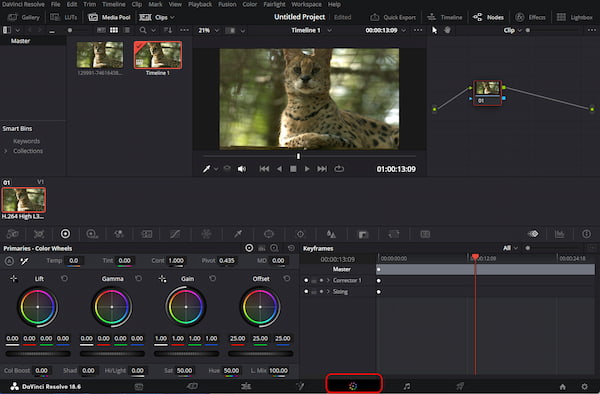
When Hollywood professionals color grade feature films, they turn to DaVinci Resolve. Blackmagic Design created this software specifically for advanced color science, and the best part is that the standard version is completely free. Resolve uses a node-based workflow instead of standard layers, giving you infinite control over specific parts of your image. You can isolate a specific color (like a red car) and change it without affecting the rest of the scene. It features the most accurate vectorscope in the business, which is an absolute lifesaver for making sure your skin tones fall exactly on the skin tone indicator line.
Check more details about DaVince Resolve Color Grading.
Q: Should I color correct or color grade first?
A: You should always color correct first. Color correction creates a neutral, balanced baseline. If you skip this step, your creative color grade will apply unevenly to your footage, exaggerating mistakes in exposure and white balance. Fix the problems first, then add the art.
Q: Can I do color grading on my phone?
A: Yes, absolutely! While you won't get the granular control of DaVinci Resolve, mobile apps like VN Video Editor, CapCut, and the mobile version of Adobe Lightroom allow you to adjust temperature, contrast, and apply custom LUTs (Look-Up Tables). It is a great way to practice the fundamentals of color grading vs color correction on the go.
Q: What is the difference between color correction and color grading in Premiere Pro?
A: In Premiere Pro, both processes happen inside the Lumetri Color panel, but they are found in different tabs. Color correction is typically done in the "Basic Correction" tab (adjusting white balance, exposure, and contrast). Color grading is done in the "Creative," "Color Wheels & Match," and "Curves" tabs, where you add specific tints, faded film looks, or push stylized colors into your shadows and highlights.
Q: What is the difference between color correction and color grading in Lightroom?
No, it is not. Editing audio speed is a simple adjustment. You can usually edit it using a single tool on most media editors.
Should I change the speed of my video file?
A: Lightroom is primarily a photography tool, but the principles are the exact same as in video. Color correction in Lightroom involves using the "Basic" panel to fix your RAW photo's exposure, recover blown-out highlights, and set a proper white balance. Color grading is done using the dedicated "Color Grading" panel (formerly Split Toning), where you creatively inject colors into your midtones, shadows, and highlights to give the photo a specific, stylized vibe.
Q: What is the difference between color correction and the color effect?
A: Color correction is the subtle act of making an image look true to real life. A "color effect" (often found in basic editing software or social media apps) is a pre-made, blanket filter thrown over an image to drastically change it, often without regard for preserving natural dynamic range or skin tones. Think of correction as a scalpel, and a color effect as a sledgehammer.
Understanding the dynamic relationship of color correction vs color grading is one of the biggest leaps you will take in your video editing journey. It transforms you from someone who just "cuts clips together" into a true visual storyteller.
Remember the golden rule: always start with a clean canvas. Take the time to patiently color correct your footage—balancing your exposure, fixing those white balance issues, and ensuring your skin tones look perfectly natural. Once that technical heavy lifting is done, you earn the fun part. You can dive into color grading, using color wheels, pulling reference from your favorite films, and playing with hue and saturation to make your audience truly feel the story.
Don't be afraid to experiment with the tools we discussed, whether that's the beginner-friendly AnyMP4, the versatile Premiere Pro, or the powerhouse that is DaVinci Resolve. Your first few attempts might look a little wild, and that is perfectly okay! The more you practice balancing your color correction vs grading, the closer you will get to achieving that flawless, breathtaking cinematic look.
Secure Download
Secure Download
 Updated by Mark Cristobal to Edit Video
More readings
 3 Ways to Change the Color of a Video (Beginner Guide)
Learn how to change the color of a video like a pro here! Discover effective methods for color transformation to add visual impact to your videos.
 Colorize GIF Image: Turning Black & White to Vibrant Colors
Discover how to colorize GIF images and breathe new life into black-and-white animations. Learn techniques to add vibrant colors using popular editing tools.
 AI Photo Color Correction: Get Photo Preset Right
Read this article guide to learn how to apply color correction photos and videos using five software to improve your captured images and video clips tenfold.
 Colorize Video: Enhance Visuals Like Never Before
Discover the magic of colorize video! Learn how to breathe life into old black-and-white footage, turning them into stunning, vibrant masterpieces.