- Convert video, audio, and DVD over 500 formats.
- GPU acceleration to speed up the conversion process at 70X faster.
- More than 16 editor tools in the toolbox (Updating).
- Create videos for TikTok, YouTube, Facebook, etc.
Free Download100% Clear & Secure
Free Download100% Clear & Secure
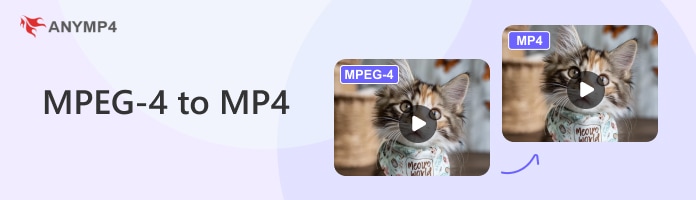
MPEG4 to MP4
Back to main page
Setting
Custom resolution:
| Core Features | Web Version | Pro Desktop |
| Max File Size | 50MB (Login: 100MB) | No Limit |
| Daily Limit | 2 Files (Login: 10 Files) | Unlimited |
| AI Video Upscaling | No | Yes (Up to 4K/8K) |
| GPU Acceleration | No | Yes (70X Faster) |
| Batch Processing | No | Yes |
Failed to upload media file! Please try again, or use AnyMP4 Video Converter Ultimate for Desktop.(Error code: 20015)

The original video resolution is higher than 1080p. If you want to output the original high resolution, you need to download the Pro Version. Or would you like to output the default 1080p resolution?

Quick Summary:
Let’s be real for a second. You just dug up an old hard drive, or maybe you exported a project from a legacy camcorder, and you're staring at a batch of files labeled .mpeg4. You try to Airdrop them to your iPhone, upload them to TikTok, or play them on your smart TV, and you get that dreaded "Format Not Supported" error.
Format conversion is a strict necessity due to these relentless device compatibility issues. But when you start Googling "convert MPEG4 to MP4," you are immediately bombarded with sketchy online tools promising the moon.
As someone who works with video files daily, I know your exact fears:
1."Is this going to take five hours?" (Slow conversion speeds are a nightmare).
2."Will my video look like a pixelated mess from 2005?" (Loss of video quality is unacceptable when you want lossless video conversion).
3."Who is actually looking at my files?" (Potential privacy leaks from online tools are a massive, often ignored risk).
In this guide, I’m going to share my personal experience and show you exactly how to convert MPEG4 to MP4 safely and efficiently. We will cut through the technical jargon, prioritize your data privacy, and find the perfect offline video converter to get your videos playing smoothly on any device.
How We Test
| Link to Tool | Data Privacy | Speed (Hardware Accel.) | Quality Loss | Batch Processing |
|---|---|---|---|---|
| AnyMP4 Video Converter Ultimate | 100% Local / Secure | Blazing Fast (GPU enabled) | Zero (Lossless Remuxing) | Yes (Unlimited) |
| VLC Media Player | 100% Local / Secure | Average (CPU bound) | Low (Custom settings needed) | Yes (Via complex command line) |
| FreeConvert (Web Tool) | Cloud-based (Risky) | Dependent on internet upload | Noticeable compression | Yes (Capped by file size limits) |
Let's dive into the practical solutions. I’ve categorized these based on use cases so you can pick the one that fits your exact needs.
Real Test:
If you want to know how to convert MPEG4 to MP4 without losing quality, AnyMP4 Video Converter Ultimate is your best bet. It is a dedicated desktop offline video converter that leans heavily into hardware acceleration and local processing. This tool is built for people who value their time, want zero quality degradation, and refuse to upload gigabytes of personal data to random web servers.
Detailed Steps:
1. Add Your Files
Free download the software for your Windows 11 or macOS machine and launch the application.
Secure Download
Secure Download
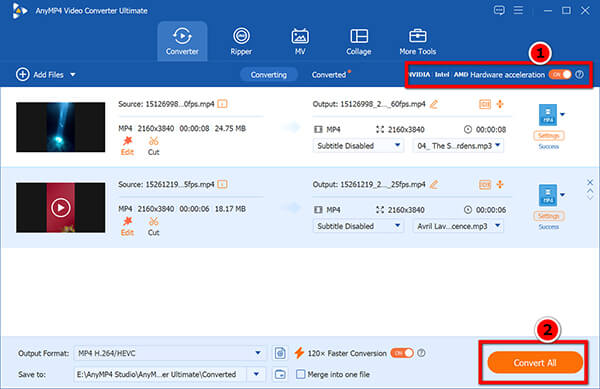
Click the big + icon in the center or simply drag and drop your MPEG4 files into the main window. (You can drag in an entire folder if you want to batch convert MPEG4 videos fast).
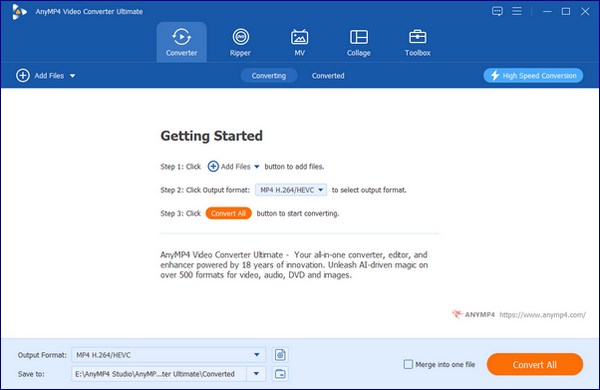
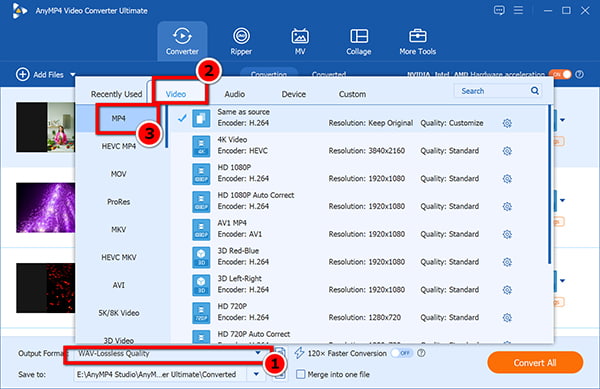
2. Select the Output Profile
Click on the "Output Format" dropdown menu in the top right. Select "Video," choose "MP4," and specifically click on "Same as Source."
The "Same as Source" profile ensures that the video encoder is set to "Keep Original." This triggers a "remux" rather than a re-encode, saving you massive amounts of time!
3. Convert MPEG4 to MP4
Hit the "Convert All" button at the bottom-right corner. The software will process your files locally and pop open the folder when it’s done.
Ensure the GPU icon (usually an NVIDIA or AMD logo) at the bottom of the interface is highlighted.
Personal Experience:
I recently had to convert over 100 gigabytes of old college project videos from MPEG4 to MP4. Using an online converter would have taken me days just in upload time, not to mention the anxiety of handing over my intellectual property to a cloud server. AnyMP4 chewed through the entire batch offline in under 15 minutes. The interface is completely idiot-proof, and because I used the "Same as Source" setting, the final MP4 files looked exactly as crisp as the originals. No stuttering, no audio desync—just perfect lossless output.
Real Test:
You probably already have VLC installed on your computer right now to play weird video formats. But did you know it’s also a powerful converter? VLC is the ultimate open-source Swiss Army knife. It guarantees local data privacy and costs absolutely nothing. The catch? The user interface looks like it was designed by engineers in 1998, and it can be a bit intimidating if you aren't tech-savvy.
Detailed Steps:
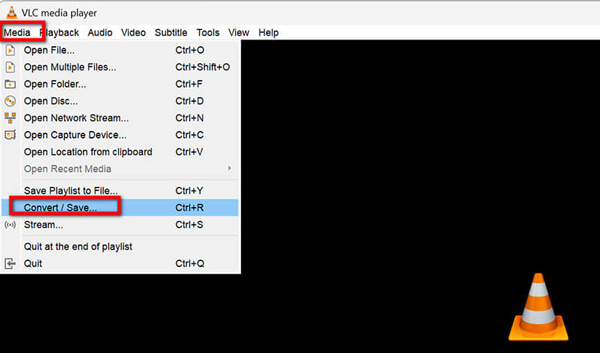
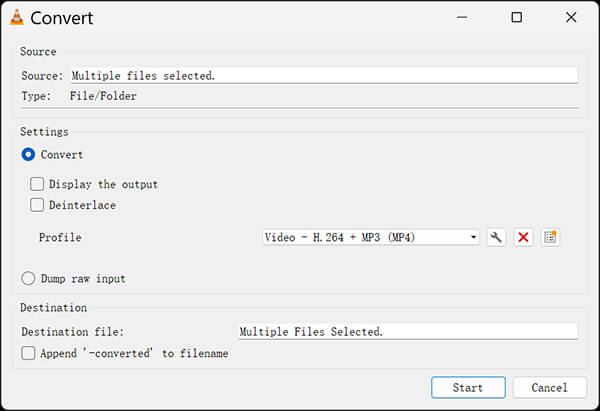
1. Open the Convert/Save Menu
Launch VLC. Go to the top menu, click Media, and select Convert / Save... (or hit Ctrl+R / Cmd+R).
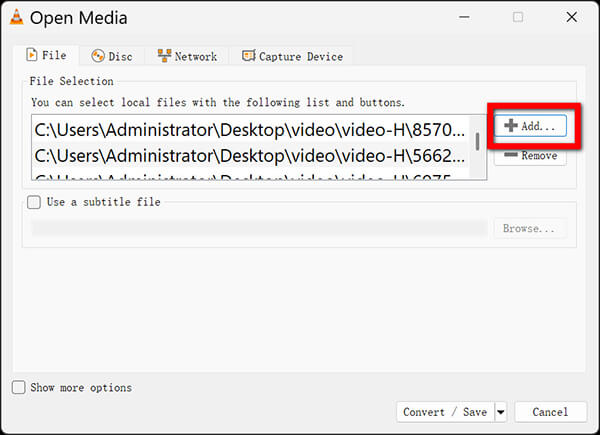
2. Add Your File
Under the "File" tab, click the Add button and locate your MPEG4 video. Then, click the Convert / Save button at the bottom.
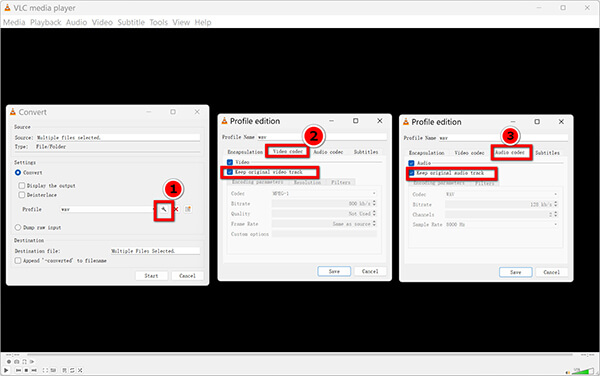
3. Choose the Profile
In the new window, look at the "Profile" dropdown. Select Video - H.264 + MP3 (MP4).
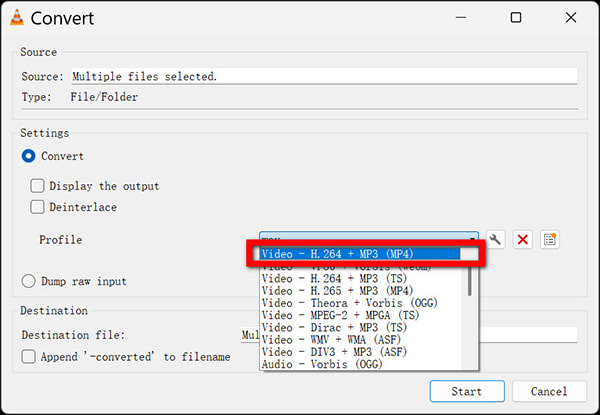
4. Tweak for Quality (Crucial Step)
Click the small "wrench" icon next to the profile dropdown. Go to the Video codec tab. Check the box that says Keep original video track. Do the same under the Audio codec tab. Click Save.
5. Start Conversion
Choose your destination file path by clicking Browse (make sure to name the file with an .mp4 extension). Finally, hit Start.
Personal Experience:
VLC is my go-to recommendation for friends who are completely broke and just need to convert one or two files. It works exceptionally well. However, my personal gripe with VLC is the lack of visual feedback. When you hit "Start," the only way you know it's working is by watching the little blue playback bar at the bottom crawl across the screen. I once forgot to check the "Keep original video track" box, and VLC spent an hour compressing my video into potato quality. So, follow step 4 carefully!
VLC doesn't have a native, user-friendly way to batch process. If you need to convert large MPEG4 files offline in bulk, you either have to write a custom command-line script (yikes) or use Method 1.
Real Test:
Sometimes you are on a locked-down work laptop where you can't install software, and you just need to convert a tiny, 20-second clip. That’s where online web tools like FreeConvert come in. There is no installation required, making it highly accessible. However, this convenience comes at a heavy cost: strict file size limits, reliance on your internet connection speed, and potential cloud privacy risks.
Detailed Steps:
1. Upload MPEG Files
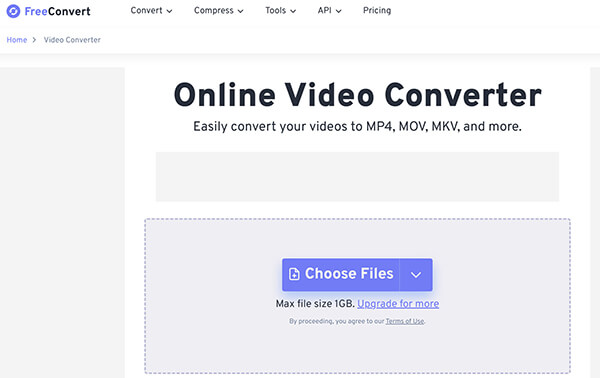
Open your browser and go to FreeConvert.com. Click Choose Files and select your MPEG4 video files from your device.
The max file size of this freeware is 1GB. If you have large video files, you need to compress MPEG files firstly.
2. Select Output
Ensure the output format is set to MP4.
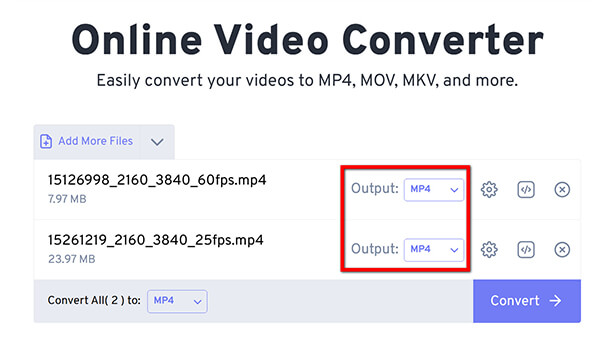
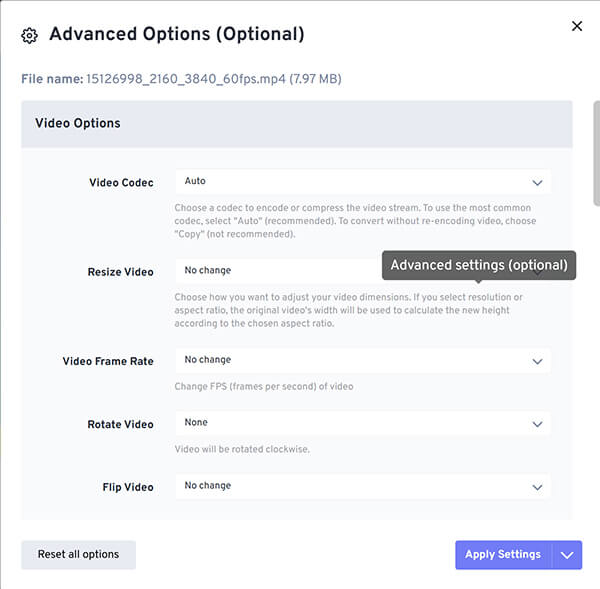
Adjust settings (optional): Click the gear icon to access advanced options. You can try to set the video codec and adjust the bitrate, though free tiers often cap your quality.
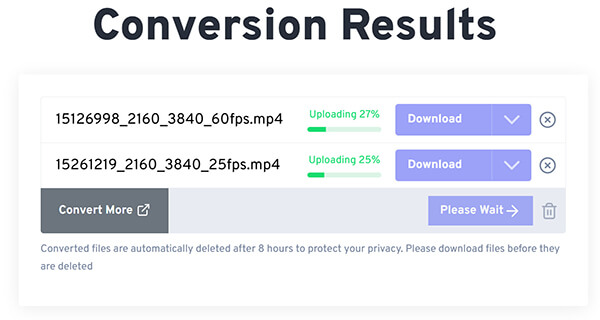
3. Convert & Download
Click Convert. Wait for the file to upload to their servers, process, and then click Download MP4 to save it back to your hard drive.
Personal Experience:
I use FreeConvert strictly for memes or funny clips I want to send in group chats. It’s incredibly easy. But let me be perfectly clear: I never use this for client work or personal family videos. Once you upload a file to a cloud server, you lose control over it. Even if a site promises to delete your files after 24 hours, data breaches happen constantly. Furthermore, trying to upload a 4GB file on a standard home Wi-Fi network will make you want to pull your hair out.
If your video contains sensitive business data, personal identification, or private family moments, skip online converters entirely. Your digital privacy is worth more than the convenience of a web tool.
If you are going to be managing video files, you need to understand one fundamental concept: MPEG4 is not the same thing as MP4. Conflating the two is the biggest concept confusion gap on the internet today.
Let’s use an analogy. Imagine a video codec as the type of liquid (water, soda, juice), and a container format as the type of bottle holding it (glass, plastic, metal).
The Magic of "Remuxing"
Why does this matter? Because if your old file is an .mpeg4 (meaning the container and the codec share the same name, which happens with older Sony/Panasonic camcorders), you don't actually need to "convert" the video data. You just need to take the MPEG-4 video track out of the old, incompatible container and put it into a shiny new MP4 container.
This process is called remuxing (multiplexing).
When you re-encode a video, the software decodes the pixels and recompresses them. This always results in quality loss and takes a lot of processing power. When you remux, you are simply swapping the box. The video data is untouched. It takes seconds, uses almost no CPU, and results in a 100% lossless output. That is why using desktop software (like AnyMP4 or VLC) that allows you to "Keep Original Video Track" is the ultimate pro-move.
Is MPEG4 exactly the same as MP4?
No. MPEG4 is a video compression standard (a codec) used to encode the actual video data. MP4 is a multimedia container format that stores video, audio, and subtitle data. An MP4 file can contain video encoded with the MPEG4 codec, but it can also contain video encoded with H.264 or HEVC.
Does converting an MPEG4 file to MP4 reduce the video quality?
It entirely depends on how you do it. If you use a tool that re-encodes the video, yes, you will experience a drop in quality due to compression. However, if you use a desktop converter to remux the file (keeping the original bitrate and video codec), the conversion is 100% lossless with zero quality reduction.
Are online video converters safe for sensitive or private videos?
Generally, no. While many reputable sites claim to delete your data within 24 hours, uploading sensitive videos (home movies, unreleased commercial projects, internal corporate communications) to a third-party cloud server introduces an unnecessary data privacy risk. Always use a localized desktop converter for sensitive files.
How can multiple MPEG4 files be batch-converted efficiently?
The fastest way to batch convert MPEG4 videos fast is by using dedicated desktop software like AnyMP4 Video Converter Ultimate. You can drag an entire folder of videos into the interface, apply the "MP4 - Same as Source" profile to all of them simultaneously, and let your computer's hardware acceleration process them in bulk offline.
What is the fastest way to change a video format on macOS and Windows 11?
The fastest method is using a desktop application that supports GPU hardware acceleration (utilizing Apple Silicon on macOS or NVIDIA/AMD graphics cards on Windows 11). By leveraging the GPU and utilizing the "remuxing" method rather than re-encoding, you can convert gigabytes of video in mere seconds.
If you take one thing away from this guide, let it be this: Choosing an MPEG4 to MP4 video conversion tool is not just about getting a file to play on your iPhone; it is about protecting your digital privacy and valuing your time.
Ready to start converting your files securely? Choose your path below:
Download AnyMP4 Video Converter (Mac/Windows) for lossless quality, batch processing, 100% data privacy.
Download VLC Media Player for free open-source local conversion, tech-savvy users.
Go to FreeConvert web tool for tiny files under 50MB, no software installation.
Secure Download
Secure Download
 Updated by Alice Thorne to Convert Video
More readings
 Top 5 Best Methods to Convert MOV to XviD
Do you want to transfer the format of your selected video to another format? This passage will show you how to convert MOV to XviD in detail.
 Online & Offline XviD Recorders for Beginners to Record Screen Video
Here're 2 powerful XviD recorders for Windows and Mac users. You can record screen video with audio as XviD format on your computer without quality loss.
 How to Convert MKV Files to XviD and DivX, or Vice Versa with EaseX
When you need to convert MKV to Xvid and DivX codec formats, here is the useful information you should know for the best media converters.
 AVI to DivX – Online and Offline Ways to Convert Video to DivX
Read and get the detailed steps to convert AVI to DivX. You can get the superfast speed and high output quality here from AVI to DivX conversion.