Summary: How to transfer photos from iPhone to computer? Want to directly copy iPhone photos to your PC/Mac without iTunes? You can rely on the professional iPhone photos transfer, iPhone Transfer Pro to get the job done. Besides iPhone pictures, it also allows you to transfer other frequently-used iOS data including music, videos, messages, contacts and more.
You have to admit that, almost all iPhone users like to backup various valuable data, especially photos to computer. Surely you are one of them. Actually, Apple offers a workable way to sync iPhone image files to computer with iTunes. But you are not allowed to directly access and check these photos. So here you are looking for another method to transfer photos from iPhone to computer.

Considering your need, here in this post we will share 5 simple ways to help you copy your iPhone pictures to computer for backup. Whether you are using a Windows 10/8/7/XP/Vista PC or Mac, you can easily find a suitable solution to transfer your iPhone photos.
At the first part, we will show you the best way to transfer all types of image files from your iOS device like iPhone, iPad and iPod to computer. As we mentioned above, you can use the powerful iPhone Transfer Pro to copy your iPhone photos to PC/Mac.
Step 1: Before you move iPhone photos to computer, you should free download and install this iPhone photos transfer on your computer. You can double click the download button below to do it. Make sure you download the right version.
Secure Download
Secure Download
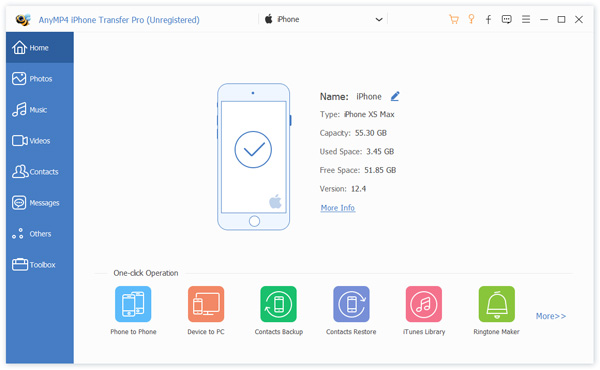
After installing, run it and connect your iPhone to it with a lighting cable. This iPhone photos transfer software will automatically detect your iOS device and show some basic information in the interface. Some key data types like Photos, Music, Videos, Contacts, Messages and Others are listed on the left control.
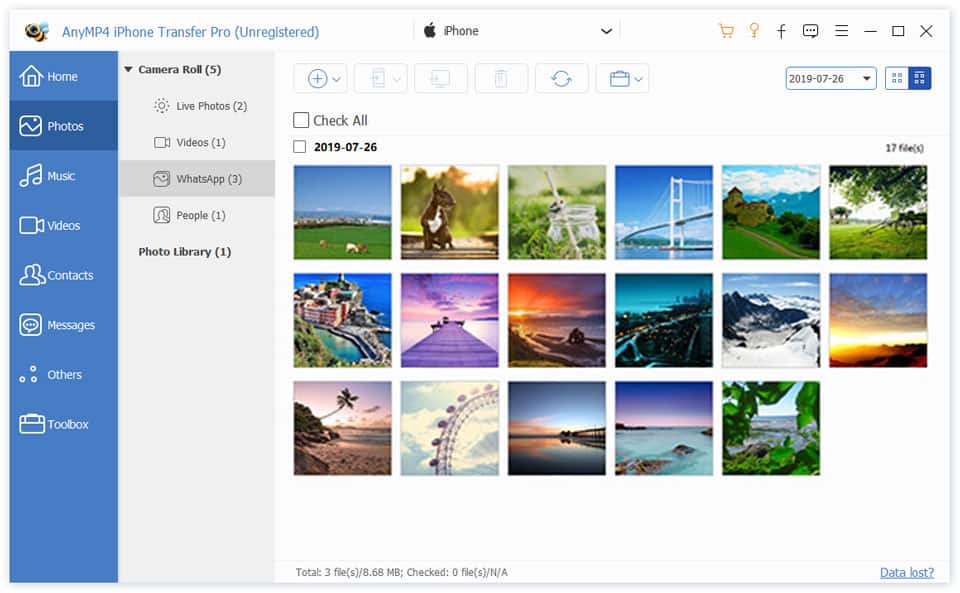
Step 2: Click "Photos" option on the left and you can check all kinds of images on your iPhone. Here you can click "Camera Roll" or "Photo Library" to view the detailed information of each photo.
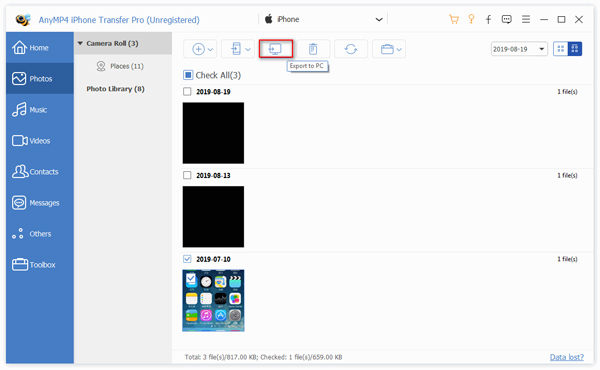
Step 3: Select the iPhone photos you want to transfer to your computer. Then click the computer like icon and choose "Export to PC/Mac" option to begin importing photos from your iPhone to PC or Mac.
Just a few seconds later, all the selected iPhone photos will be transferred to your computer. If you want to copy other iOS data, you can use the similar steps.
Besides iTunes, iCloud also provides you with a simple way to backup various iOS data including iPhone pictures. In fact, this method is mainly used to sync data among iOS devices. iCloud Photo Stream can help you sync iOS photos. You can easily access iPhone photos from any iOS device with the same Apple ID. When it comes to transfer iPhone photos to PC, you need to download an iCloud for Windows app.
Step 1: First, you need to turn on "iCloud Photos" or "iCloud Photos Library" feature on your iPhone. You can go to "Settings" app and locate "Photos" option. Here you can enable it. By doing so, your iPhone photos will be uploaded to iCloud through Wi-Fi.
Step 2: Download, install and launch iCloud for Windows app on your Windows PC. During this step, you need to sign in with the same Apple account.
Step 3: When you enter this software, you can check "Photo" and then choose to download these iPhone photos to your computer.
Windows treats the iPhone as a digital camera or external USB drive, so you can use Windows Explorer to transfer your iPhone photos to PC. Windows Explorer has the capability to copy, move, rename, and search for files and folders. It enables you to check and move iPhone photos in Camera Roll.
Step 1. Connect your iPhone to PC with a USB cable. Windows will automatically detect your iOS device. Then "iPhone device" will appear under "Portable Devices Sections".
Step 2. Double click your "iPhone" icon to open it. Then you will see the "Internal Storage". You can double click on it to open it.
Step 3. In most cases, you can only access the "DCIM" folder. Good thing is, the iPhone photos you want to transfer are just in this folder. Then you can choose and transfer iPhone pictures to computer from this folder.

Thing will become much easier if you are using a Mac and want to transfer photos from your iPhone to Mac. Now you can take the following guide to copy iPhone photos to Mac with Photos app.
Step 1: Run iTunes (iTunes 12.5.1 or later) on your Mac and then connect your iPhone to it. For the first connection, you need to turn on your iPhone and tap "Trust your Mac" on the screen.
Step 2: The Photos app will automatically open on your Mac. Here you can click the Import tab at the top of the Photos app to choose and transfer your iPhone pictures to Mac.

AirDrop also offers a simple way to transfer iPhone photos. But you can only use this method to send iPhone pictures to Mac.
Step 1: Unlock your iPhone and swipe from bottom of the screen to arise the "Control Center". Tap "AirDrop" and then choose "Everyone" from the menu.
Step 2: On your Mac, click "Go" > "AirDrop" and you will find your iPhone' s Apple ID shows on the screen.
Step 3: On your iPhone, open "Photos" app and choose the photos you want to transfer to Mac. Tap "Share" button and choose your Mac. Then tap "Send" to copy iPhone photos to Mac.
After reading this page, you can get 5 simple ways to transfer photos from iPhone to computer. You can use the classic built-in Photos app way to copy your iPhone photos to PC or Mac. Or you can rely on iCloud or AirDrop way to do the same work. Also, you can choose the recommended iPhone Transfer Pro.
 Posted by Ted Klarso to Mobile Transfer
Related Articles
 How to Backup iPhone Photos to PC/Mac/iCloud Photo Library/Dropbox
Backup all your photos from iPhone in original quality. You can get 3 different methods to backup iPhone photos to computer or cloud storage with ease.
 10 Best iPhone Photo Editors – How to Edit Your Photos on iPhone
What should be the best iPhone photo editors and how to edit your photos on iPhone? Just learn more detailed information about the 10 best iPhone applications from the article.
 How to Record iOS Screen on Windows/Mac with AirPlay Recorder
Want to mirror and record iPhone/iPad screen to your Windows or Mac computer for a better watching experience? An AirPlay recorder can do you a favor. Keep reading to find the list of top AirPlay recorders.
 Top 6 Best Photo Recovery Software You Should Know
Bothering by the problem of Photo Recovery? Here's our review of best data recovery software. They can solve your problem and get back photos quickly.