"I got Windows 7 Home Premium and I usually use the built-in tool to burn video complication and data discs, I have some DVD-RW discs that are not empty and I want to erase the contents and re-use them, is there any way to perform this task?"
Today, more and more DVDs are rewriteable. It means that you can remove videos and data from the disc and burn new files on it. This tutorial will show you how to use free DVD erasers on Windows 11/10/8/7 and macOS.
This post mainly talks about the DVD eraser to wipe all data from the DVD.
This post mainly talk about the the DVD eraser to wipe all data from the DVD. For the dirt on DVD, you will need to read this post: Best DVD Cleaner.
Before erasing a DVD, do not forget to backup DVD movies to computer for avoiding any data loss.
AnyMP4 DVD Copy is the software that you need to copy all the DVD videos in 1:1 ratio to a computer for backup. It supports all DVDs from any region, even encrypted DVD.
Recommendation
Secure Download
Secure Download
Though many people complained there are various bugs in Windows 11/10, more and more users upgrade to the latest operating system. That is partly because Microsoft has introduced and improved lots of useful tools, like the DVD eraser. Learn the guides of erasing DVD on Windows 11/10/8/7.
1. Insert your DVD-RW into your DVD drive and open an Explorer window by double-clicking This PC on your desktop, or hitting the Windows icon on the bottom left of the screen and find the Explorer icon.
Make sure your DVD region is compatible with country. Once it is not, you can unlock DVD region to insert your DVD freely.
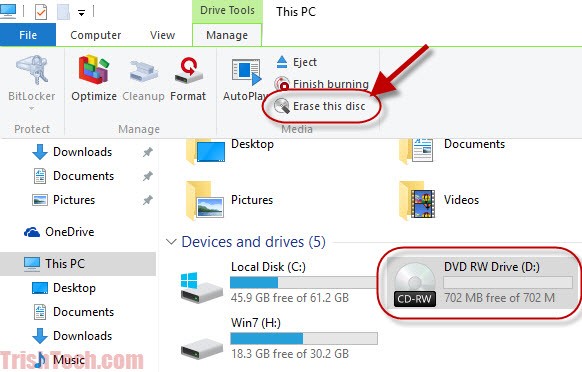
2. Locate the Devices and drives section and select the DVD drive.
3. Click the downward icon at the upper right corner to unfold the top ribbon.
4. Go to the Manage tab and click Erase this disc in the Media area.
5. When prompted, click the Next button to start performing DVD erasing.
This way is only available to CD-RW and DVD-RW. To erase DVD-R, skip to the method 3. Moreover, if you only want to erase several files from the DVD-RW, you can open it in your computer, select the files and click the Delete button on your keyboard.
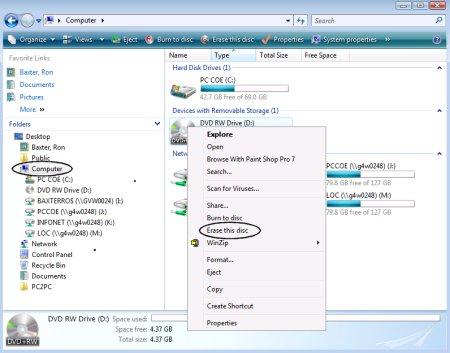
1. Double-click on the My Computer icon on your desktop. If you cannot find it, go to the Start menu and search for My Computer.
2. Put the DVD into your computer and the disc name will appear in the Explorer window. Right-click on the disc and select Erase this disc.
3. When the Ready to erase disc dialog pops up, click the Next button to confirm it and trigger the process.
4. Wait for the loading bar to complete. Then close the window and remove your DVD from the computer.
Note: This guide is also valid on Windows Vista.
DVD-R, stands for readable only DVD. It means that you cannot rewrite new contents on DVD-R. If you want to protect sensitive data on your disc, you can destroy it. Before performing it, we suggest you to copy and back up important files to your computer. Then you can use a shredder to dispose of the old discs.
When it comes to macOS, Apple has designed a wide range of utilities into the operating system. Every Mac made today can burn DVD discs. For reusing DVD-RW, Apple did not exactly make it easy to figure out. Here is our step-by-step guide.
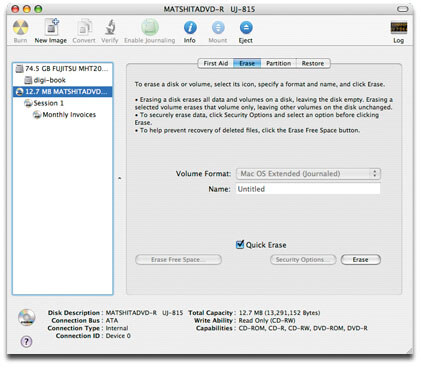
1. Place a DVD-RW you want to erase into your SuperDrive. If there are any files you want to store on the disc, back up them to your hard drive. The Disk Utility app should pop up automatically. If not, you can find it in Applications > Utilities.
2. Select the DVD/CD from the left hand column, and go to the Erase tab.
3. You will be presented two options on the window:
Quickly erase: delete files off of the DVD and it only takes a few minutes to complete the process.
Completely erase: if you cannot read or rewrite contents on the disc, select this option. It may take up to an hour.
4. Select the proper one based on your situations and click the Erase button to initiate the process.
Once the process is done, you can reuse your optical disc just like a new disc to play or burn video to DVD on Mac.
Note: Keep in mind that rewritable disc have a limited life as well. It is not a good idea to use them for long term file archiving. Plus, you should never erase and reuse them more than about a hundred times.
This tutorial has showed you how to use the built-in DVD erasers on Windows 11/10/8/7 and macOS. First of all, both Windows and Mac have the capacity to erase DVD-RW. Though the procedures are a bit different, you would not meet any trouble with our concrete guides. On the other hand, we suggest you to back up your DVD data on the disc before erasing. We hope that our post is helpful to you. If you have other questions related to erase DVDs, please feel free to leave messages below this article.
 Updated by Ted Klarso to Copy Blu-ray&DVD
More readings
 How to Convert DVD to MKV Videos without Losing Video Quality
In this article we will learn the way to convert DVD to MKV by using the best DVD ripping software with the original conditions or extract MKV videos from your discs.
 Top 8 Free DVD Creators to Help You Create DVDs on Windows and Mac
In this article we share the best free DVD creator software to help you quickly and simply make personalized DVDs on Windows 10/8/7 and Mac OS X and above by your own.
 How to Efficiently Copy A DVD to Windows 10/8.1/8/7 and Mac OS X/11/12
There are many ways to copy a DVD to your computer, but if you're looking for the most straightforward option, you can find the best tools and their concrete guides in this article.
 What is Windows DVD Maker and How to Use It and Best Alternatives
Windows DVD Maker is designed to create video DVDs that can be played with DVD playback software or on a standalone consumer DVD player. Here is our review and introduction.