Have you ever clicked on a video because you were attracted to the thumbnail of that video? Thumbnails are your first opportunity, and sometimes only, to capture others’ attention in this era of short videos. According to a survey, 90% of the most popular videos on YouTube have personalized thumbnails, which demonstrates the significance of thumbnails. YouTube is a visual medium, which means thumbnails are often the first thing people see. Moreover, an excellent thumbnail is not just a supplement to the title; it can even surpass the title’s effect. Because images are processed by the human brain 60,000 times more quickly than text.
With that in mind, we will share a detailed guide on how to edit your YouTube video thumbnail. Now, let’s start to find more.
An outstanding thumbnail not only needs to meet the platform’s rules but also requires an understanding of the visual principles to attract clicks. Before learning the methods to edit a thumbnail on YouTube, let’s acknowledge the requirements and design principles of YouTube’s thumbnails.
Dimensions: YouTube officially recommends a resolution of 1280×720, the minimum requirement to ensure the thumbnail’s clarity. It can be perfectly displayed on all devices.
Aspect ratio: You must strictly adhere to the aspect ratio: 16:9. This international standard video aspect ratio can perfectly adapt to various devices such as computers, mobile phones, and tablets, which can avoid black bars or image cropping.
File formats: JPG or PNG can provide the best image quality, so you can choose these two formats first. If you want to reduce the size of the file, you can also consider WebP, but some older browsers may not support it.
File size: Try to limit the YouTube thumbnail file size to no more than 2 MB. Overly large files can cause slow loading and negatively impact the user’s experience. It may even make thumbnails fail to display. I recommend using specialized tools to reduce file size without compromising image quality.
Clarity and simplicity: Studies show that users only spend 1.5 seconds browsing a thumbnail on average. Therefore, it is necessary to ensure that the main elements can be recognised instantly.
High-contrast and vibrant colours: High-contrast colours can appeal to more people. The most striking colors on YouTube are warm colors like red, orange, and yellow.
Readable text: The text should be brief and straightforward, and keep it within 3 to 5 words. If it can be expressed visually, don’t use text.
Relevance: The thumbnail must accurately reflect the video content, which is the foundation for building long-term trust. Although some misleading images may lead to short-term clicks, they can damage the channel’s reputation.
After understanding the principles for YouTube thumbnails, it’s time to apply your theoretical knowledge. We will guide you step by step on how to edit thumbnails using YouTube’s official tools.
YouTube Studio (web version) offers a complete thumbnail editing function. Here is the detailed guide.
1. Log in to the account
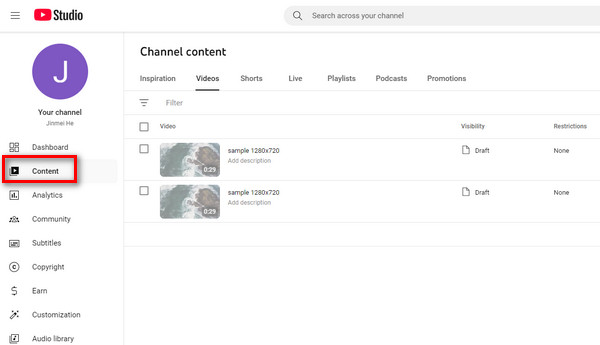
First, open your browser (such as Chrome) to visit YouTube Studio and log in to your account. And click the Content button in the left navigation menu to view all your videos.
2. Enter the editing interface
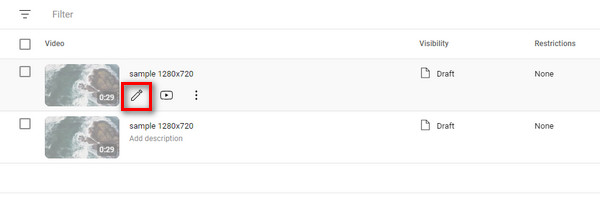
After finding the video that needs to be modified, hover the mouse over it and then click the pencil icon that appears. Next, you will enter the detailed management interface of the video, where you can modify the metadata.
3. Edit the thumbnail
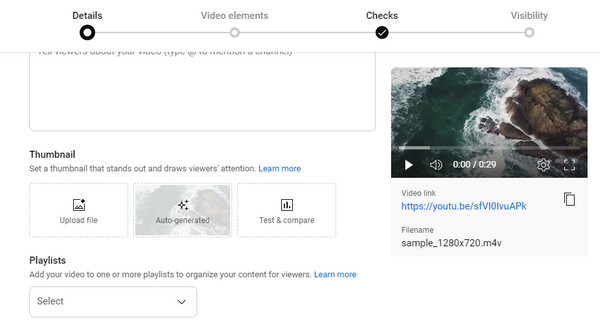
In the Thumbnails section, you will see three options: uploaded file, auto-generated, and test & compare.
Uploaded file means uploading your pre-designed image (e.g., 1280×720 thumbnail made in PS). This is an entirely customizable way of thumbnails, suitable for professional creators who pursue high click-through rates.
Auto-generated means that YouTube automatically generates three candidate thumbnails based on the video content. It is suitable for instant publishing, but lacks personalized design.
Test & compare: You can upload 2-3 different thumbnails simultaneously, and the system will randomly display them to different users and compare the click-through rates.
If you image you uploaded is blurry, you can enhance the image quality to make it clearer.
But there are a few limitations. This function is currently available on computers through YouTube Studio. Moreover, to use this feature, you must first enable the advanced features. In addition, the test results may take a few days or up to two weeks to be finalized.
You can upload image files or automatically generate thumbnails according to your needs. Then, press the Next button to continue the editing.
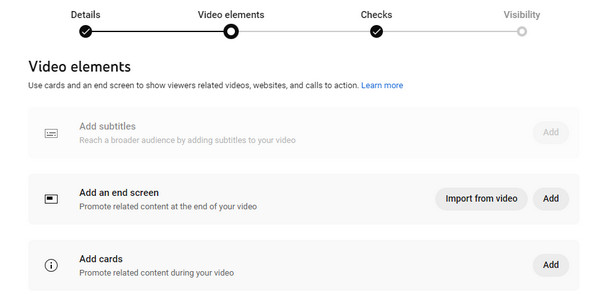
4. If needed, add cards and an end screen to show viewers related videos, websites, and calls to action. After that, click the Next button.
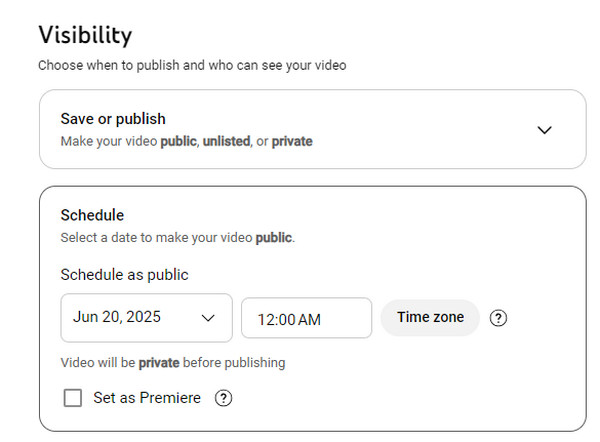
5. Choose the visibility
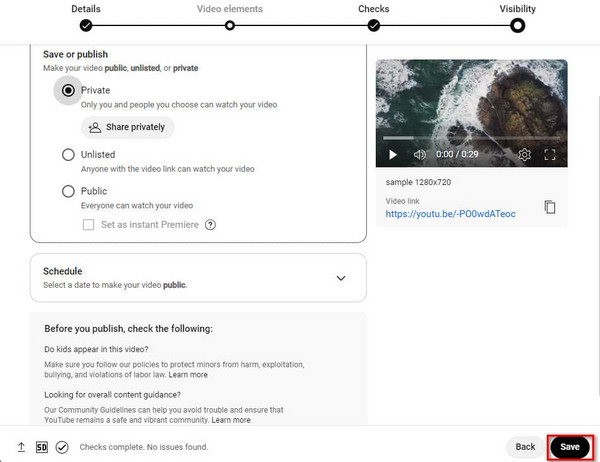
Check your video for issues that may restrict its visibility. Then, click on the page after the jump to choose the visibility: when to publish and who can see your video.
6. Save the video
Click the Save button at the bottom right corner of the page to finish the editing.
7. Check the thumbnail
After saving, it is recommended to search for the video on YouTube to confirm that the thumbnail has been updated.
After completing the above steps, your thumbnail has been successfully edited.
If you often need to manage channels or wish to adjust thumbnails instantly based on data changes on your mobile devices, the YouTube Studio mobile app equally offers powerful editing functions. The following is a detailed guide.
1. Download and open the YouTube Studio app on your phone, then log in to your account.
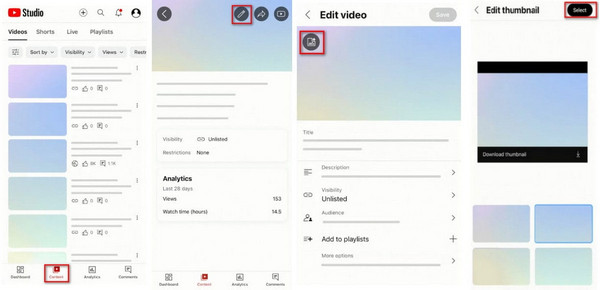
2. In the bottom navigation, click the Content tab, which displays all the videos you’ve uploaded. (Video not uploaded on YouTube?)
Then, find the video for which you want to edit the thumbnail and click it.
3. After entering the video’s detailed interface, click the pencil icon to start editing.
4. Select an auto-generated thumbnail or choose a custom thumbnail on YouTube editor to create a custom video thumbnail from an image on your phone.
5. Confirm your thumbnail selection and click the Select button. Finally, save the video. By now, the thumbnail editing process for your YouTube Studio mobile app has been fully finished.
There are significant differences in YouTube video thumbnail editing between desktop and mobile devices. Users can choose the most suitable way based on their actual needs. The YouTube Studio on a computer offers more comprehensive functions, such as scheduled publishing and adding cards. It is particularly suitable for professional creators who need to finely adjust the design elements. The YouTube Studio mobile app places more emphasis on convenience and is more suitable for quick or real-time editing.
I would recommend that creators use a combination of two ways: complete the main thumbnail design on the computer first, and then test the final effect and make instant adjustments via mobile. In this manner, the best impact can be displayed on all devices, and the editing quality can be ensured.
Through the basic features of YouTube Studio, we have already completed the basic editing of thumbnails. However, for some YouTube users who seek more design freedom and need to edit offline, the features of YouTube may seem somewhat limited. So, a third-party tool is required in this case.
AnyMP4 Video Converter Ultimate is an offline, versatile video converter and editor that supports media metadata editing. It can efficiently manage the thumbnails. With it, you can simply change the album's title, composer, genre, artist, and so on. It supports over 300 digital file formats for YouTube, including MP4, MP3, MKV, MOV, FLAC, AVI, etc. Additionally, you can create a thumbnail straight from video files by using it.
Here is how to edit YouTube thumbnails via AnyMP4 Video Converter Ultimate.
1. Download and install AnyMP4 Video Converter Ultimate on your Windows or Mac computer.
Secure Download
Secure Download
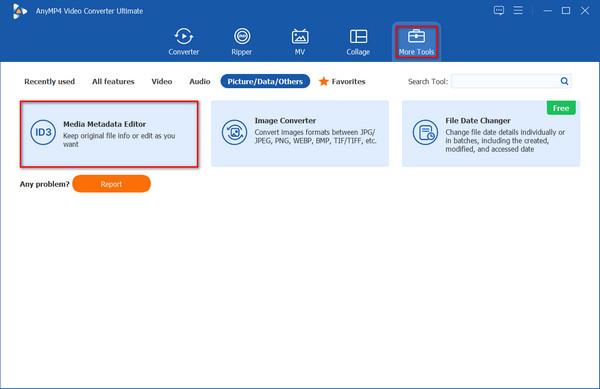
Then, open the software, navigate to the More Tools tab, select the Media Metadata Editor tool, and click it.
2. Download and install AnyMP4 Video Converter Ultimate on your computer. Add the YouTube video, which supports a lot of formats (MP4, M4A, M4R, M4B, M4P, 3G2, M4V, MOV, MP3, WMA, ASF, WMV, WAV, AVI, and FLAC).
Then, click the + icon next to the left video thumbnail to add it.
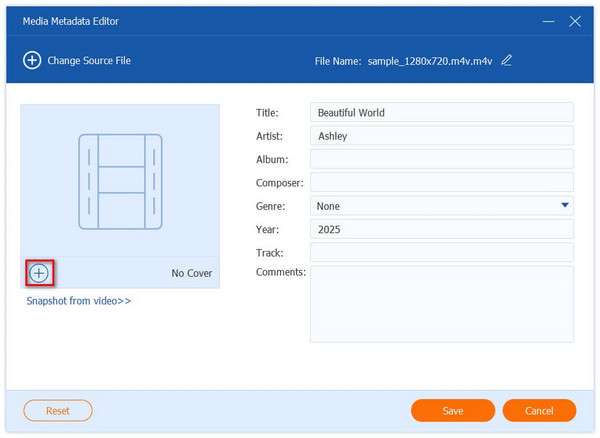
3. You can change the title, artist, album, composer, genre, and other relevant details of your thumbnail on the right side if needed.
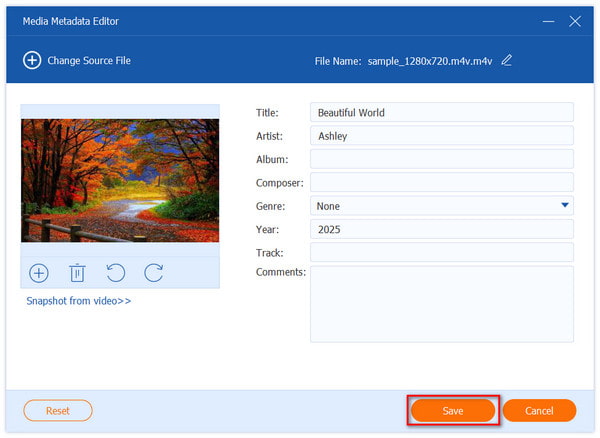
4. Finally, click the Save button to save the thumbnail. After finishing the editing, you can find the exported video to check if the thumbnail has been changed.
Why can’t I change the thumbnail on my YouTube video?
The video may be in the review status due to the function lock, or the account may not have finished the mobile phone verification. It is recommended to check whether the account shows the verified logo in the upper right corner, then refresh the page and try again.
How long does it take for a thumbnail to change on YouTube?
In general, it can take a few seconds to several hours. Several variables, such as YouTube’s processing, internet speed, and caching, can affect editing time.
Why does YouTube show the wrong thumbnail?
Processing lags, cache problems, or policy infractions might cause YouTube to display the incorrect thumbnail.
A good thumbnail on YouTube is more than simply decoration. It’s the first step toward drawing viewers in and visually representing the content’s worth. With this guide, you’ve got a handle on what a good thumbnail should look like and how to edit your YouTube video thumbnail. Now it’s time to put it into practice and act.
 Posted by Angelica Liwanag to Edit Video
Related Articles
 How to Play Videos with Screen off on iPhone and Android
In this post, we are going to show you how to play YouTube videos with screen off on iPhone or Android devices, and then you can do your work or other tasks.
 2 Efficient Ways to Compress Videos for YouTube Upload Free Online
When uploading a video more than 1 hour on YouTube, it may take a long time. Here are 2 efficient ways to compress videos for uploading or sharing quickly.
 Does YouTube Reduce Audio Files Before Uploading It?
YouTube compression audio is expected to be part of the YouTube algorithm. However, it can increase the audio quality. See what thing we can do about it.
 How to Make Money from YouTube Videos [10 Profitable Ideas]
Learn how to make money from YouTube videos by following our ideas. Discover ten creative YouTube video ideas that can help you monetize your channel.