As one of the most useful apps for iPhone/iPad users, Notes app can be used to note down what users like, such as to-do list, schedule, password, or private information of medical, financial, etc. For do not forget some important information, we usually input it in our notes on our carry-on iPhone /iPad. We even write our accounts, passwords and other private information on it.
To protect intimate information and our asset information and prevent others viewing these notes, we need to give these a lock of password or touch ID since the release of iOS 9.3.
Here are some ways to lock notes on iPhone/iPad. We hope they would be useful to you.
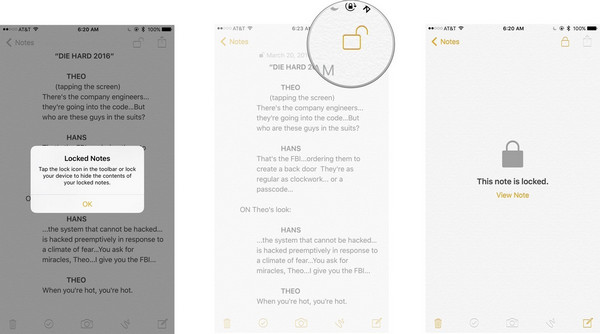
The list of notes on your iPhone, iPad or iPod touch running iOS 11/12/13/14/15 has new options when you swipe to the left or right on an individual note. For example, a swipe to the right will let you pin the note to the top of notes list. A swipe to the left will give you the option to lock, move or delete a note.
Swipe to the right - Pin this note.
Swipe to the left - Lock, move or delete this note.
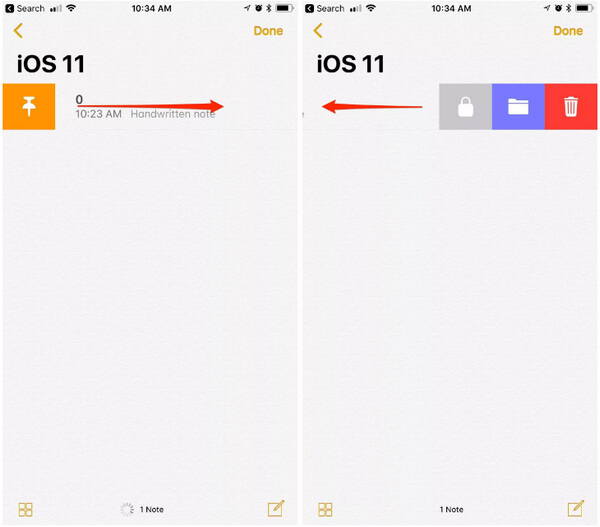
If this is the first time for you to lock the note, the screen will turn to one where you need to set the note password once you tap on the Lock icon.
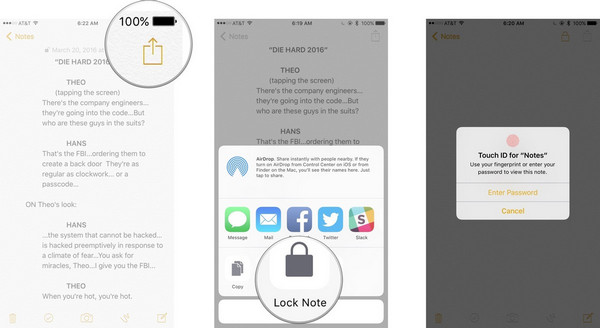
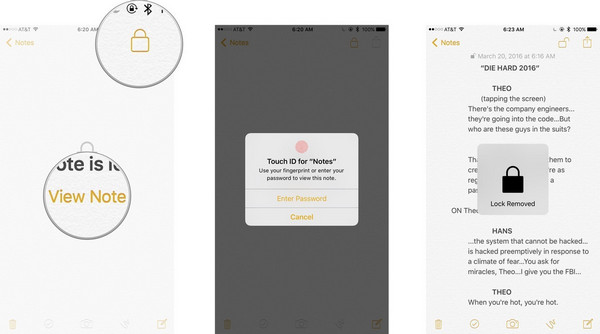
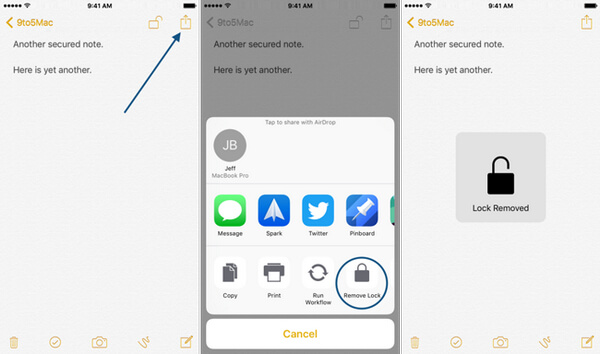
To unlock an individual note, swipe to the left and tap on the Unlock icon.
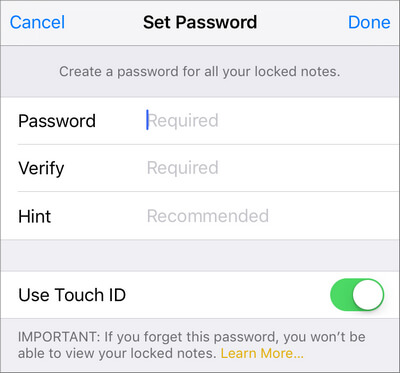
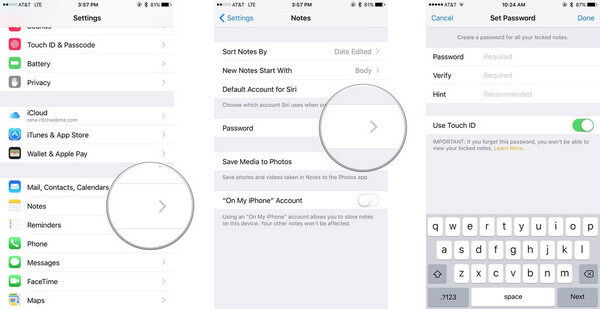
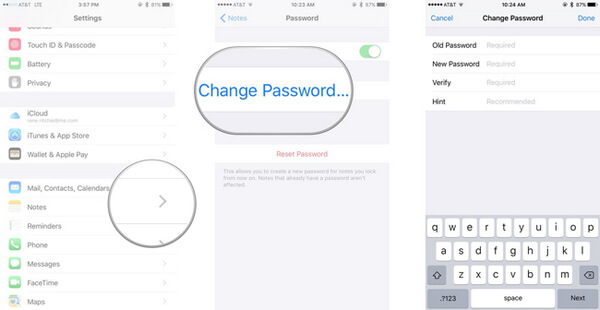
if you don't upgrade your iPhone, iPad or iPod touch to iOS 27 beta, 26/18/17/16/14, you'll automatically be asked to set a global notes password for protecting the notes at the first time when you are trying to secure a note, or the first time when you visit the password for notes in the Notes settings.
If you never meet it, or cannot wait to set a secure notes password, you are able to set it quickly by following the steps below to lock a specific note on iPhone/iPad.
To pay attention, make sure the password is strong enough to really protect your notes.
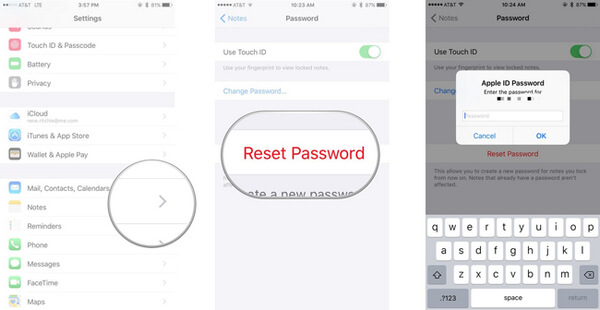
Touch ID makes the process much faster and more convenient, but also means someone could try and get you to touch the sensor when you're sleeping or otherwise incapacitated. Keep it in mind.
You do have to enter your password at least once before you can use Touch ID. So if Touch ID isn't presented as an option the first time, simply enter your password and you should get asked for Touch ID the next.
It's important to remember that, while the body of the note will be hidden when locked, the title of the note will still be visible. Never put anything in the title you wouldn't want anyone else to see.
For iPhone X and follow-up models users, Apple Inc offers face ID to lock notes.
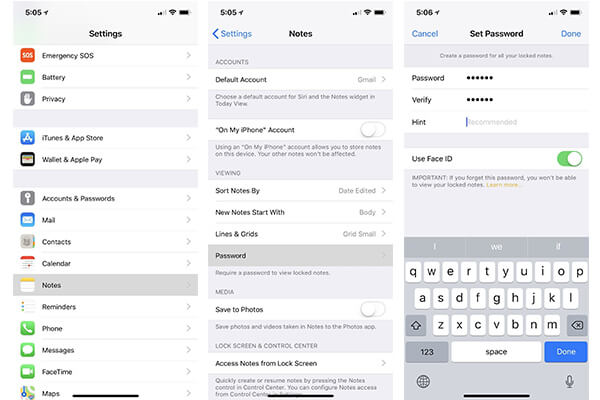
Compared with locking single note one by one, it would be more convenient to lock all notes one-off. Here are the detailed guides.

you also can lock all notes in your iPhone settings.
In this article, we mainly show you how to lock notes and different solutions about password. You can learn from this article about how to lock a specific note on iPhone/iPad, or lock all notes at once. In addition, if you want to reset, change, or remove notes lock password, the article also gives you some tips and tricks. Have a nice day!
Related Articles
 How to Recover Deleted Notes from iPhone
Do you want to recover deleted notes from iPhone? You can find 5 best methods to get the deleted notes back from the article.
 FAQs of iOS Device Cannot Be Detected by AnyMP4 iPhone Software
iOS device cannot be detected by AnyMP4 iOS related software? Here are the full solutions to fix it, so that you could use AnyMP4 iPhone software freely.
 Ultimate Solutions to Bypass or Remove iCloud Activation Lock
Do you know how to remove iCloud lock? You can follow this article to do iCloud Activation Lock removal to solve the problems.
 Top 6 Programs to Backup SMS on Android
Do you know how to backup SMS on Android? The article explains 6 excellent ways to backup SMS.