Syncing audio and video is a vital part of video editing that ensures your content looks and sounds professional. Whether you're working with footage from multiple cameras, using an external microphone, or recording interviews, proper synchronization helps avoid distracting issues like mismatched lip movements or audio lag. In this article, you'll learn how to manually and automatically sync audio and video in Premiere Pro and troubleshoot common sync problems.
Manual synchronization is the method of using visual and auditory cues to precisely align your audio and video clips. This technique is crucial when your camera fails to record clean reference audio or when automated syncing simply doesn't work.
1. Place clips on the timeline
Drag both your video and audio files into the timeline, placing them on separate tracks.
2. Locate a sync reference
Scrub through the footage to find a distinct sound event, like a clap or snap, that appears clearly in both the video and audio.
3. Insert markers
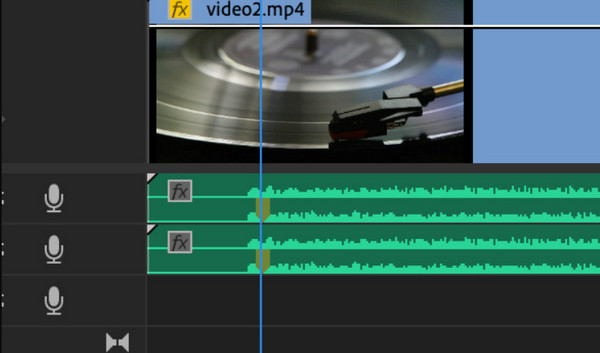
Press the M key to drop a marker on both clips at the exact moment of that sound.
4. Align using markers
Move the audio clip horizontally until its marker lines up perfectly with the marker on the video track.
5. Link the clips together
Once aligned, select both clips, right-click, and choose the Link to bind them for synchronized editing.
Manually syncing audio and video using markers is a dependable technique, especially when automatic tools fall short or when working with footage that lacks timecode. In my own editing workflow, this method has proven especially useful for interviews and multi-camera shoots. Adding markers not only speeds up the alignment process but also makes it easier to review and fine-tune the sync later. Once the clips are linked, editing becomes much smoother and more organized. For creators who value precision and control, manual syncing is a skill worth mastering.
While manual synchronization is the most precise and reliable technique, it is inherently slow. If you have dozens or even hundreds of clips, dedicating time to frame-by-frame alignment for every single shot is simply not feasible. Fortunately, Adobe Premiere Pro is a video editing software for Windows and Mac designed to handle this workload, providing powerful, automated methods that can sync entire projects in seconds, provided your source footage meets a few key requirements. You have two main methods for achieving this automatically, depending on where you prefer to work: the timeline or the project panel.
This method is best for single or small groups of clips already placed in your sequence, allowing you to align them directly in the timeline.
1. Add and Select Clips
Import your video and external audio files into Premiere Pro, then drag them onto separate tracks in the timeline. Select both clips by holding Shift and clicking on each.
2. Open Synchronize
Right-click on the selected clips and choose Synchronize from the context menu to open the sync settings.
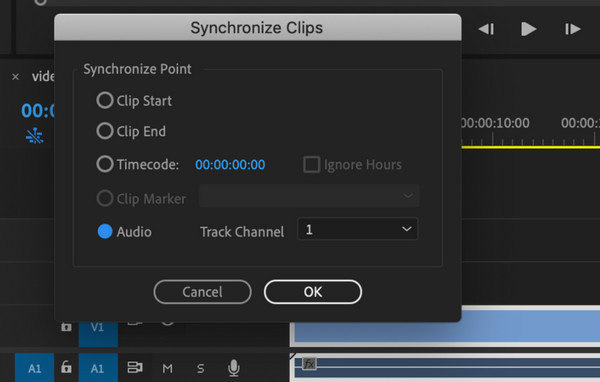
3. Choose Sync Method
In the dialog box, select your preferred sync point, typically ‘Audio’ to match waveforms, or ‘Timecode’ if both recordings share matching timecode.
4. Confirm and Clean Up
Click the OK button to let Premiere Pro align the clips automatically. Once synced, link the clips together and remove any unwanted reference audio to tidy up your timeline.
Using Premiere Pro’s automatic sync feature has significantly streamlined my editing workflow. With just a few clicks, the software aligns external audio and video based on waveform data, saving me from the tedious process of manual adjustments. In my experience, this method works best when the audio is clean and includes a distinct sync point like a clap or spoken cue. For interviews and multi-camera shoots, it’s a real time-saver. However, I’ve learned that poor audio quality or background noise can interfere with waveform detection, so I often enhance or clean the audio before syncing. Overall, automatic syncing has become an essential part of my post-production routine, especially when handling large volumes of footage efficiently.
This method operates in the Project Panel and permanently merges the video and external audio into a new master clip. This is the fastest and most efficient way to handle large batches of footage (like multi-camera shoots).
1. Import and Select
Bring your video and external audio files into the Project panel. Then, select both clips that belong together.
2. Merge the Clips
Right-click the selected files and choose Merge Clips… to open the merge settings.
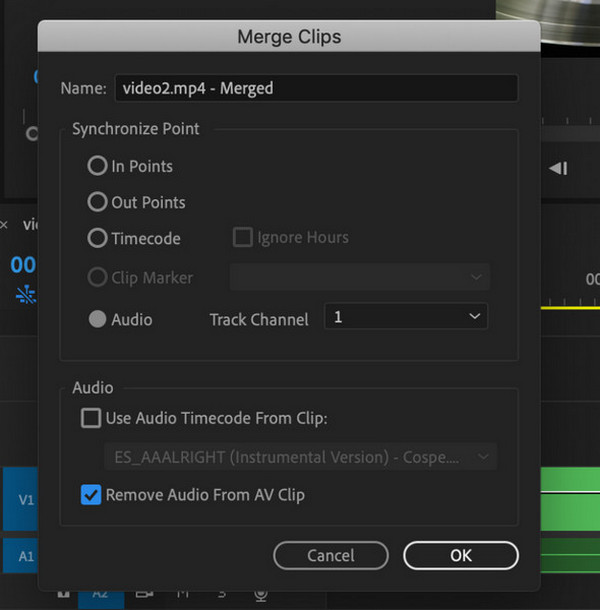
3. Choose Sync Method
In the dialog box, select your preferred synchronization option, typically Use Audio or Use Audio Timecode From Clip, to let Premiere align the clips.
4. Confirm and Use
Click the OK button to generate a new, merged clip that’s already synced and ready for editing in your timeline.
Merging clips feature in Premiere Pro has become one of my go-to methods for syncing audio and video, especially when organizing footage before editing. It’s fast, clean, and creates a single, unified clip that’s easy to manage in the timeline. I’ve found it particularly helpful when working with interviews or multi-camera shoots where external audio is recorded separately. Overall, Merge Clips is a reliable and efficient tool that simplifies my workflow and saves me valuable time.
While Adobe Premiere Pro offers robust syncing tools, it can be overwhelming for beginners or time-consuming for quick edits. If you're looking for a simpler, more streamlined solution, AnyMP4 Video Converter Ultimate is a great alternative to sync audio and video.
Recommendation
Secure Download
Secure Download
Step-by-step guide on how to sync audio and video with this software:
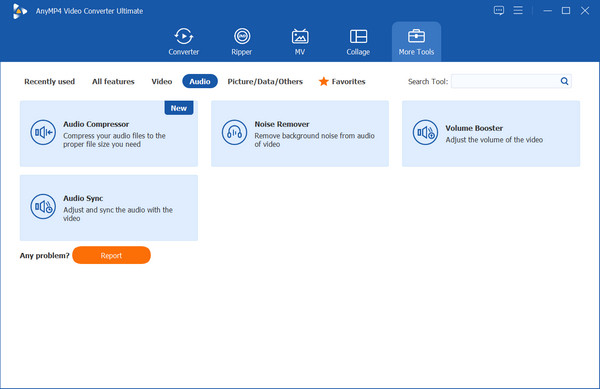
1. Access the Toolkit
Before starting, download and install it on your computer. Open the software, navigate to the Toolbox tab, and select the Audio Sync utility.
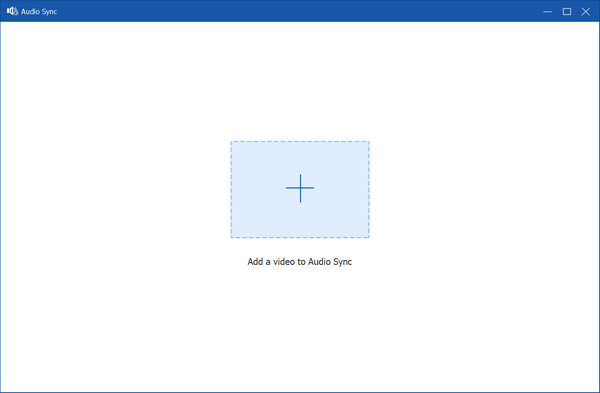
2. Add the Video File
Click the plus button to upload the video file that is experiencing audio delay (e.g., your screen recording).
3. Precise Delay Correction
The software provides a Delay slider and a numerical input box. You can drag the slider or input a precise millisecond value to shift the audio track forward or backward.
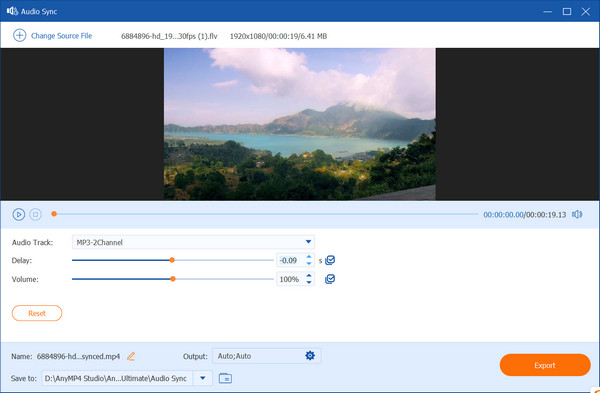
4. Export the Video
Once you confirm the sync is perfect, click the Output button to select the output format, and then click the Export button to finish the process.
AnyMP4 Video Converter Ultimate offers a refreshingly simple way to fix audio sync issues, especially for screen recordings or clips with noticeable delay. From my own experience, this method is incredibly helpful when I need to fix audio drift quickly without launching a full editing suite like Premiere Pro. I’ve used it to correct webinar recordings and tutorial videos where the audio lagged slightly behind the visuals. The ability to fine-tune the delay in milliseconds gives me precise control, and the export options make it easy to save in the format I need. It’s a lightweight yet powerful solution for anyone dealing with sync issues outside of a full-scale editing workflow.
Even with the best tools, audio and video fall out of sync sometimes, especially when dealing with screen recordings, external microphones, or long-form footage. Here’s how to identify and fix common sync issues efficiently.
• Frame rate mismatch: Video recorded at one frame rate and exported at another can cause gradual drift.
• Variable audio sample rate: Inconsistent audio sampling (e.g., 44.1kHz vs. 48kHz) may lead to misalignment.
• Hardware lag: External mics or capture cards may introduce latency.
• Software glitches: Editing software may misinterpret timecode or waveform data.
• Long recordings: Even minor timing differences can accumulate over time, causing noticeable drift.
• Check frame rate and sample rate: Ensure your video and audio files use consistent frame rates (e.g., 30fps) and audio sample rates (e.g., 48kHz).
• Use audio sync tools: Tools like Premiere Pro’s Synchronize or AnyMP4’s Audio Sync utility can automatically align clips using waveform analysis.
• Manual adjustment: If automatic syncing fails, manually drag the audio track in the timeline to match visual cues (e.g., lip movement or claps).
• Split and re-sync long clips: For extended footage, break it into smaller segments and sync each part individually to avoid drift.
• Replace distorted audio: If the original audio is corrupted or noisy, consider re-recording or using a backup track.
Can I fix sync issues after exporting the video?
It’s possible, but not ideal. You’d need to re-import the video, adjust the audio delay, and export again. It’s best to fix sync problems during the editing phase.
What if my audio is noisy or unclear?
Try cleaning the audio with noise reduction tools before syncing. If the waveform is still hard to detect, manual syncing using visual cues (like lip movement or claps) may be more reliable.
Why does my audio drift out of sync over time?
Audio drifting out of sync over time is often caused by mismatched frame rates or audio sample rates. Even small differences can lead to noticeable desynchronization in long recordings. External devices like USB microphones may also introduce latency. To fix this, ensure your video and audio settings match during recording and export. Using sync tools or manual adjustments can help correct any drift.
In this guide, we explored both manual and automatic methods of syncing audio and video in Premiere Pro and shared practical troubleshooting tips for common sync issues. If you're looking for a faster, easier way to fix audio sync problems without diving into complex timelines, AnyMP4 Video Converter Ultimate is a smart choice. Its intuitive interface, precise delay control, and batch processing make it ideal for creators of all levels. Download it today and experience seamless audio-video syncing with just a few clicks.
Secure Download
Secure Download
 Updated by Mark Cristobal to Edit Video , Edit Audio
More readings
 A Concrete Guide to Fix Movavi Video and Audio out of Sync
There might be various cases that audio is out of sync in Movavi screen recording; however, you can learn multiple solutions to fix this problem efficiently.
 3 Best Methods to Sync Audio and Video in DaVinci Resolve
Get into this post and learn our easy-to-follow guides to sync audio and video in DaVinci Resolve. Also, discover troubleshooting tips when sync fails.
 Adobe Premiere Pro vs Final Cut Pro: A Comparison and Review
Read this article to help you decide which among Adobe Premiere Pro and Final Cut Pro is the better option for your video editing needs based on their features.
 The Ultimate Guide to Make Split-Screen Effects in Premiere Pro
When you want to make a split-screen effect in Adobe Premiere Pro, this is the ultimate guide to learn more about the detailed process and best tips.