DaVinci Resolve is a top-grade video editing software popular among professionals. Many casual editors often wonder, Can you mix frame rates? The answer is yes. DaVinci Resolve can handle projects with clips shot at different frame rates. However, it requires proper settings and techniques to ensure smooth playback and maintain audio sync. In this post, we’ll show you exactly how to mix frame rates in DaVinci Resolve. We’ll cover the preparation steps, handling different frame rates, and finalizing your project for export. This way, we can help you achieve professional-quality results when combining videos with varying frame rates.
Frame rate refers to the number of individual images displayed per second in a video. It determines how smooth motion appears on screen. Common frame rates include 24 fps (used in film), 25 fps (used in PAL broadcast systems), and 30 fps (used in online video and NTSC broadcast systems). Meanwhile, 60 fps is used for high-motion content, and 120 fps is used for ultra-smooth slow-motion capture. In video editing, there are two important types: Timeline Frame Rate and Project Frame Rate. Timeline Frame Rate sets the playback speed and motion smoothness within the editing workspace. Project Frame, on the other hand, defines the master frame rate for the final export.
Before anything else, the most important thing you should do is set the project's frame rate. Bear in mind that you can only change the frame rate in DaVinci Resolve before importing media. Decide which frame rate will be your project’s master frame rate based on your preference.
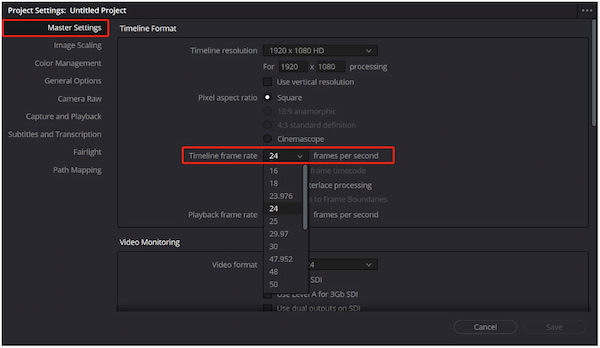
1. Before uploading any clips, navigate to the File tab and select Project Settings. Proceed to the Master Settings and look for the Timeline Frame Rate selector. Select a frame rate that matches your delivery requirements.
2. Move to the Media Page and import all your video clips. Right-click the column headers and enable Frame Rate to view each clip’s frame rate. Note which clips differ from your project frame rate; these will require special handling.
Important Note: Please note that DaVinci Resolve locks the project’s frame rate once clips are added. As mentioned previously, changing it afterward requires starting a new project.
DaVinci Resolve offers several methods to blend different frame rates smoothly. You can choose Clip Attributes to change its frame rate before editing. For slow-motion footage, you can use the Change Clip Speed or Retime Controls options to match the project’s frame rate.
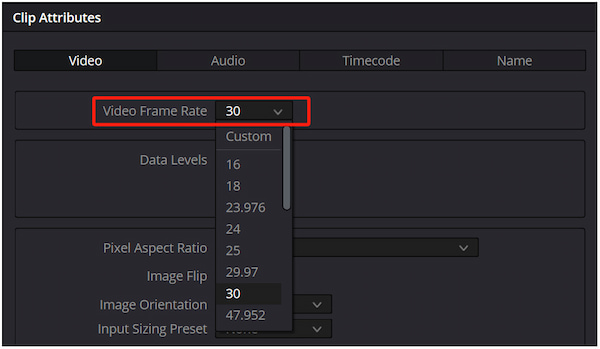
1. In the Media Pool, right-click a clip and choose Clip Attributes. Under Video settings, change the default Video Frame Rate to match your project’s frame rate.
2. Add a high-frame-rate clip to the timeline. Right-click the clip and select Change Clip Speed to open the Retime Controls. Set a slower playback percentage to achieve slow motion.
3. Select Retime and Scaling, followed by Retime Process, and click Optical Flow. Set Motion Estimation to Enhanced Better for higher-quality frame interpolation.
Creative Tip: Use 24 fps and 60 fps clips together, but preview the sequence often. Keep cuts and transitions where frame rate differences are less noticeable.
Once editing is complete, review the entire timeline to ensure playback quality. Watch for choppy motion, dropped frames, or any moments where slow-motion appears unnatural. However, here’s the deal: Mixed frame rates can cause subtle drifting if not handled correctly.
1. In the Edit Page, play through the entire timeline. Watch for stuttering, ghosting, or unnatural slow-motion segments. If needed, make minimal adjustments.
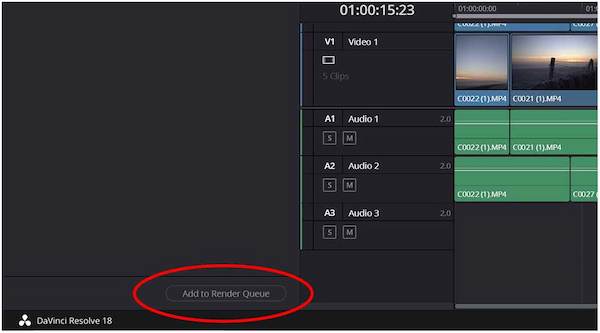
2. In the Deliver Page, set the frame rate to your project’s frame rate in the Render Settings. Click Add to Render Queue, then click Start Render to save the final project.
Important Note: Incorrect export settings can sometimes cause playback errors. Play the rendered video in an external player to confirm smooth motion and proper sync.
Non-professional users find mixing frame rates in the DaVinci Resolve to be complex. This leads them to seek a simpler and more beginner-friendly solution. AnyMP4 Video Converter Ultimate offers a reliable solution for adjusting frame rates in a project. Its built-in MV Editor allows you to quickly freeze a video frame by importing a video and a still photo. You can export videos to various formats, including MP4, MOV, MKV, and over 500 others. Additionally, it allows you to adjust the output frame rate, resolution, quality, and download folder.
1. Begin by downloading the AnyMP4 Video Converter Ultimate for free. Install the mix frame rate editor on your system and finish the installation process. Once completed, run the software to begin the video frame rate freezing.
Secure Download
Secure Download
2. As soon as it launches, you will be headed into the Converter tab by default. Switch to the MV tab to access the MV editing workspace. Click +Add to import the video clip, play it in the preview window, then pause at the exact frame you want to freeze.
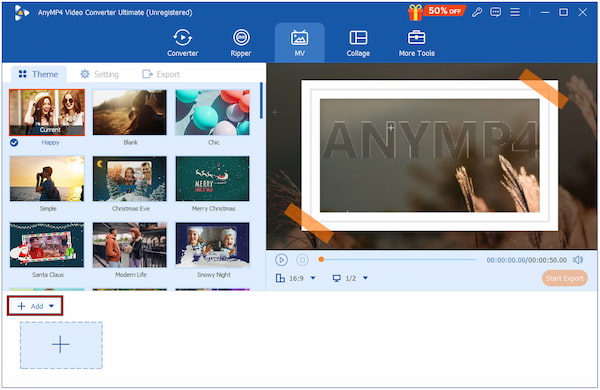
Important Note: Do not forget to trim the area where you pause the video. This way, only the portion before the freeze point is kept in this clip.
3. Click the Play button in the video preview and use the Snapshot tool to capture the frame. Next, click + next to the uploaded clip to import the screenshot into the MV editor. In the uploaded still image, click the Clock button to extend its duration.

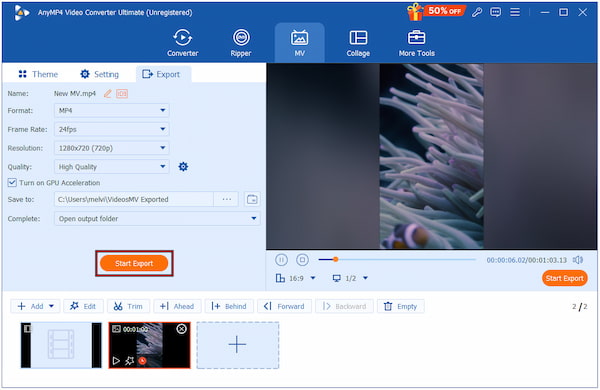
4. Move to the Export tab and configure format, frame rate, resolution, and quality. In the Save To field, select your download folder for the output file. Click Start Export to render and save your video with the freeze-frame effect.
AnyMP4 Video Converter Ultimate offers a simple way to create a freeze-frame effect. With it, you can edit mixed frame rates by turning a selected frame into a still image. This lets you blend different clips without worrying about complex frame rate conversions in DaVinci Resolve Editor.
Now you're equipped with the knowledge to mix frame rates in DaVinci Resolve. This task is entirely possible with the right preparation, careful timeline management, and proper export settings. However, if you’re looking for a simpler alternative, AnyMP4 Video Converter Ultimate offers a more straightforward, beginner-friendly solution. With its MV editor and flexible export options, it’s a great tool for producing professional videos without complexity. Get it today and explore an efficient way to create professional-looking videos, even when mixing frame rates.
 Posted by Mark Cristobal to Edit Video
Related Articles
 Comprehensive Guide to Freeze Frame Videos (Free and Paid)
This article will serve as your step-by-step guide to easily learn how to freeze frames in Premiere Pro, DaVinci Resolve, and AnyMP4 Video Converter Ultimate.
 How to Go Frame by Frame in VLC for Windows and Mac Versions
Do you want to capture a specific VLC screenshot of every frame? Read this article to learn how to use VLC player frame-by-frame mode for Windows and Mac.
 How to Change Font Size/Style/Color on iPhone
How to change the font style on iPhone? This post shows the full guide to changing the default font style, size, and color on iPhone with and without jailbreak.
 2 Ways to Change MP3 Bitrate Online and Offline
Here are the 2 ways to change MP3 Bitrate to upgrade or downgrade the audio quality of your songs. You can change it with the online and offline software.