Quick Summary:
When I first started in professional video editing, I remember staring at my screen, feeling completely defeated. I had just shot a beautiful short film, but the raw footage looked flat, gray, and lifeless. I found myself asking on the internet: Is Final Cut Pro good for color grading? The answer, I quickly discovered, is a resounding yes.
But the journey from dull raw footage to a breathtaking Cinematic Look can feel incredibly overwhelming. In this guide, I’m going to share my personal workflow to help you master Final Cut Pro color grading and get your videos looking like a Hollywood masterpiece.
| Best For | Pros | Cons | |
|---|---|---|---|
| Native FCPX Tools | Beginners & Intermediate editors wanting full control without extra costs. | Free (included), highly optimized for Mac, no software lag, comprehensive color wheels and curves. | Can be intimidating at first; lacks some advanced automated features. |
| Plugins (e.g., Color Finale) | Professional colorists and editors need advanced, layer-based grading. | Extremely powerful, offers advanced halation and film grain, layer-based workflow, and excellent color management. | Costs extra money; it can occasionally cause playback lag on older Macs. |
| AnyMP4 Video Converter Ultimate | Absolute beginners, vloggers, or anyone needing a quick, easy fix outside of FCP. | Incredibly easy to use, AI video enhancement, fast processing, and no complex video scopes to learn. | Less precise control over specific shadows/highlights compared to dedicated NLEs. |
One of the biggest mistakes I made early on was trying to make my footage look cool before making it look correct. To succeed at color grading in Final Cut, you must understand the difference between video correction and grading.
Think of it like building a house. FCPX Color Correction is pouring the foundation. You are simply neutralizing the image, and fixing the Exposure, White Balance, Skin Tones, and matching shots. Once the foundation is solid, Color Grading is painting the walls and adding the furniture. This is where you add that stylized Final Cut Pro Cinematic Color to evoke an emotion.
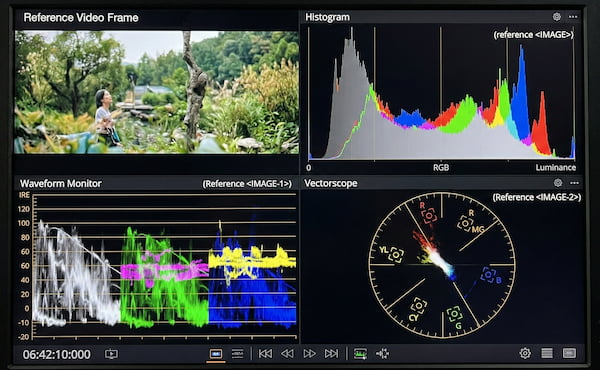
To build that foundation, you cannot trust your eyes alone. Your room lighting changes, your screen brightness varies, and your eyes get tired. This is where Video Scopes come in. They are your objective truth.
To open your scopes in FCPX, press Command + 7. I highly recommend keeping them open on a second monitor if you have one!
If you bought a modern mirrorless camera, you’ve probably heard of shooting in LOG (logarithmic) profiles like S-Log, C-Log, or V-Log. LOG footage captures a massive amount of dynamic range, but straight out of the camera, it looks incredibly gray and desaturated.
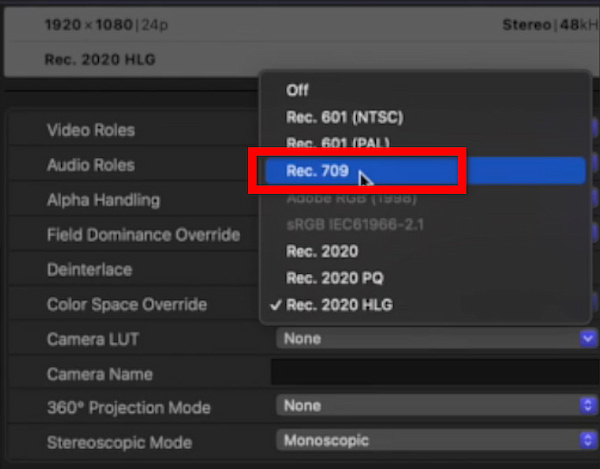
Before you touch a single color wheel, you need to bring this LOG footage back to a normal color space, usually Rec. 709.
1. Select your clip in the timeline.
2. Go to the Info Inspector panel on the top right.
3. Under the Info inspector (the little i icon), look for the Camera LUT dropdown.
If the Info inspector isn’t already shown, choose Window > Show in Workspace > Inspector, then click the Info button at the top.
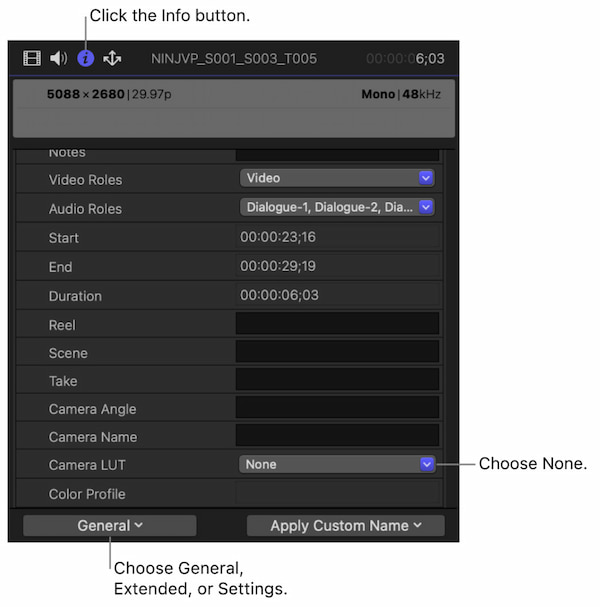
4. Apply the correct utility LUTs (Lookup Tables) that match your camera (e.g., Panasonic V-Log to Rec. 709).
Boom! Your footage instantly looks like normal video again, and you are ready to start editing.
So, does Final Cut Pro have video color grading built in? Absolutely, and it’s incredibly robust.
Apple redesigned the color interface a few years ago, moving away from just the basic Color Board to include a whole suite of professional tools. By pressing Control + Command + W, you can switch your workspace to the Color & Effects layout, which beautifully arranges your scopes, your viewer, and your color tools in a way that makes sense.
Let’s get into the fun part. Here is my ultimate Final Cut Pro color wheels tutorial and workflow for getting that highly sought-after Cinematic Look.
The Color Wheels are your best friend for foundational balancing. When you add a Color Wheels effect from the Color Inspector, you'll see four wheels: Master, Shadows, Midtones, and Highlights.
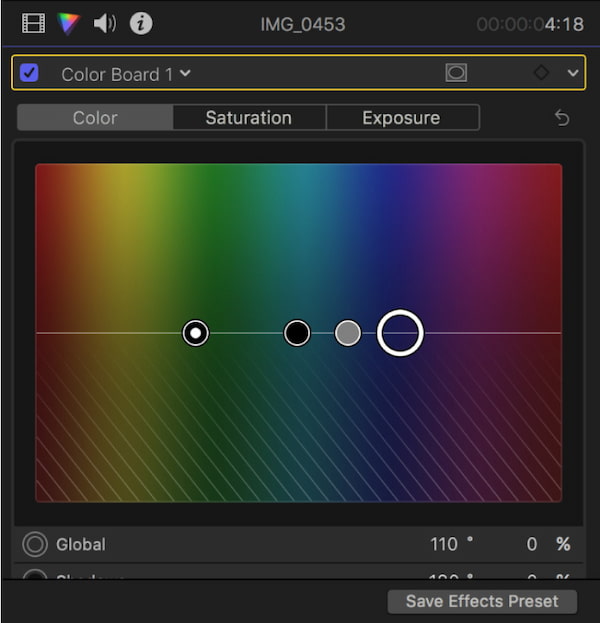
Once your image is balanced, it’s time to get surgical.
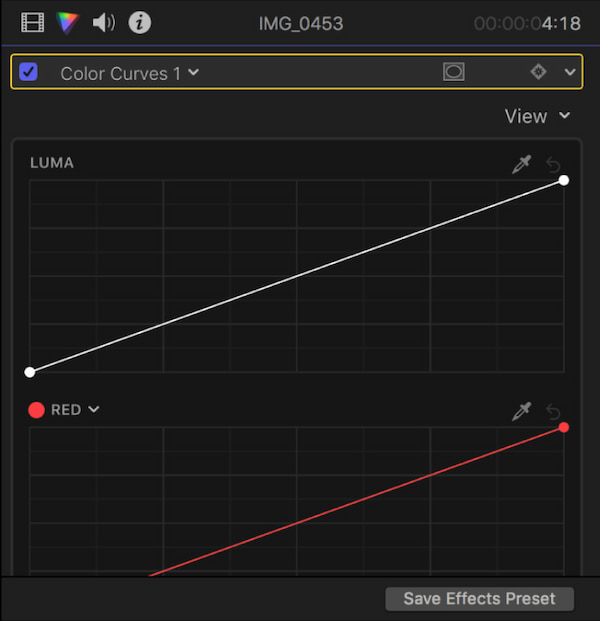
Color Curves allow you to adjust the Red, Green, and Blue channels individually using a diagonal line. If you want a classic teal and orange cinematic look, you can go to the Blue curve, pull down the top (highlights) to add yellow to the bright areas, and push up the bottom (shadows) to add blue to the dark areas.
Hue/Saturation curves are purely magical.
Don't go crazy with saturation! Pushing the sliders too far will break your footage and introduce ugly digital noise. Small, gentle tweaks make a massive difference.
Sometimes you only want to affect one part of the image, and like brightening a subject's face so they stand out from the background.
1. At the top of your Color Wheels or Curves effect, click the little mask icon (it looks like a square with a circle inside).
2. Choose Add Shape Mask.

3. Position the circle over your subject's face and feather the edges so it blends naturally.
4. Now, any adjustments you make (like boosting the midtone exposure) will only happen inside that circle!
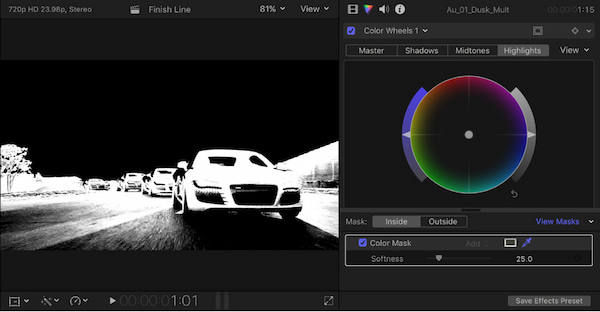
If your subject is moving, you can use the tracker or manually add keyframes to make the mask follow them across the screen.
You’ve spent hours perfecting your FCPX color grading. The worst thing you can do is export it with the wrong settings and watch your colors shift and wash out on YouTube.
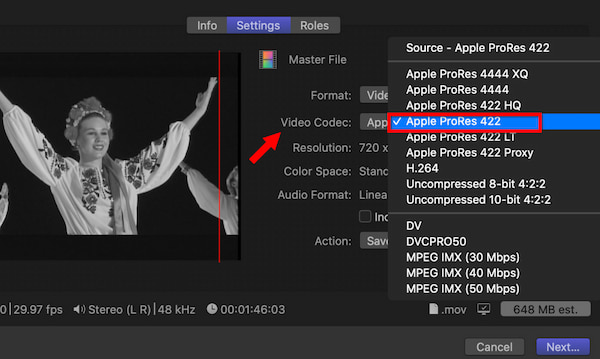
For the highest quality archive, export your master file using a ProRes (Codec).
1. Go to File > Share > Export File.
2. Under the Settings tab, change the Video Codec to Apple ProRes 422 or ProRes 422 HQ.
3. This creates a massive file, but it perfectly preserves every ounce of color data. You can then use software to compress it to an MP4 for the web without losing your carefully crafted tones.
While the native tools are fantastic, many professional colorists eventually look for the best color grading plugin for Final Cut Pro X. In my experience, the reigning champion is Color Finale.
Color Finale brings a true layer-based, Photoshop-style workflow right into FCPX.
Instead of jumping between different native inspector tabs, Color Finale gives you a unified floating window. You can stack your corrections: a layer for exposure, a layer for your utility LUT, a layer for FCPX color grading presets, and a layer for your final creative grade.
Why use it?
To use it: Simply drag the Color Finale effect from your Effects browser onto your clip, click Open Controls in the inspector, and start stacking your layers!
Let’s be honest. Professional Video Editing software like Final Cut Pro can be intimidating. It requires a powerful Mac, costs nearly $300, and has a steep learning curve. What if you just have a quick video for social media, and you want it to look vibrant and sharp without spending hours looking at Video Scopes?
This is where AnyMP4 Video Converter Ultimate shines as an incredible alternative. Despite its name, it’s much more than just a converter; it has a built-in Toolbox loaded with AI-powered video enhancement tools.
If you have a video that is too dark, too blurry, or just lacks punch, you can fix it in three easy steps using AnyMP4.
1. Open the Video Enhancer
Download and launch AnyMP4 Video Converter Ultimate.
Secure Download
Secure Download
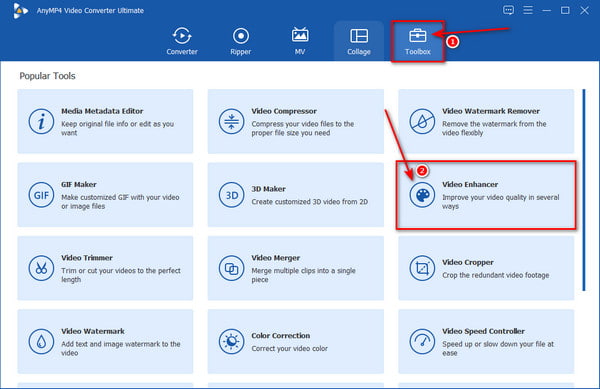
At the top of the screen, navigate to the Toolbox tab. Here, you will see a variety of helpful tools. Click on Video Enhancer.
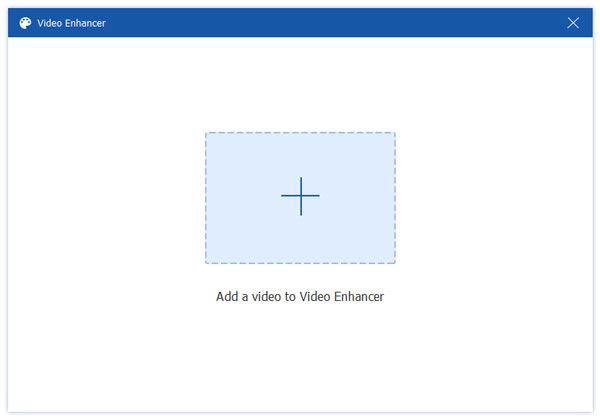
2. Add Your Video and Choose Enhancements
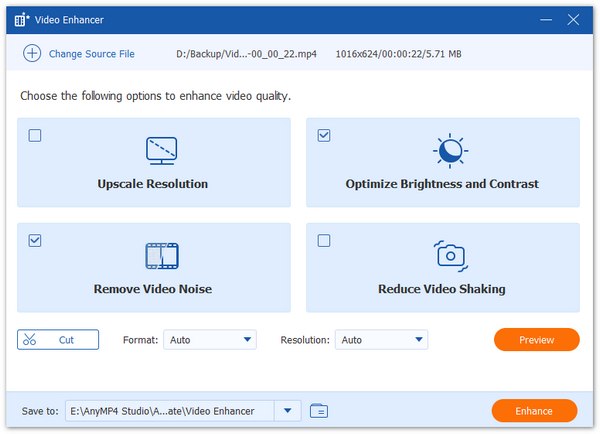
Click the big + icon to upload your dull or low-quality video file. A new window will pop up with four powerful AI options:
Check the box next to Optimize Brightness and Contrast.
3. Preview and Export
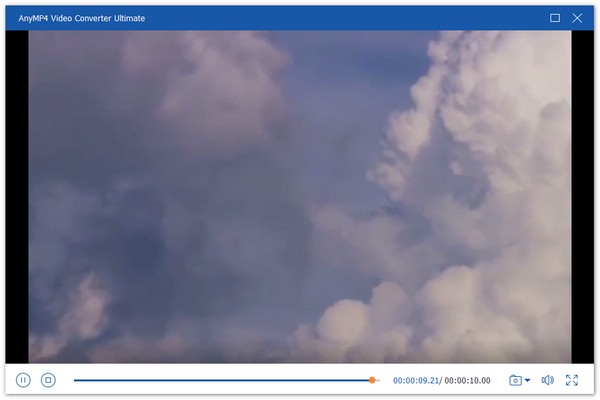
Click the Preview button to see a 10-second side-by-side comparison of your raw footage and the newly enhanced footage. Once you are happy with how vibrant and clear it looks, select your output format (like MP4 or MOV) and click Enhance.
If you want slightly more manual control in AnyMP4, you can also use the Color Correction tool in the Toolbox. This allows you to manually slide the Brightness, Contrast, Saturation, and Hue to get the exact look you want without the complexity of FCPX scopes!
Is LUT the same as color grading?
No! This is a very common misconception. A LUT (Lookup Table) is essentially a mathematical preset, and a filter that applies a specific set of color values to your footage. While applying a creative LUT is part of the color grading process, true color grading involves manually balancing exposure, fixing shot-to-shot differences, and manipulating specific hues using wheels and curves. Think of a LUT as an Instagram filter, while color grading is the entire photo editing process.
Does Final Cut Pro have LUTs?
Yes! Final Cut Pro has built-in support for LUTs. As mentioned earlier, it handles Camera/Utility LUTs natively in the Info Inspector to convert LOG footage. Furthermore, you can apply Custom Creative LUTs directly in your timeline by using the Custom LUT effect found in the Color section of the Effects Browser. You can easily import your favorite FCPX color grading presets (.cube files) downloaded from the internet.
How to calibrate a MacBook screen for color grading?
If your screen isn't showing true colors, your final video will look wrong on everyone else's devices. For basic calibration, go to your Mac's System Settings > Displays. For newer MacBook Pros with XDR displays, you can choose specific reference modes like HDR Video (P3-ST 2084) or Design & Print (P3-D50) depending on your delivery format. For true professional calibration, however, you should invest in a hardware calibrator (like a Datacolor Spyder or Calibrite ColorChecker), which hangs over your screen and creates a custom color profile specifically for your exact monitor's current state.
Mastering Final Cut Pro color grading doesn't happen overnight. It takes practice, patience, and a willingness to make a few ugly videos before you make a beautiful one.
Remember the golden rule: always start with solid FCPX Color Correction. Use your Waveforms to balance your exposure and rely on your Vectorscope to protect those skin tones. Once your foundation is perfect, dive into the Color Wheels and Curves to craft your unique Cinematic Look.
Whether you decide to stick with the incredibly powerful native tools, upgrade to a plugin like Color Finale, or use a quick and easy solution like AnyMP4 Video Converter Ultimate for your daily vlogs, the power to make your footage pop is right at your fingertips.
Secure Download
Secure Download
 Updated by Mark Cristobal to Edit Video
More readings
 Color Grading in Premiere Pro to Fix Video Visual Effect
Check this and learn the secrets of color grading in Premiere Pro with this guide. Elevate your editing skills and create visually captivating content.
 Improve Video Using Color Correction in Premiere Pro
Do your videos look bland? Check this post and learn the color correction in Premiere Pro. This post includes the steps to achieve a natural-looking clip.
 2 Solutions to Change Background Color in Illustrator
Read this article to learn how to use Adobe Illustrator to change the background color of artboards and layers when using the software’s editing window.
 DaVinci Resolve Color Grading: 2026 Updated Tutorial
Have you listened to the DaVinci Resolve? This article will share with you how to use this powerful tool to color grading videos. Read on!