Extreme sports and adventure content will always have their niche in the social media market. To properly capture moments for these kinds of content, GoPro cameras are a must-have. In this article, we will provide two guides on how to use two editing software programs designed to edit GoPro videos. This article aims to provide a comprehensive guide for users who are looking forward to capturing adrenaline-filled POV videos with their GoPro cameras.
Before moving forward to editing, you have to ensure that your video clips are organized first. Make sure to place videos in their folders to avoid mixups and confusion. Learning how to edit GoPro videos starts with organizing your clips.
If you plan on using your GoPro footage to create content, it is advisable to adjust its current settings based on the activity that you will partake in. Adjust its stability and recording mode.
To ensure the quality of your videos, the resolution you use must also be decent. This is even more important if you plan on using GoPro footage for editing or post-production related work.
If you are an experienced GoPro user, make sure to enable your camera’s ProTune. This will unlock more advanced manual settings, which are perfect for experienced users.
Since GoPro cameras are designed for capturing point-of-view videos, your field of view must be adjusted together with the POV you want to use. If you want a POV that is narrower, adjust your FOV as such.
Before proceeding to specific editing guides, let us first discuss the steps to add video clips to the editing menu of GoPro Quik. Keep in mind that this GoPro video editor is mobile-based, and its editing features are optimized to be beginner-friendly.
1. Open GoPro Quik, go to the Media tab, and find the video you want to edit.
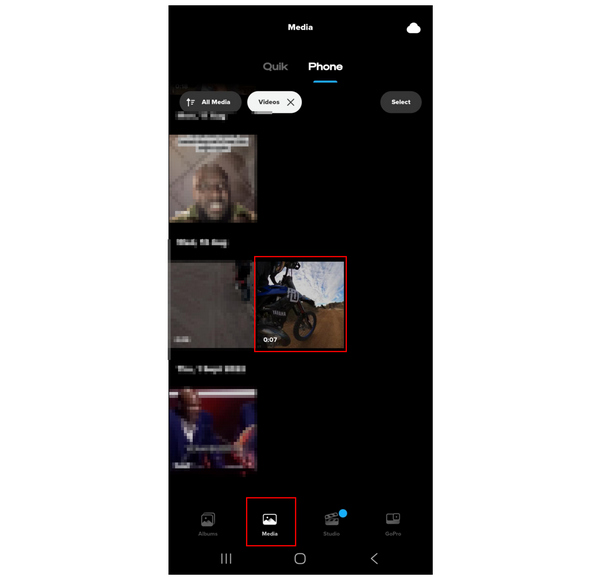
2. After selecting the video, tap the Edit button under the preview screen.
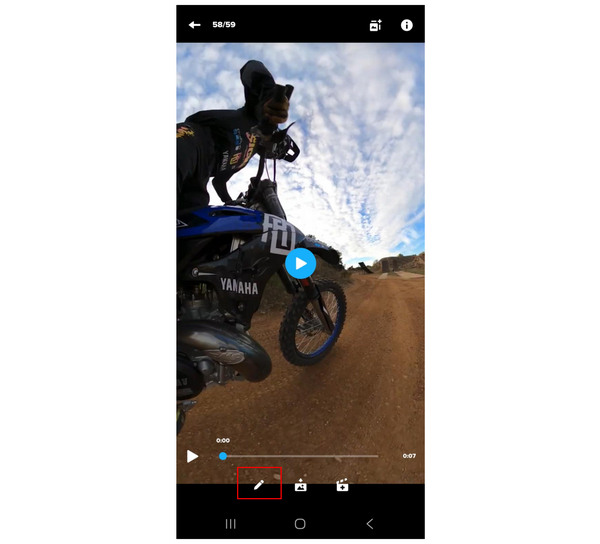
Once your videos are uploaded, you can now use the different editing options available in the mobile editing app.
1. Once the video you want to edit has been added, it will be set to the Trim tool by default. Tap the Scissors button in the editing timeline to begin the trimming process.
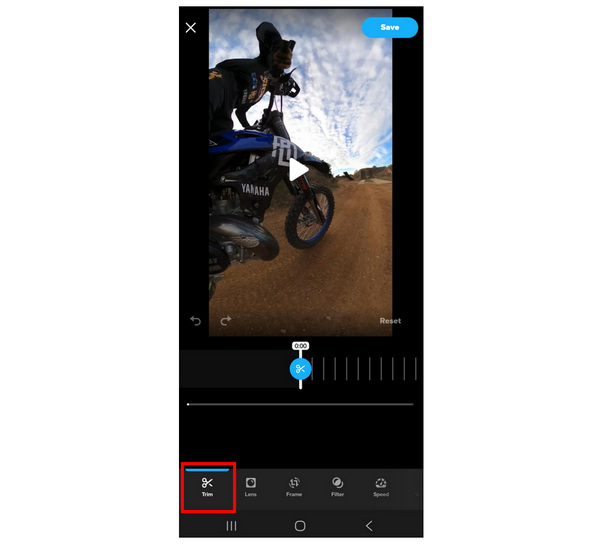
2. After tapping the Scissors button, move the editing timeline to adjust the button where you want the video to be trimmed. Then, tap the Scissors button again after setting where the video will be trimmed.
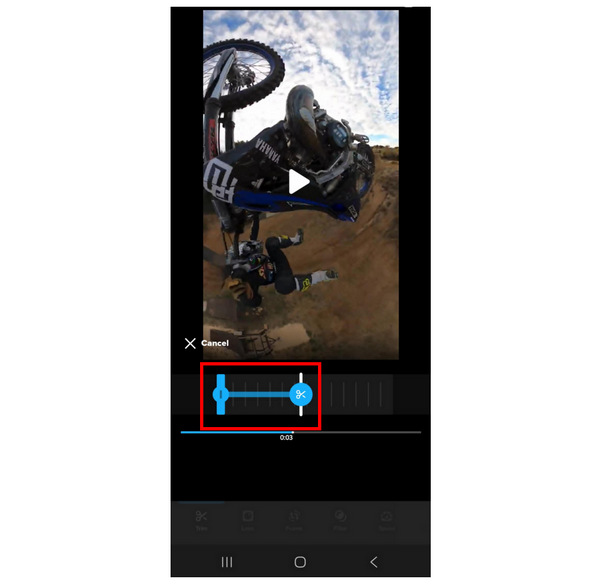
3. Now that you have set where the video trim will end. A rectangular box will appear in the editing timeline; this portion is the trimmed section of the video. Click on Save to import the trimmed video to your device’s storage.
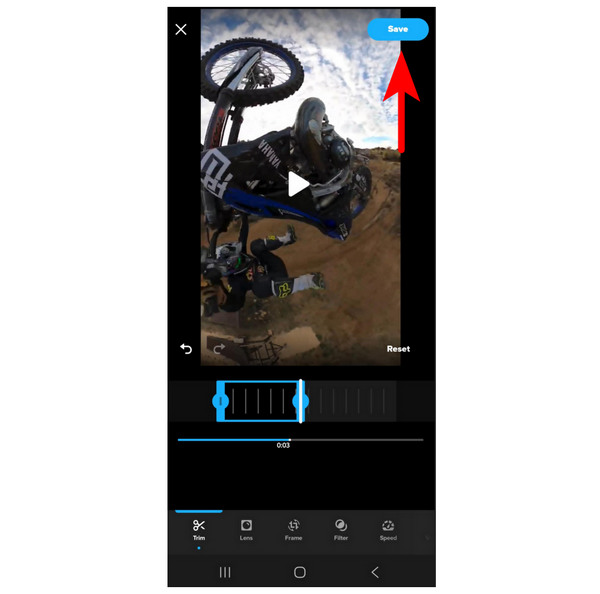
Since trimming essentially cuts your video to a set section of it, the portion of the video that you did not select will be discarded. Keep this in mind when trimming videos using any video editor.
Unfortunately, there is no stabilization enhancement tool in the GoPro Quik app. However, if you are using footage from a GoPro Hero 2024 model, the app will automatically stabilize your recording since this model has no built-in stabilization. Fortunately, videos from GoPro Hero 5 and later versions have built-in stabilization, making the GoPro Quik app not needed for stability enhancement.
If you plan on editing third-party captured videos in GoPro Quik, keep in mind that a stabilization option is absent.
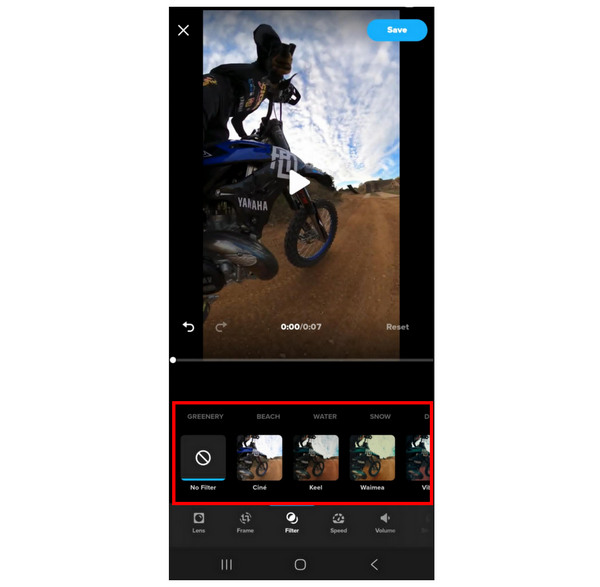
1. Swipe left in GoPro Quik’s editing tools to find the Filter option. Select it.

2. In the Filter tool, choose among the available video filters in the editor. These filters are divided into different styles, from Greenery, Beach, Water, Snow, and more. Each styles have a selection of filters available among them. Choose the style you want to apply as well as the filter you want to use.
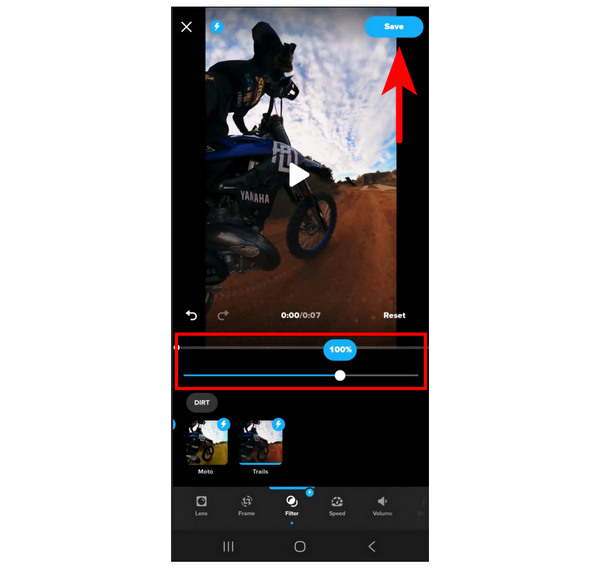
3. After choosing the filter you want to use, you can adjust the Filter Intensity Bar under the video duration. It will be set by default to 100% but you can increase or decrease it. Tap on Save to apply the filter you have selected.
Using the filters available in GoPro Quik, color correction and grading are made simpler. The wide selection of filters is also a big plus.
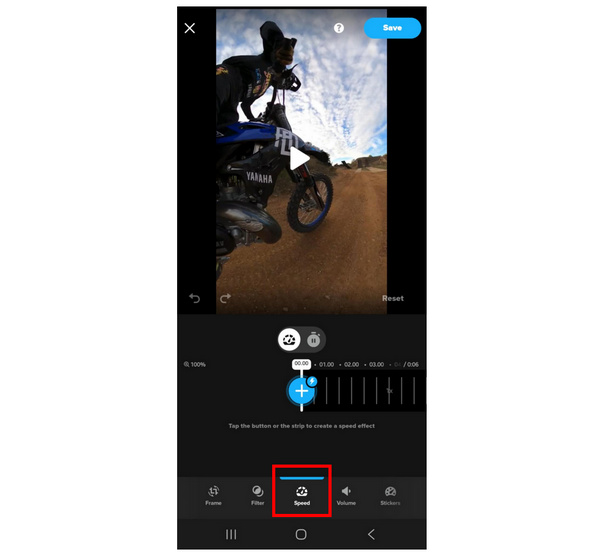
1. Select the Speed tool under the options available in GoPro Quik
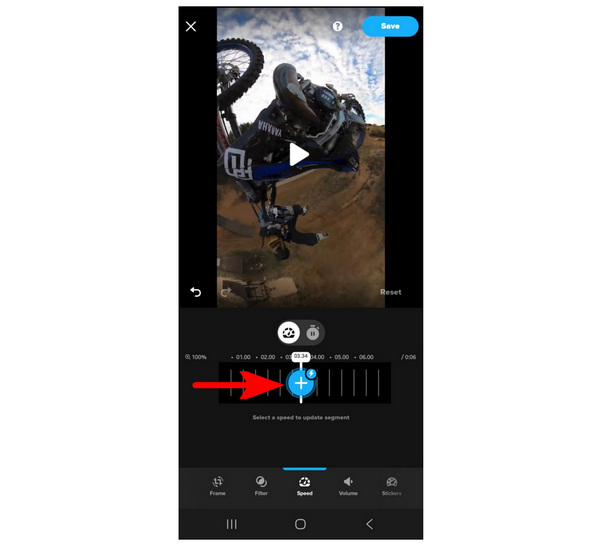
2. Adjust the video timeline to move the Plus button. The position of the Plus button will set where the speed adjustment will start. Click it once you have set the starting position.
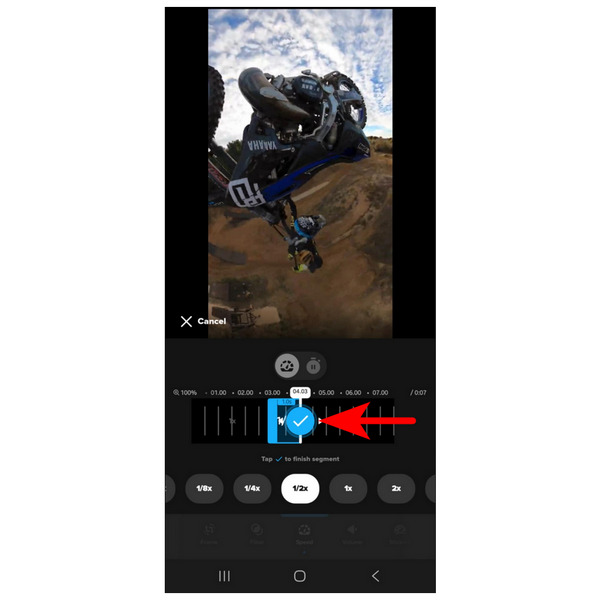
3. Adjust the timeline to set the portion of the video that will have its speed adjusted. Then choose the speed multiplier, which will be set by default to 1/2x, but you can slow down or speed up the video. Tap on the Check button to confirm your adjustment.
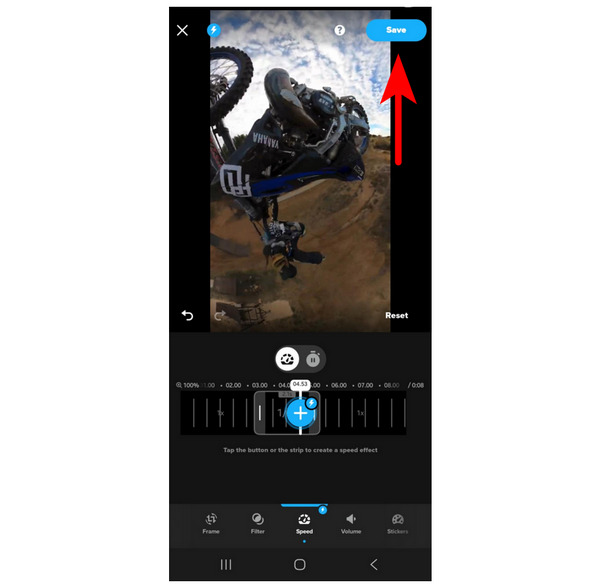
After confirming your adjustment, you will return to the preview window. Tap on Save to confirm the video speed modification.
Learning how to properly play with video speed will drastically improve the quality of your video. Make sure to practice this editing skill.
1. Swipe left to find the Volume tool. Tap it. Then, choose whether you want the video to be Muted, Regular Volume, or Boosted Volume. Click on Save after choosing your audio adjustment.
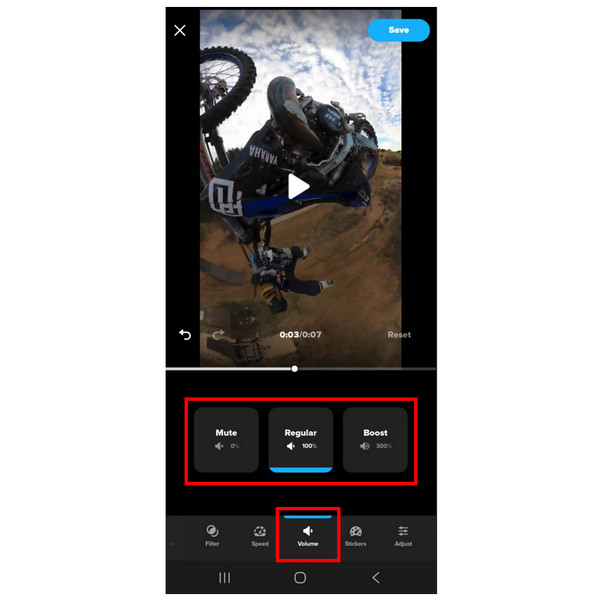
The audio enhancement option of GoPro Quik is not an enhancement per se; it can only adjust the volume intensity. However, you can use it to increase the volume if you add music to your GoPro video.
1. Lens Correction in GoPro Quik requires videos to be recorded by HERO11 or newer versions to have it applied. If you are editing third-party videos or GoPro clips older than HERO11, the Lens adjustment option is not available.
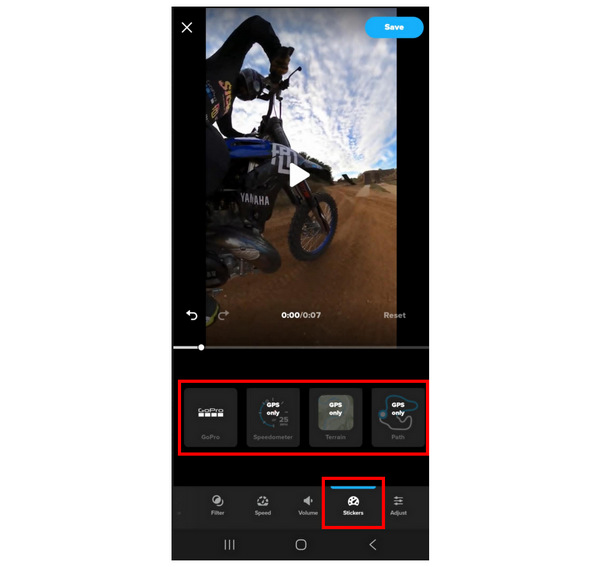
There is no Text tool available in GoPro Quik. However, you can add titles to your video using the Stickers available in it. You can add a GoPro watermark, Speedometer capture, Terrain, Path Overlay, and other GPS-supported stickers. As the labels suggest, these stickers require GPS access to be enabled.
Although GoPro Quik is designed to be beginner-friendly, this philosophy also limits the program to having more advanced editing tools. To solve this limitation, using desktop-based editors is more advisable, and AnyMP4 Video Converter Ultimate is a solid option for that.
To start, the media format converter background of the tool made it capable of having broad format support. This means that most videos, regardless of their format, may be edited in the tool, including GoPro recordings.
GoPro videos edited in the software may be adjusted by the basic editing features available in the MV Editor feature of the program. This includes basic trimming tools, filters, and more advanced features such as frame rate editing and resolution adjustments.
With the help of these tools, your GoPro video will not only be edited but will also be enhanced. This is even more possible since the tool also supports HD to 4K quality conversion. Moreover, the program's toolbox feature includes practical editing tools such as a video compressor, volume booster, video speed editor, and more.
With the help of these advanced features, together with the practical editing tools available in the program, AnyMP4 Video Converter Ultimate makes a strong case as one of the most efficient multimedia processing tools for PC and Mac computers. This makes the software a solid solution for those looking to learn how to edit GoPro videos on a Mac.
To learn how to edit GoPro videos using the program, make sure to read our three-step guide below, and do not forget to download the software for an easier time following our guide.
Secure Download
Secure Download
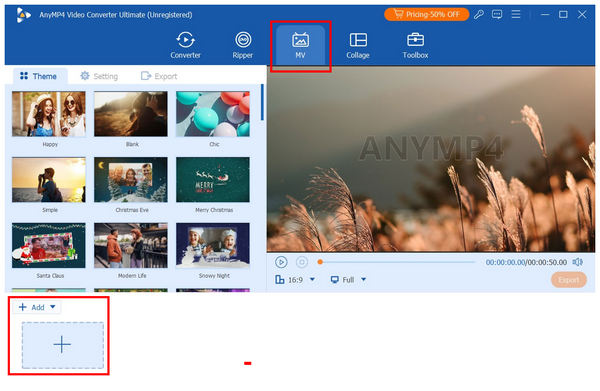
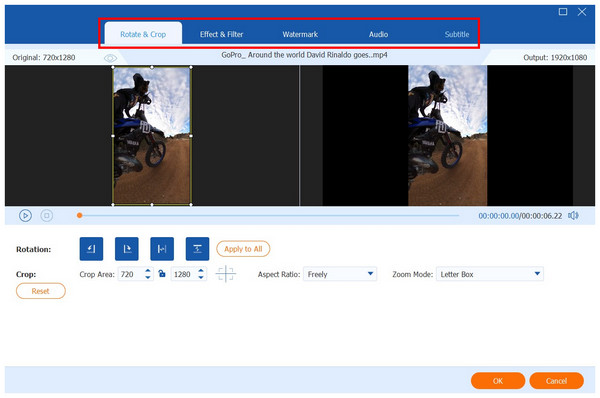
1. Open AnyMP4 Video Converter Ultimate and then go to the MV Editor section. Click on Add File to import the GoPro video you want to edit.
2. Once the video has been added, you can select Edit or Trim to use these adjustment tools.
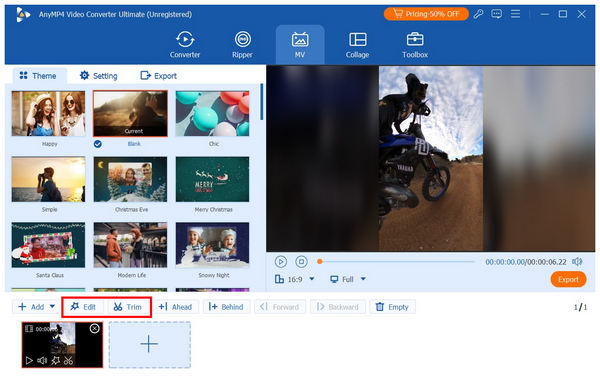
Inside the Edit menu, you can apply various adjustments to the video, such as Rotate & Crop, Effects & Filter, Watermark, Audio, and Subtitle.
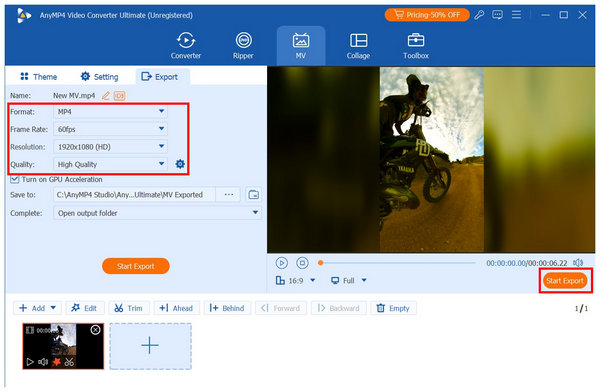
3. Back in the MV Editor menu, click on Export. In this menu, you can apply more advanced adjustments such as Format, Frame Rate, Resolution, and Video Quality. Once you are satisfied with these settings, click on Start Export to begin importing the edited GoPro video to your computer.
Using these editing tools, you can improve the quality of the GoPro video you want to edit with the more advanced editing tools in AnyMP4 Video Converter Ultimate. This makes the program a direct upgrade when compared to GoPro Quik.
With the help of our step-by-step guides in this article, we hope that your editing experience with GoPro videos is now much smoother. If the limitations of GoPro Quik are a hassle for you, consider using desktop-based editors like AnyMP4 Video Converter Ultimate as an alternative.
Secure Download
Secure Download
 Posted by Mark Cristobal to Edit Video
Related Articles
 All You Need to Know About Blender Video Editing – Review and Tutorial
This article will give a review to Blender video editor and make a tutorial on how to use blender video editing feature to edit videos.
 Lightworks Video Editor Review and Its Top 3 Alternatives
Lightworks is a powerful video editor that won the Academy and Emmy award. Read this review to get more information to choose a suitable video editor.
 WeVideo Review - WeVideo Free/Power/Unlimited Video Editor and Maker
What is WeVideo? This post will review and show you how to use this WeVideo video editor and maker. You can also find 5 more great WeVideo alternatives.
 4 Easy Ways to Compress GoPro 4K Videos for Email to Smaller Ones
Have a wonderful GoPro video and want to share it with friends? You can learn 4 ways to compress the GoPro video to less than the standard 20MB in this article.