Free Download100% Clear & Secure
Free Download100% Clear & Secure
When you’re watching a stream, the vibe is chill, and suddenly, BAM! The streamer gets a jump-scare or wins a clutch round, shouts at the top of their lungs, and your eardrums are ringing for the next ten minutes. Or, on the flip side, you can barely hear them over the game music until they start yelling.
If you’re the one behind the mic, you don't want to be that streamer. This is where the OBS audio compressor comes in. In this guide, I’m going to break down everything you need to know about the OBS sound compressor, from the confusing technical terms to the exact settings I use for my daily broadcasts.
The OBS audio compressor is a built-in filter in OBS Studio that automatically lowers the volume of your audio source when it exceeds a threshold. Think of it as an invisible hand that turns down your volume knob the moment you get too loud, and lets go when you speak normally.
In my experience, using a mic audio filter like this is the difference between an amateur setup and a "pro" sounding broadcast. It’s not just about being loud; it’s about being consistent.
PROS
CONS
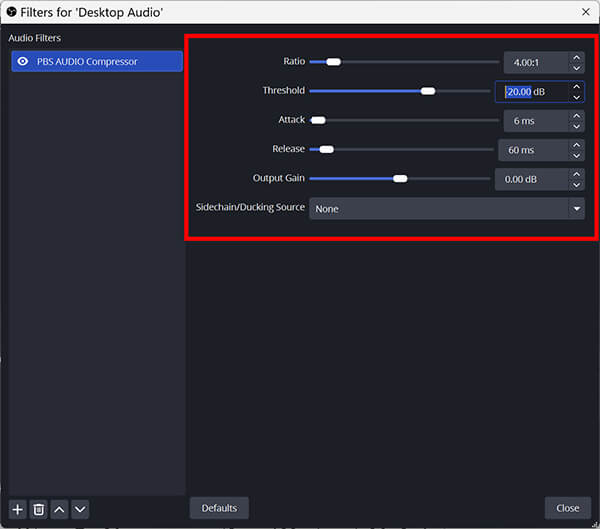
Let’s dive into the "meat" of the tool. When you open the OBS audio compressor settings, you’ll see five or six sliders. Here is what they actually do based on my real-world testing.
The Ratio determines how much the compressor reduces the volume once it crosses the threshold. For example, a 4:1 ratio means that for every 4dB the volume goes over the limit, OBS only lets 1dB through.
This is the level (in decibels) where the compressor starts working. Anything quieter than the threshold is left alone; anything louder gets compressed. (Learn more about audio compression here.)
Attack is how fast the compressor starts (in milliseconds), and Release is how fast it stops once the volume drops.
Because compression reduces the loud parts, the overall volume might seem lower. Output Gain lets you boost the final signal.
If you want to achieve OBS audio compression for a clearer voice, follow these exact steps. I’ve refined this process over hundreds of hours of streaming.
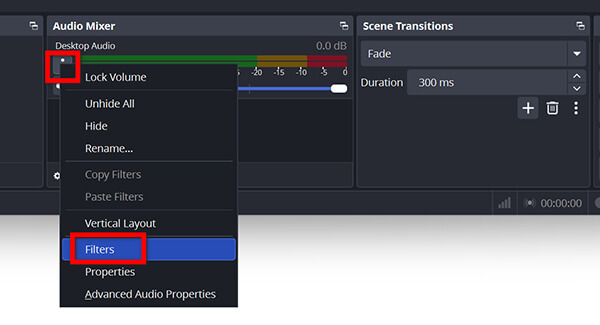
1. Open Your Audio Filters
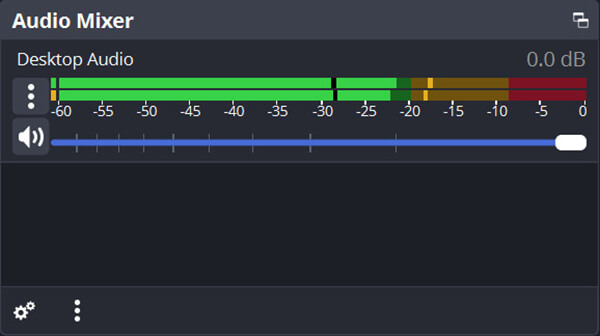
Go to the Audio Mixer dock in OBS. Find your microphone (usually labeled 'Mic/Aux'). Click the three dots (⋮) and select Filters.
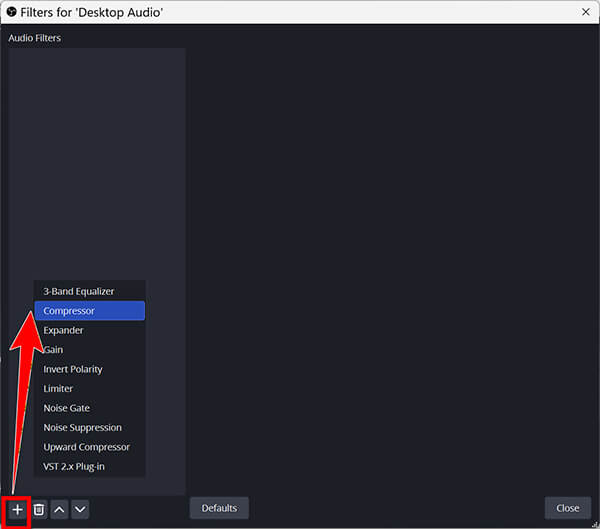
2. Add the Compressor
Click the + icon at the bottom left of the Filters window. Select Compressor from the list. You can name it "Main Compressor."
3. Dial in the Ratio and Threshold
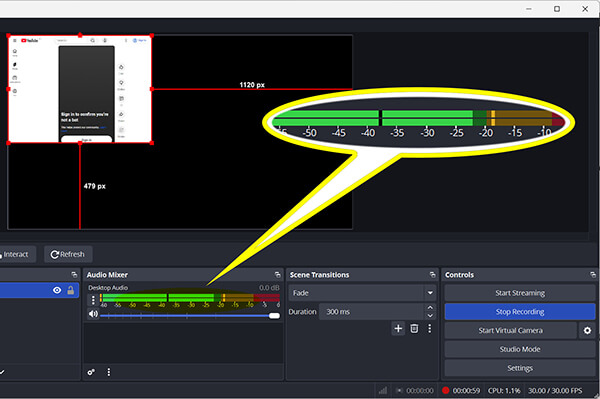
Start with a Ratio of 4:1 and set your Threshold to -20dB as a starting point. Talk at your normal volume; you should see the "Gain Reduction" bar (the green bar moving to the left) barely moving. Now, shout! You should see that bar move significantly.
Set Attack to 6ms and Release to 60ms. This is a standard "safe" zone that works for 90% of people.
4. Compensation (Output Gain)
If your voice feels too quiet now, slowly move the Output Gain slider up until your levels in the main OBS mixer are hitting the "yellow" zone (between -15dB and -10dB) when you talk normally.
5. Test with Game Audio
Play a video or some game music. Ensure your voice sits "on top" of the music. If the music drowns you out, increase the Output Gain slightly.

If the audio compression isn't what you want and you want to make it smaller, you can compress the video recording file after exporting it with third-party tools.
Always do a "local recording" test for 30 seconds before going live. Listen back to your shouting and your whispering to ensure the balance feels natural.
After using nearly every OBS mic audio filter available, the built-in compressor remains a powerhouse. It is robust, low on CPU usage, and highly effective.
Performance Verdict: If you are a live creator, the OBS sound compressor is non-negotiable. It solves the most common complaint in streaming: inconsistent volume. While it takes about 10 minutes to set up properly, the tool's "set it and forget it" nature makes it a 10/10 recommendation for any serious creator.
Is it perfect?
No. For post-production (editing a video you already recorded), OBS isn't the best tool. But for live 1-on-1 interaction or gaming, it's the gold standard.
Sometimes, you’ve already recorded a video and realized the audio is a mess. You can’t go back and use the OBS filter. In this case, I recommend AnyMP4 Video Converter Ultimate. While OBS is for live work, AnyMP4 is a powerhouse for fixing files after the fact.
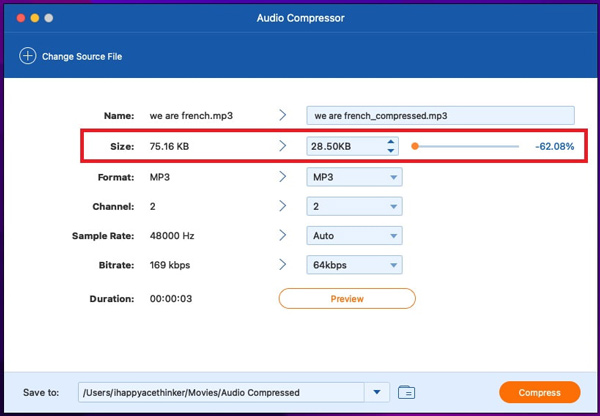
AnyMP4 Video Converter Ultimate features a dedicated Toolbox that contains a specialized Audio Compressor tool. It’s perfect for when you need to level out a recording or reduce the size of a massive audio file for uploading to Discord or YouTube.
Secure Download
Secure Download
Recommendation
| OBS Audio Compressor (Built-in) | VS | AnyMP4 Video Converter Ultimate (Toolbox) |
| Live streaming & Real-time recording | Best For | Fixing files after recording |
| Moderate (Learning curve) | Ease of Use | Very Easy (One-click Toolbox tool) |
| Dynamic Range (Voice Leveling) | Specialty | File Size & Post-Process Normalization |
| Live monitoring only | Preview | Dedicated 10-second preview button |
| Full control over dynamics | Customization | Quick fixes and volume boosting, de-noise, audio sync, etc. |
What are the best compressor settings for streaming voice?
Based on my experience, the best OBS compressor settings for streaming are:
• Ratio: 3:1 or 4:1
• Threshold: -18dB to -24dB
• Attack: 5ms
• Release: 60ms
• Output Gain: +3dB to +6dB (adjust as needed)
What do ratio, threshold, attack, and release mean in the OBS compressor?
• Ratio: How much the volume is lowered.
• Threshold: The "line in the sand" where the lowering starts.
• Attack: How quickly the "lowering" begins.
• Release: How quickly the volume returns to normal.
Can I use a compressor with other filters, like a noise gate or a suppressor?
Yes! This is called an OBS audio filter chain setup. The standard order should be:
1. Noise Suppression (Removes background hum)
2. Noise Gate (Turns off the mic when you aren't talking)
3. Compressor (Balances your loud/quiet voice)
4. Limiter (The final safety net to prevent any peaking)
Mastering the OBS audio compressor is a rite of passage for any content creator. It’s the difference between a viewer sticking around because they feel comfortable and leaving because their ears hurt. By understanding the OBS compressor vs limiter (the compressor squeezes, the limiter stops), and setting up your OBS audio filter chain setup correctly, you’ll sound professional regardless of your hardware.
Secure Download
Secure Download
 Updated by Mark Cristobal to Edit Audio
More readings
 2 Efficient Methods to Compress Videos for Web on Windows/Mac
When you add a video as your website background and find it always buffer because of the large size, it's time to compress videos for web.
 Compress with VLC – Reduce the File Size of a Video for Free
Learn how to compress videos with VLC. If you want to compress video files without losing quality, you can also get 2 VLC video compressors alternative here.
 How to Remux OBS Recordings [2026 Guide]
Read this article to learn how to convert OBS recordings to MP4 using the recording software’s remux recording option. Follow our full guide to learn how.
 Fix OBS Audio Not Working Via Quick Solutions and Settings
Are you having trouble with audio recordings in OBS? Read this article for a full guide on how to fix the most common audio-related issues in the software.