Premiere Pro is an all-featured and professional video editor developed by Adobe. It is designed with many editing features. You can change and modify the video playback speed using Adobe Premiere Pro.
This post will tell you how to slow down a video in Premiere Pro in detail. Moreover, a great alternative to Premiere Pro is recommended for you to easily speed up or slow down a video.
Adobe Premiere Pro is not a free video editing tool. It allows you to free use all its features for seven days. Whether you want to have a free trial or directly buy it, you can free download it from the official Adobe site and follow the steps below to slow down a video.
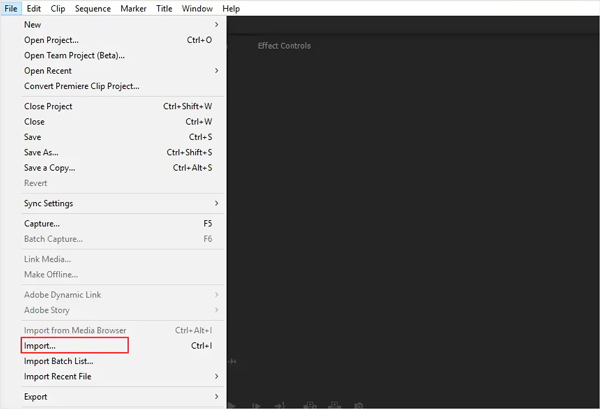
Step 1.Open Premiere Pro on your computer and start with a new project. Click the top File menu and then choose the Import option to add your video file to it. After that, you need to drag the video to the timeline panel or project panel.
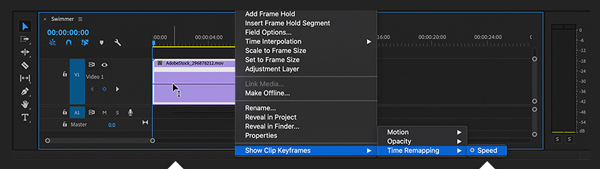
Step 2:Right-click to select the video clip you want to slow down its playback speed in Premiere Pro. Choose the Show Clip Keyframes option, Time Remapping, and then Speed from the drop-down menus. In some Premiere Pro versions, you can directly choose the Speed/Duration option from the pop-up menu.
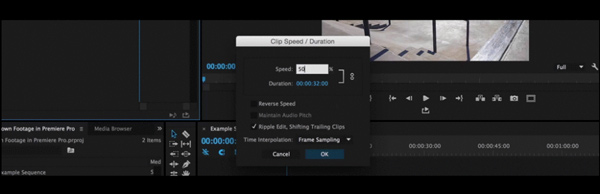
Step 3:In the pop-up Speed window, you can enter a specific number to control the video playing speed. For instance, a 50% speed setting will make the video twice as slow.
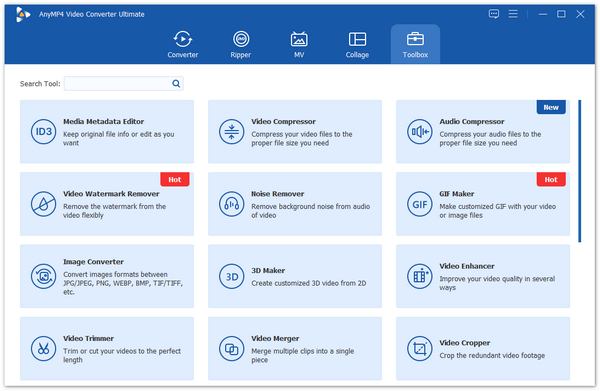
After the free trial, you may do not want to pay for the Premiere Pro. Or you prefer an easier way to quickly slow down a video. Considering your need, this part introduces you to a great Premiere Pro alternative, Video Converter Ultimate, to change the playback speed. It is equipped with an easy-to-use Video Speed Controller to help you speed up or slow down any video with ease.
Secure Download
Secure Download
Step 1. Download and open this Video Converter Ultimate on your Windows PC or Mac. Click the Toolbox and then choose the Video Speed Controller.
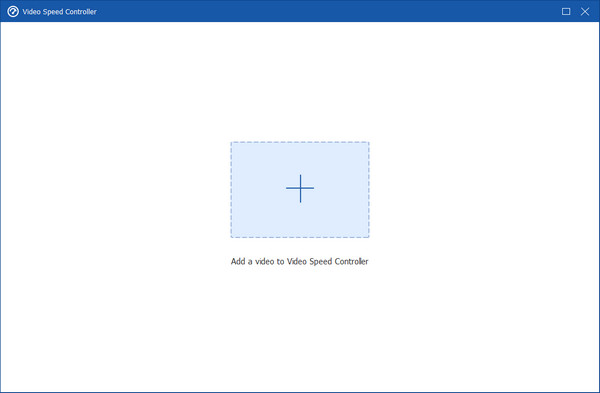
Step 2. Click the + icon in the central part to select and add the video file you want to slow down its playing speed.
Step 3. If you want to make a slow-motion video, you can choose the 0.125X, 0.25X, 0.5X, or 0.75X. As you can see, it also allows you to increase the video speed to 1.25X, 1.5X, 2X, 4X, or 8X, according to your need.
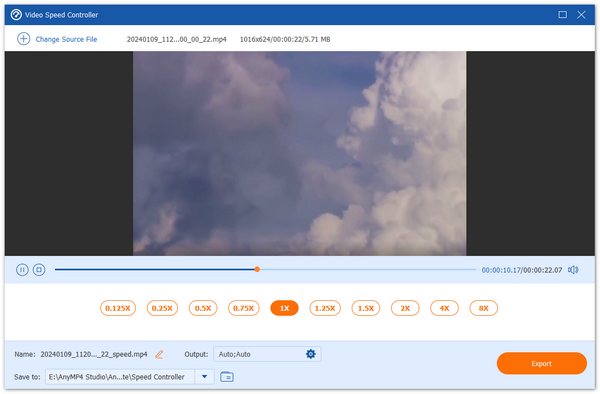
Step 4. You can customize various output video and audio settings from Output. Also, you can rename the file and select a suitable destination folder. After that, you can simply click on the Export button to save this edited video on your computer without quality loss.
Question 1. What are Premiere Pro supported formats?
Adobe Premiere Pro supports many video, audio, and still-image formats, such as MP4, MOV, AVI, MXF, 3GP, AIFF, ASF, GIF, AVC, HEIF, M2TS, MTS, M4V, VOB, WAV, WMV, M4A, and more.
Question 2. How to lower the volume in Premiere Pro?
Import your video to Adobe Premiere Pro, click the top Window menu, and choose the Audio Clip Mixer option. Now you can easily pull the fader down to lower the audio track's volume output.
Question 3. Can Premiere Pro crop video?
Yes, you can use Adobe Premiere Pro to crop a video. Add your video to Premiere Pro and drag it to the timeline. Click and choose the video file, click the Effects menu, and choose the Crop feature from the Transform drop-down menu. Then you can use the crop feature to remove unwanted parts from the video.
This post mainly talked about how to slow down a video using Adobe Premiere Pro and Video Speed Controller. You can use your preferred tool to change the video playback speed.
 Posted by Riley Mitchell to Edit Video
Related Articles
 Top 10 Fast and Slow Motion Video Editors for Different Platforms
When you want to make some fast or slow motion video clips, you can find the 10 best fast and slow motion video editors from the article.
 Concrete Tutorial – How to Compress Video in Adobe Premiere Pro
You just installed Adobe Premiere Pro but don't know how to use it? Don't worry. This post will get you started by telling you in detail how to compress videos in Adobe Premiere Pro.
 Concrete Guide to Add Music to iMovie on Mac and iPhone/iPad
You do not need to purchase music from iTunes. This step-by-step guide tells you how to add background music to an iMovie project on iPhone or Mac computer.
 Resize Video for Instagram - How to Crop/Resize Video for IG
How to resize a video for Instagram? How to crop video for Instagram free? Why does Instagram crop my videos? Get detailed guide to crop or resize video for IG.