4 Best Methods to Remux MKV to MP4 Without Re-encoding
Quick Answer:
Remuxing MKV to MP4 repackages video and audio streams into a new container without re-encoding, preserving 100% original quality. For fast batch conversions, AnyMP4 Video Converter Ultimate is highly efficient, while Shutter Encoder and FFmpeg offer robust, free open-source alternatives for Windows and Mac.
When you need to remux MKV to MP4, it is usually because a smart TV, iPad, or PlayStation just rejected your video file with a frustrating format error. While MKV is an excellent container for keeping multiple audio tracks and advanced subtitles intact, it lacks the universal playback support that MP4 enjoys.
Many online tutorials overcomplicate this container swap or confuse it with heavy, time-consuming transcoding. To get the most out of your hardware, you need to know how to swap these file wrappers losslessly without wasting hours re-encoding data that is already perfectly fine. Let's look at exactly what happens to your media streams during this process.

How We Test
- We ran these tools on a Windows 11 desktop rig using a 10GB MKV file containing H.264 video and AC3 audio. We evaluated processing speed, CPU load, and interface usability. We specifically looked for tools that truly support stream copy to guarantee zero quality loss, immediately discarding previous claims that remuxing degrades video fidelity.
|
Best For |
Price |
Platform |
Difficulty |
| AnyMP4 Video Converter Ultimate |
Easiest 1-click batch remuxing |
Paid (Free Trial) |
Windows / Mac |
Easy |
| Handbrake |
Open-source GUI users |
Free |
Windows / Mac / Linux |
Medium |
| FFmpeg |
Command-line automation |
Free |
Windows / Mac / Linux |
Hard |
| Shutter Encoder |
Modern, free open-source GUI |
Free |
Windows / Mac |
Easy |
What Does Remux MKV to MP4 Mean? (Remux vs Transcode)
Remuxing (multiplexing) is simply taking the exact video and audio data out of the MKV box and putting it into an MP4 box. Because you are not touching the actual video codec, the process is 100% lossless and takes seconds instead of hours.
Transcoding decodes and re-encodes the video data. That takes massive CPU power and inevitably degrades image quality. If your MKV already contains MP4-compatible codecs (like H.264), remuxing is the only logical choice.
Method 1: AnyMP4 Video Converter Ultimate (Easiest & Fastest)
Trying to process a 50GB Blu-ray rip on a standard laptop usually crashes the system or takes an entire afternoon. The primary pain point of container conversion is hardware bottlenecking. AnyMP4 Video Converter Ultimate bypasses this entirely by utilizing a dedicated stream copy engine. Instead of forcing your CPU to decode and re-encode the heavy H.264 or HEVC data, it extracts the raw video and audio streams from the MKV and instantly drops them into an MP4 shell. It handles the heavy lifting automatically, preventing configuration errors that could ruin your playback.
1. Drag your entire MKV folder directly into the main window. If you like, you can click the Add Files button to locate the MKV files, and import them into this software when handling full TV seasons.
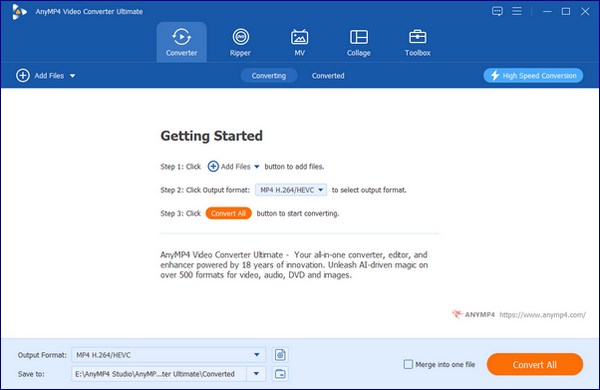
2. Open the Output Format dropdown, switch to the Video tab, select MP4 from the sidebar, and choose Same as source. This locks in the lossless stream copy.

3. Choose your destination directory and click Convert All. The process completes almost instantly because no transcoding occurs.

Method 2: Handbrake (Best Free GUI Option)
Handbrake is completely free and actively updated, but you must be careful with your configuration to achieve a near-lossless result. Unlike dedicated stream-copy tools, Handbrake is primarily a transcoder, so you must explicitly adjust the RF slider to 0 (Lossless) or use specific passthrough settings for audio to avoid a multi-hour re-encode. It requires more technical awareness than Method 1, but it remains the gold standard for open-source video handling.
1. Open Handbrake, click Source, and load your MKV file.

Set the Summary tab container format to MP4.

2. Go to the Video tab. Look for the Constant Quality slider and drag it all the way to the right until it reads 0 (Lossless). This prevents the encoder from crushing your bitrate.

3. Switch to the Audio tab. Change the audio codec dropdown from AAC or MP3 to AAC Passthrough or AC3 Passthrough depending on your source stream.

4. Click Start Encode at the top of the screen to output your file.

Honestly, Handbrake's UI is a complete mess if you just want a quick remux. I once spent an hour waiting for a movie to process, only to realize the software defaulted to a heavy, lossy re-encode. It doesn't have a simple, prominent Stream Copy button for video. You have to manually drag the Quality slider all the way to a specific threshold and hunt down the audio passthrough settings. If you miss one checkbox, your laptop fans will spin up to 100%, and you waste an afternoon transcoding data that should have taken seconds to copy.
Method 3: FFmpeg (Best for Command-Line Users)
Unlike bulky GUI software, FFmpeg talks directly to your operating system kernel. It requires zero graphical desktop resources, making it exponentially faster than Handbrake for pure stream copying. It is an unguided command-line tool, but it gives you absolute control over your stream mapping.
1. Install FFmpeg on Mac or Windows computer. Open your Terminal or Command Prompt.
- • If you are on Windows: Press the Windows Key on your keyboard, type cmd, and press Enter to open the Command Prompt.
- • If you are on a Mac: Press Command (⌘) + Spacebar at the same time to open Spotlight Search, type terminal, and press Return to launch the Terminal.

2. Navigate to your video folder using the cd command.
1. Type cd (type lowercase cd followed by a single space).
2. Open your normal file explorer or Mac Finder, grab the actual folder where your videos are stored, and drag it directly into the terminal window.
3. The terminal will instantly type out the exact, perfect folder path for you. Just hit Enter.

3. Type the following command, and hit Enter:
ffmpeg -i input.mkv -c copy output.mp4
Note
Among the command, input means the file name of the MKV video file in that folder, and you need to replace with the real name in your file.

The command tells FFmpeg to ingest the MKV (-i) and copy both video and audio tracks directly (-c copy) into the new MP4 filename without touching the inner data.
Then you can find the converted MP4 video file stored in the same folder of the MKV file.

A hard truth about remuxing: you cannot blindly repackage everything into an MP4. The MP4 container is strictly standardized. If your source MKV contains FLAC audio or PGS (image-based) subtitles ripped from a Blu-ray, a pure -c copy stream copy command will instantly fail. MP4 expects AAC or AC3 for audio, and SRT or TXT for text. When you hit a remux failure, you must multiplex the video stream losslessly while simultaneously transcoding the incompatible audio track by using a hybrid command like ffmpeg -i input.mkv -c:v copy -c:a aac output.mp4.
Method 4: Shutter Encoder (Best Modern Free Tool for Windows & Mac)
If FFmpeg's command line feels too intimidating but you still want a 100% free, open-source tool that handles true lossless remuxing, Shutter Encoder is the absolute gold standard. Unlike XMedia Recode which is locked to Windows and looks like it was designed in 2005, Shutter Encoder runs beautifully on both Windows and macOS. It acts as a sleek graphical interface for FFmpeg, exposing its raw container-swapping power through a single, foolproof function called Rewrap.
1. Open Shutter Encoder and drop your MKV file into the large central drop zone.

2. Click the Choose function dropdown menu. Scroll down to the Editing category and select Rewrap.

Crucial Settings Check: Once selected, look at the right-hand settings panel under Filter. Ensure the destination extension is set to .mp4. Shutter Encoder will now directly clone the underlying H.264/HEVC video stream without triggering a heavy, system-choking re-encode.

3. Click the Start function button at the bottom. A progress bar will flash briefly, and your pristine, lossless MP4 will appear in the source folder.

FAQs About Remuxing MKV to MP4
What is the difference between remuxing and transcoding?
Remuxing copies the existing audio and video streams into a new container without altering the data. Transcoding completely decodes the data and re-encodes it, which takes longer and reduces video quality.
Does remuxing MKV to MP4 preserve subtitles?
It depends on the subtitle format. MP4 natively supports text-based subtitles like SRT. If your MKV uses image-based subtitles like PGS or VOBSUB, the remuxing process will likely drop them unless you burn them into the video (which requires transcoding). You can add subtitles to MP4 by following this guide.
Can I remux MKV with multiple audio tracks?
Yes. Tools like FFmpeg (using the -map 0 command) and AnyMP4 VCU allow you to retain multiple audio tracks, provided those audio codecs (like AAC or AC3) are supported by the MP4 container.
How to remux MKV to MP4 on Mac?
Mac users can use the Mac version of AnyMP4 VCU for a GUI experience, or install Handbrake and FFmpeg (via Homebrew) to process files natively on macOS.
Does remuxing reduce file size?
No. Because remuxing does not compress the video or audio streams, the final MP4 will be almost the exact same size as the original MKV file.
Which Remux Tool Should You Use?
Before closing this guide and picking a method of remuxing MKV to MP4, check your specific file requirements to avoid broken outputs or dropped audio tracks:
- • For full TV seasons or massive 4K files: Stick to a dedicated desktop suite like AnyMP4 Video Converter Ultimate. It automates the stream-compatibility check so you do not accidentally corrupt a file header or drop vital audio channels during a bulk transfer.
- • For quick, single-file conversions requiring a modern interface: Use Shutter Encoder's Rewrap function. It gives you explicit control over your streams on both Windows and Mac without forcing you into a confusing, multi-layered setup.
- • For automated server scripts or command-line speed: Run a pure FFmpeg terminal command. It utilizes zero graphical overhead and executes raw stream copies instantly, provided you map your audio channels correctly beforehand.
Skip traditional transcoders like Handbrake unless you explicitly want to shrink your overall file size or hard-burn image-based subtitles into the video track. For pure, lightning-fast container swaps, re-encoding the video is simply the wrong approach.