Store
Store- Multimedia
For Windows
- Converter Tools
- Video Converter Ultimate

- Video Converter
- 4K Converter
- MP4 Converter
- Audio Converter
For Mac
- BD/DVD
For Windows
- DVD Tools
- DVD Ripper
- DVD Copy
- DVD Creator
- DVD Converter
- DVD Toolkit
For Mac
- Mobile
For Windows
For Mac
- Utility
- Freeware
User Guide
Get Started
Download & Install
Download Blu-ray Ripper and then follow the on-screen instructions to install it on your computer. After installation, run Blu-ray Ripper on your computer.
Register
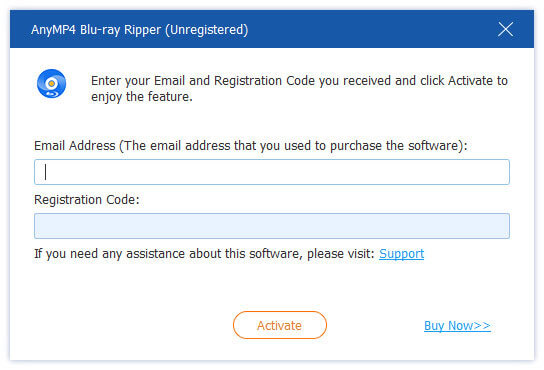
There are some limitations in the trial version of AnyMP4 Blu-ray Ripper. To enjoy more features without limitations, you can need to register the software with your Email Address and Registration Code.
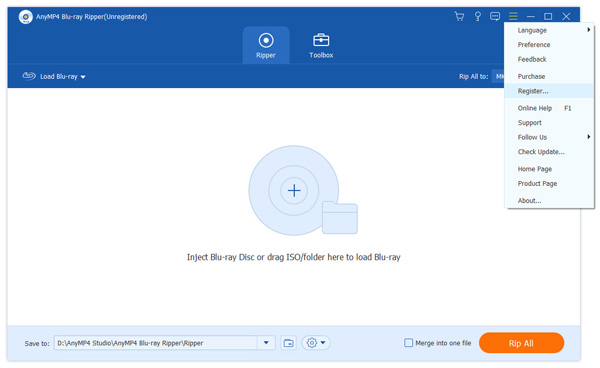
Click the Menu icon on the top right of the interface, and select Register to open the register window.
Then you need to enter your email address and registration code, and click Activate button to complete the registration. Make sure that you are using a stable internet connection while registration.
Update
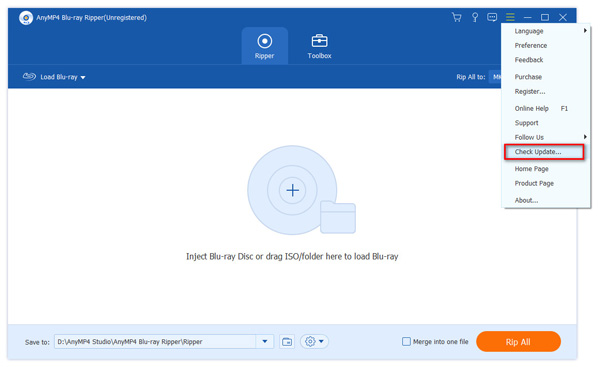
AnyMP4 Blu-ray Ripper will release a an update constantly when there are bug fixes and other improvements. Follow the methods below to update your software.
Method 1: Click the Menu icon and choose Check Update. When there is an update, you can download and install it immediately.
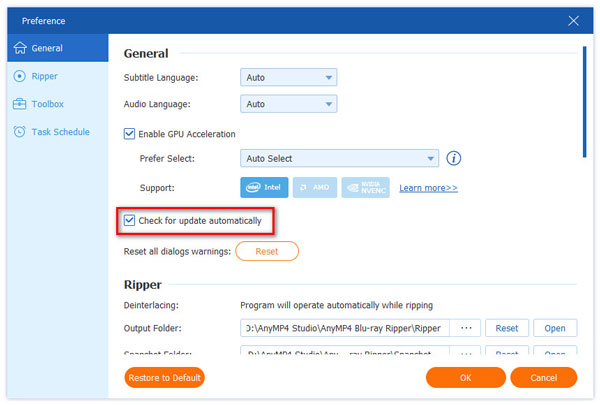
Method 2: Click the Menu > Preferences, and check the box of Check for updates automatically. Then you will get the message whenever an update is available.
Method 3: Go to AnyMP4 Blu-ray Ripper official website to download the latest version.
Preference
The Preference window enables you to adjust settings in advance. You are given choices to adjust general settings like subtitle language, audio language, ripper settings, toolbox settings and task schedule.
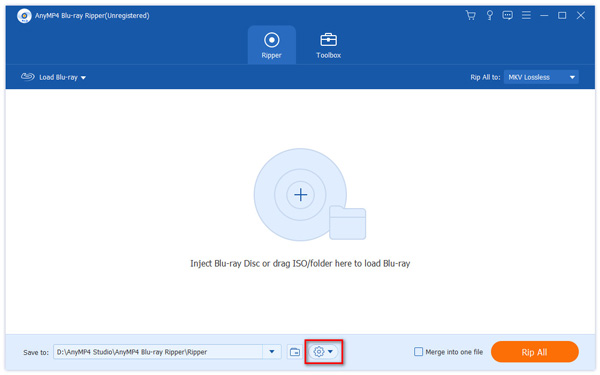
Just click Preference (the gear icon) next to the Output folder to open Preference window. Or you can click Menu > Preference to adjust more settings.
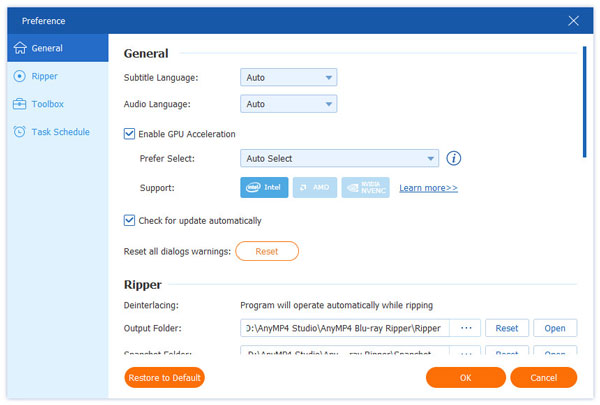
General
In the General tab, you can choose to adjust Subtitle Language, Audio Language, as well as GPU Acceleration. AnyMP4 Blu-ray Ripper supports the newest accelerating technology, AMD APP and NVIDIA® CUDA™ acceleration, which makes the Blu-ray ripping process 30X faster than other similar software.
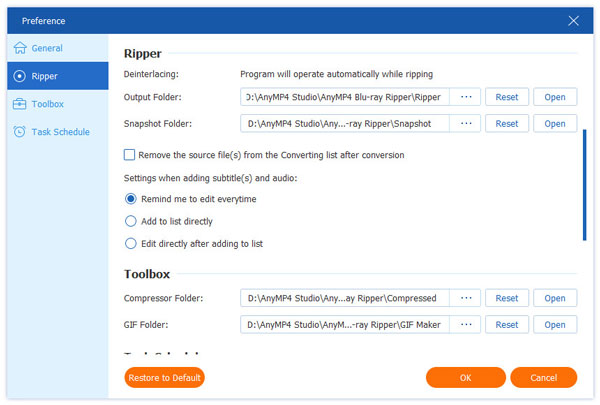
Ripper
In the Ripper tab, you are able to set the Output Folder and Snapshot Folder to save the ripped Blu-ray video and snapshots. It gives you choices to remove the source file or not conversion.
Toolbox
The Toolbox tab enables you to select the Compressor Folder and GIF Folder for the compressed video and new created GIF.
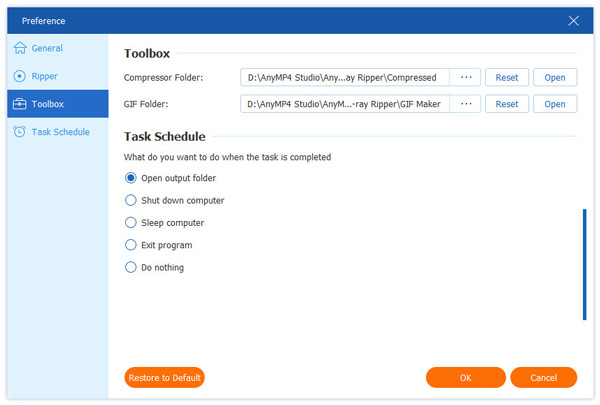
Task Schedule
AnyMP4 Blu-ray Ripper lets you preset a motion after the task is completed. You can choose to open output folder, shut down computer, sleep computer, exit program, or do nothing.

How to Use Blu-ray Ripper
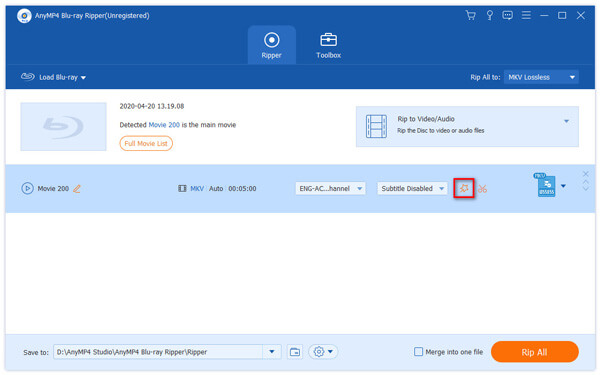
Step 1 Load Blu-ray disc/Folder
Click Load Blu-ray button to load the Blu-ray disc you want to convert; or select "Load Bu-ray Disc" or "Load Blu-ray Folder" from the drop down list of Load Blu-ray. You can see also click the big plus icon in the main interface to load the Blu-ray disc.
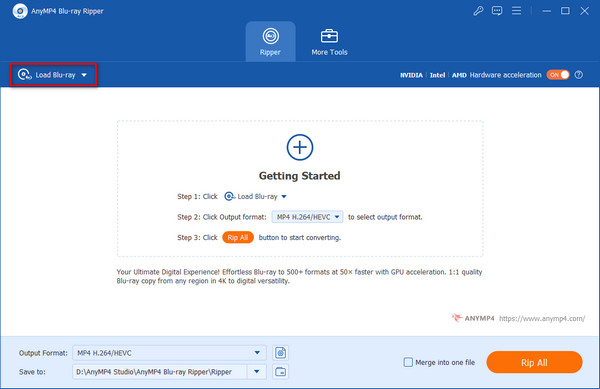
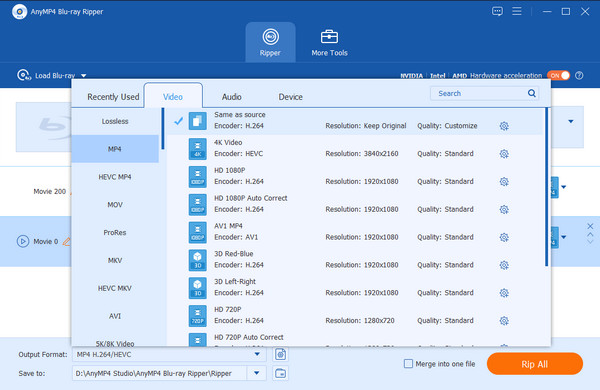
Step 2 Select output format
The default output format is MKV Lossless, which keeps the same image and audio quality as the original Blu-ray file. Click the drop down button of “Rip All to” to select the proper video format, audio format or the format suits the device.
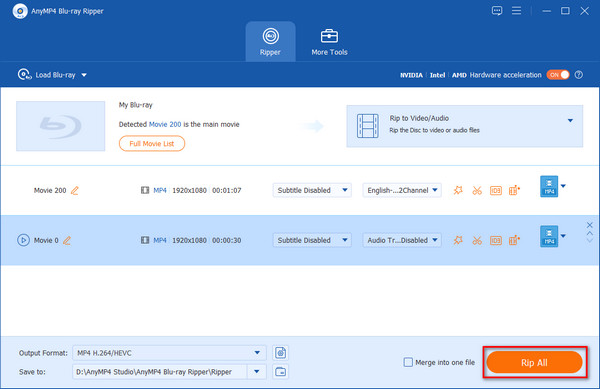
Step 3 Rip Blu-ray to videos
Click the drop-down button of Output folder to select a destination folder. Then click Rip All button to start ripping your Blu-ray to video.
How to Edit Blu-ray video before Ripping
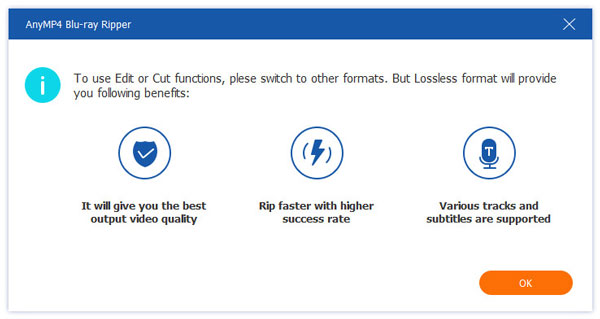
AnyMP4 Blu-ray Ripper provides multiple video tools to edit the Blu-ray video. Simply click Edit (the magic stick icon) to start the editing your masterwork.
To edit the Blu-ray video, you should make sure the output format is not MPG Lossless, but others.
Cut video
Blu-ray Ripper enables you to cut long video into pieces. With the powerful cutting feature, you can clip the video to perfection.
Step 1 Click the Cut (the scissor icon) to enter the video cutting window.
Step 2 Drag the slider and click Set Start/Set End button to set the starting or ending of the video.
Step 3 The Fast Split feature lets you cut one video file into several clips by average through setting the time or file number.
Then click the Save button to save the video clip.

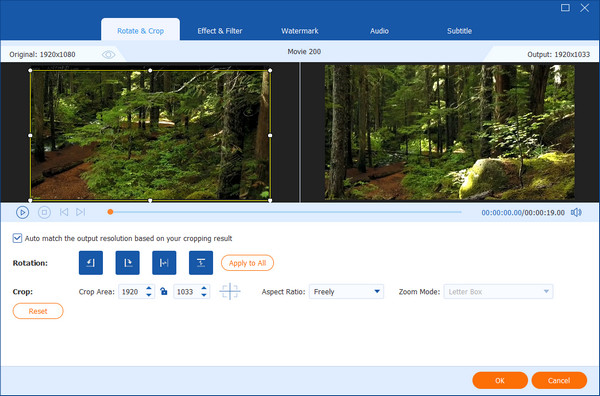
Rotate & crop video
This program offers you to quickly remove the black edges on your video. If the video stays in the wrong direction, you can use the Rotate feature to adjust it to the right angle.
Step 1 Click the Edit button to enter the editing window. Then select the Rotate & Crop tab.
Step 2 You are free to drag the frame border or enter a fixed size in the Crop Area box. You can also choose 16:9, 4:3, 1:1, 9:16 as the Aspect Ratio. Besides, you are able to select Letter Box, Pan & Scan, Full as the Zoom Mode.
Step 3 Click Left Rotate, Right Rotate, Horizontal Flip or Vertical Flip icon to adjust to the desired rotation. Then click OK button to select the changes.
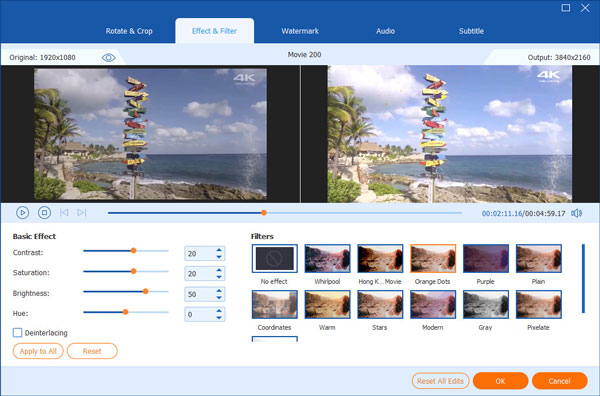
Add effects & filters
The Effect & Filter feature lets you adjust basic effects like Contrast, Saturation, Brightness and Hue. There are many filters for you to choose from to perfect your Blu-ray video.
Step 1 Click the Edit icon and select Effect & Filter tab.
Step 2 You can drag the slider to adjust contrast, saturation, brightness and hue. Besides, you can also click one filter to apply it to your video.
Step 3 Click OK button to apply the changes.
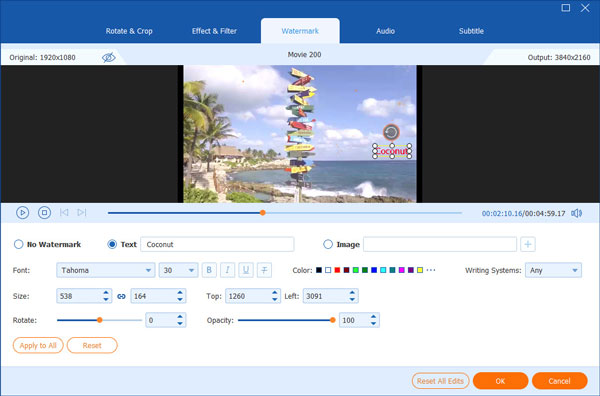
Add watermark
The Watermark option allows you to add a logo to your Blu-ray video. You are able to add a text or image to the video.
Step 1 Click Edit icon and select Watermark tab.
Step 2 Check the Text or Image option to add text/image watermark to the video. You can adjust the text font, size, color, position, rotation and opacity.
Step 3 Click OK button to save the changes.
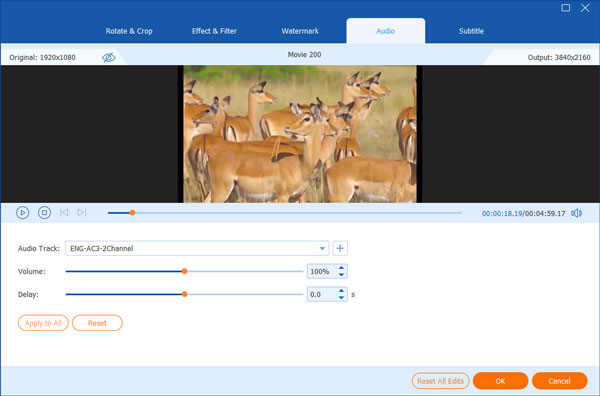
Adjust audio
In the “Audio” tab, you can select the audio track from local computer.
Step 1 Click Edit icon and select Audio tab.
Step 2 Click Add Audio button to choose an audio track from your computer. Drag the volume slider to turn up or turn down the volume. If the audio doesn’t come up with the image, you can adjust the delay between the image and audio.
Step 3 Click OK button to save the audio track to your video.
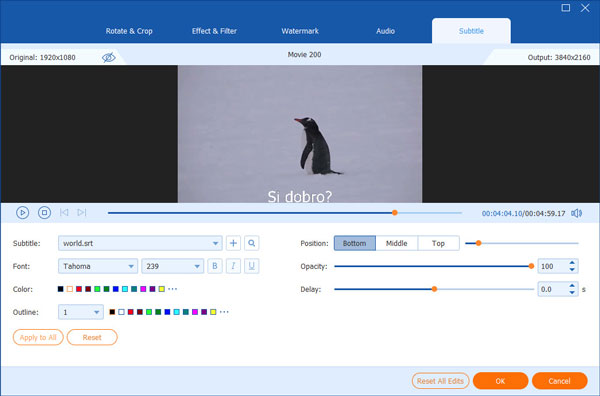
Add subtitles
The “Subtitle” option of AnyMP4 Blu-ray Ripper lets you add subtitles to the Blu-ray movie.
Step 1 Click Edit icon and select Subtitle tab.
Step 2 Click Add Subtitle(s) button to choose a subtitle from local computer. You can also adjust the subtitle font, size, color, outline, position, opacity and delay.
Step 3 Click OK button to apply the changes.
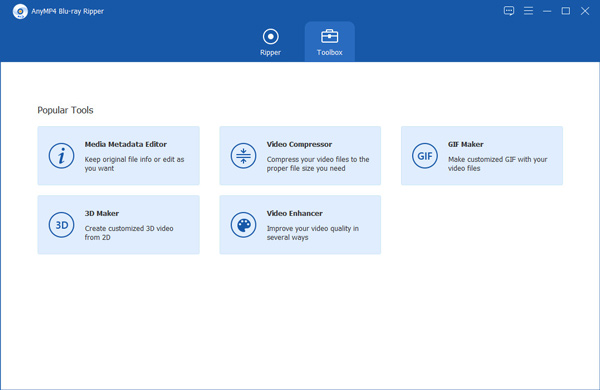
How to Use Toolbox
There are useful tools in Toolbox of AnyMP4 Blu-ray Ripper, including Media Metadata Editor, Video Compressor, GIF Maker, 3D Maker, and Video Enhancer. View the steps below to use these magic tools.
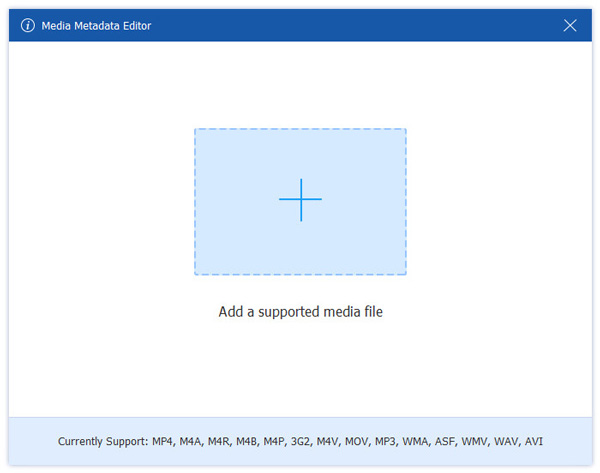
Media Metadata Editor
Step 1 Add media file
Click Media Metadata Editor in the Toolbox window, and click the big plus area to add the video or audio you want to edit.
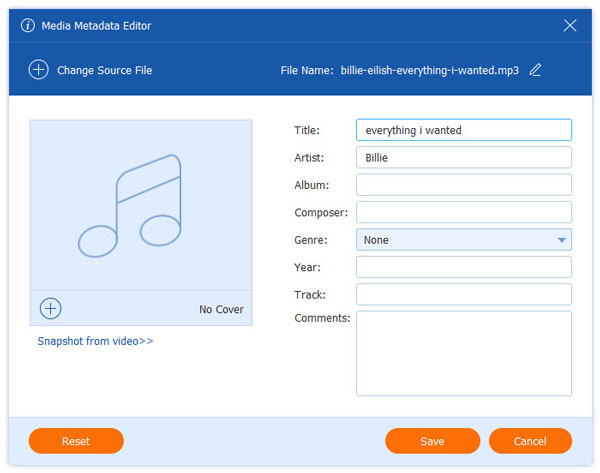
Step 2 Edit ID3 tag
You can edit the ID3 tags like title, artist, album, composer, genre, year, track and comments. You can also add a photo as the cover.
Video Editor
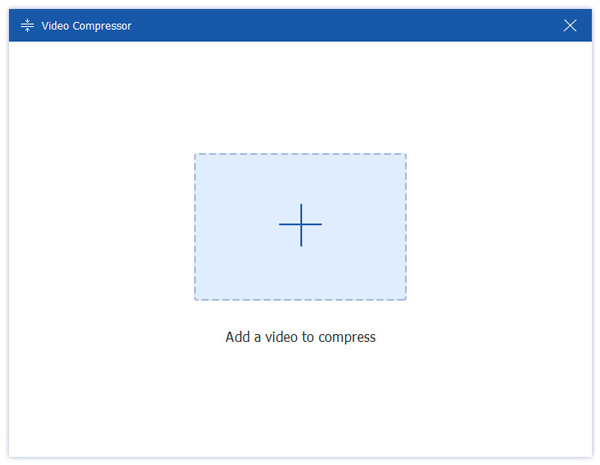
Step 1 Add video file
Select Video Compressor in Toolbox window, and click the big plus button to add the video you want to compress.
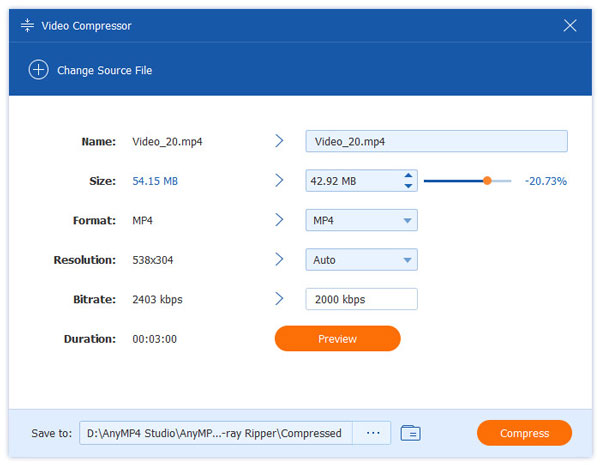
Step 2 Compress the video file
You can move the slider to reduce the file size. Besides, you can also change the video name, select output format, resolution, bitrate and more. Then click the Preview button to preview the compressed video file for 10 seconds. Click Compress button to start compressing the video file.
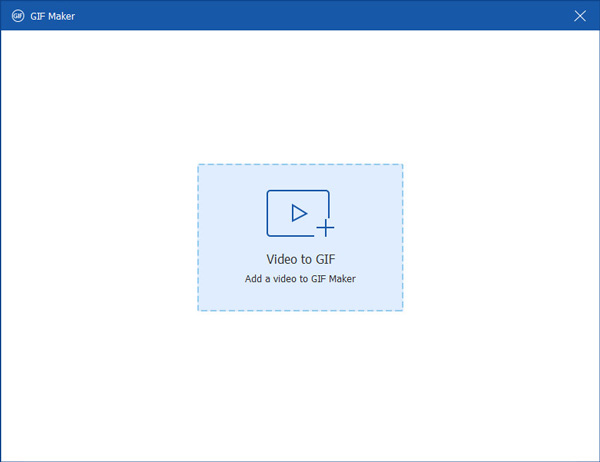
GIF Maker
Step 1 Add the video file
Select GIF Maker in Toolbox and click Video to GIF area to import one video file from the computer.
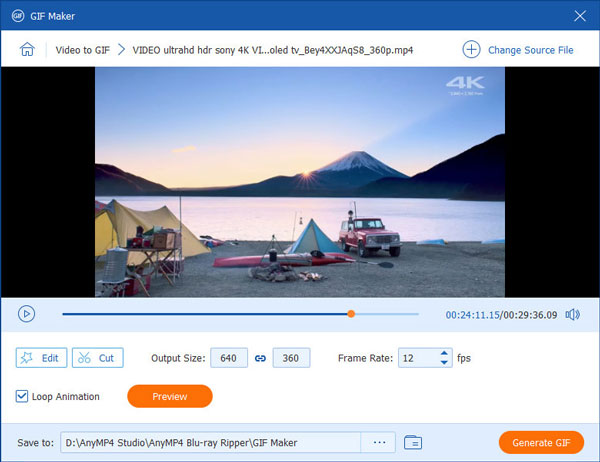
Step 2 Make GIF from video
You can use the Edit button or Cut feature to cut down the long video. You should set the output size, frame rate and loop animation. Then click Generate GIF button to start making GIF from the video.
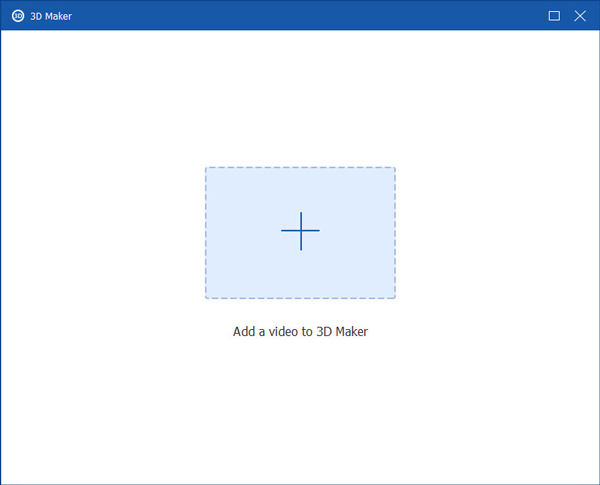
3D Maker
Step 1 Add 2D file
Click 3D Maker under Toolbox. Next, click the big plus, and a pop-up window shows that you need to browse and add the 2D video into this software.
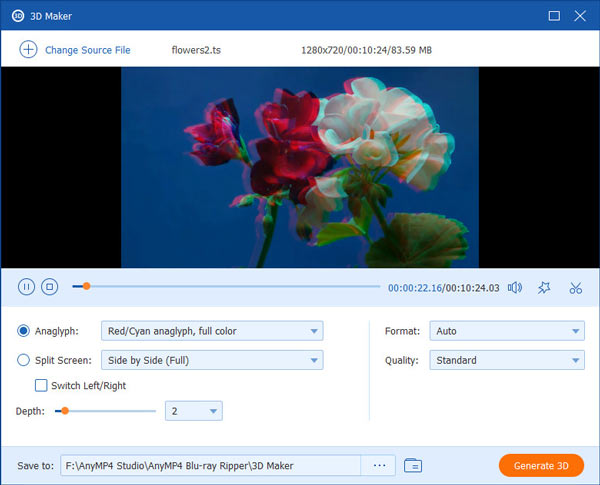
Step 2 Convert 2D to 3D
Select the 3D effect that you want to apply from Anaglyph or Split screen. Then choose the detailed 3D mode from either of the 2 modes. You can select an ideal format and video quality that you want to save for the 3D file from the right-side.
Move the slide bar to adjust the Depth, click the three-dot to choose a location to store the 3D file.
Finally, click Generate 3D to start converting 2D to 3D.
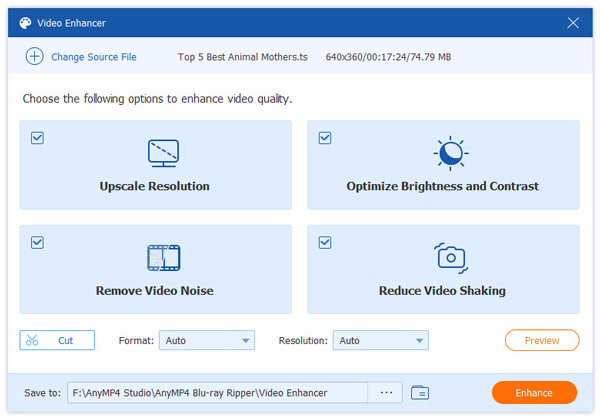
Video Enhancer
Step 1 Add a video
Click Video Enhancer under Toolbox. Then click the big plus icon to add the video that you want to apply the enhancement feature into this tool.
Step 2 Enhance video quality
Here are 4 options to improve your video quality, Upscale Resolution, Optimize Brightness and Contrast, Remove Video Noise, and Reduce Video Shaking.
Select the checkbox before the option you want, and choose the output format and resolution you need.
The Preview button enables you to view the video effects before outputting.
The Cut button lets you split a video into segments easily.
Finally, click Enhance to start optimizing your video quality.